
Inspection
1. Where applicable, remove the cap, then loosen the appropriate wheel bolts. If the front brake disc is being inspected, tighten the hand brake, if the procedure is carried out on the rear brake disc, block the front wheels. Jack up and support the appropriate part of the vehicle on axle stands. Remove the wheel.
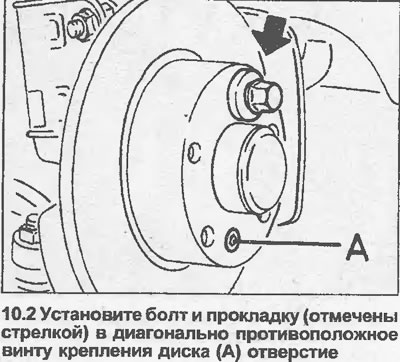
2. Where applicable, make sure the brake disc mounting screw is securely tightened. Place a shim approximately 10.0mm thick on one of the wheel bolts, insert the bolt into the hole diagonally opposite the disc mounting screw and tighten it (see illustration).
3. Rotate the brake disc and inspect it for deep scratches that should be resharpened or replaced. Minor scratches are perfectly acceptable.
4. Using a micrometer or flat metal block and feeler gauges, check that the disc runout does not exceed the limits given in Specifications. Measure the disc runout at 10.0 mm from its outer edge.
5. On single overhead cam models (SOHC) If the rear brake disc runout is excessive, check the rear wheel bearing adjustment as described in Section 10.
6. If the front brake disc runout (all models) or rear brake disc wobble (double overhead cam models (DOHC)) exceeds the norm, remove the disk as described below in this Chapter. Make sure the surface of the disc facing the hub is completely clean. Install the disc and check the runout again.
7. If the runout is still excessive, the disc should be replaced.
8. To remove the disc, proceed as follows.
Front brake disc
Removing
9. Where applicable, remove the wheel bolt and spacer installed to inspect the disc.
10. Remove the brake pads (Chapter 4).
11. On 2.0L models, unscrew the two mounting bolts and remove the caliper bracket.
12. Turn off the fastening screw and remove a disk from a nave.
Installation
13. Installation is carried out in the reverse order. Make sure the mating surfaces of the disc and hub are perfectly clean and apply a small amount of blocking compound to the mounting screw threads. Install the brake pads (Chapter 4). Rear Brake Disc - Single Overhead Cam Models
14. On these models, the rear wheel hub is built into the disc. Removal and installation are described in Section 10.
Rear Brake Disc - Dual Overhead Cam Models
Removing
15. Remove the wheel bolt and spacer installed when inspecting the disc.
16. Remove the brake pads as described in chapter 5.
17. Remove the brake caliper (see chapter 9), without disconnecting the brake pipe. Move the caliper to the side and tie it to the body so as not to deform the tube.
18. Turn off the fastening screw and remove a disk from a nave. If this fails, retract the handbrake pads by inserting a screwdriver into the hole in the disc and turning the adjuster wheel.
Installation
19. Installation is carried out in the reverse order. Make sure the mating surfaces of the disc and hub are perfectly clean and apply a small amount of blocking compound to the mounting screw threads. Install the brake pads as described in chapter 5.
Visitor comments