
OpelBook.ru
Cars AvtoVAZ Cars Mitsubishi Cars BMW Cars Mercedes Cars Nissan Cars Toyota Cars Chevrolet
English Русский
Български
Беларускі
Український
Српски
Hrvatski
Română
Polski
Slovenský
Magyar
 |  Sitemap  |  Contacts  |    


Main Astra Corsa Insignia Kadett Omega Vectra Zafira Others Articles
Frontera A (1991-1998, petrol) Frontera B (1998-2004) Ascona C (1981-1988) Vivaro A (2001-2014)
  • Main
  • Opel
  • Frontera B
  • Transmission
  • Manual gearbox MUA5C
  • Removal and installation the transfer case

Removal and installation the transfer case (Opel Frontera B)

            0

Contents: Removal ⬇ Installation ⬇

Removal


Disconnect the cable from the negative battery terminal.

Remove the gearbox together with the transfer case (see the relevant chapter).

Remove both drain plugs and drain the transmission oil from the gearbox housing and transfer case into a suitable container.
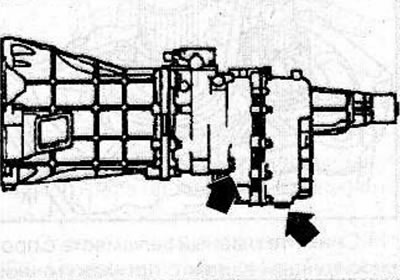
Remove both drain plugs and drain the transmission oil from the gearbox housing and transfer case…


Remove the rectangular shift housing from the transmission (see the relevant chapter).

Remove the transfer case mode shift drive (see the relevant chapter).

Using a special tool KM-468-C, hold the drive flange from turning, unscrew the nut and remove the flange from the transfer case.
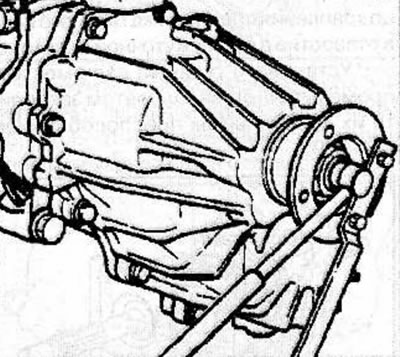
Using a special tool KM-468-C, hold the drive flange from turning, unscrew the nut and remove the…


Remove the cover with the driven gear of the vehicle speed sensor from the transfer case (see the relevant chapter).


Remove the bolts and remove the rear cover from the transfer case.
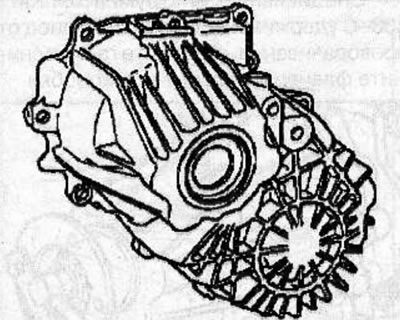
Remove the bolts and remove the rear cover from the transfer case.


Remove the main shaft rear bearing retaining ring.

Using the KM-210-V puller (1) and the KM-775 extractor (2), remove the rear bearing from the main shaft.
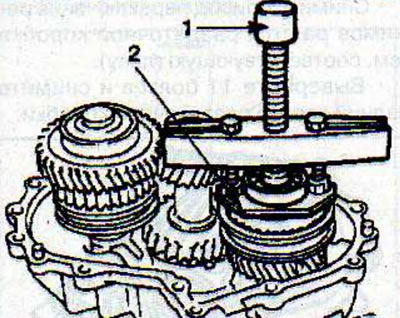
Using the KM-210-V puller (1) and the KM-775 extractor (2), remove the rear bearing from the main…


Using the special tool KM-776-A, hold the main shaft from turning, and using the special tool KM-468-C, unscrew the nut securing the front output flange to the main shaft.
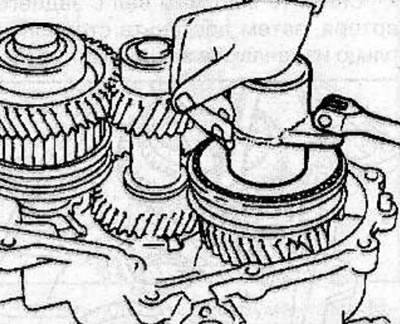
Using the special tool KM-776-A, hold the main shaft from turning, and using the special tool…


Using a two-jaw puller, remove the transfer case high/low clutch, bushing and input gear from the main shaft.
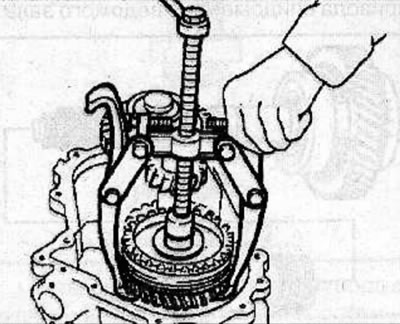


Using a two-jaw puller, remove the transfer case high/low clutch, bushing and input gear from the…


Remove the input gear needle bearing, inner race, locking ball and oil spray plate from the main shaft.
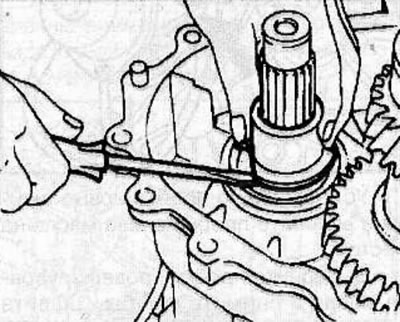
Remove the input gear needle bearing, inner race, locking ball and oil spray plate from the main…


Remove the bolts and nuts and remove the front gearbox housing from the intermediate plate.

To prevent damage to the working edges of the seal, seal the splines of the main shaft with adhesive tape.

Installation


Install the high and low stage synchronizer sleeve or the clutch sleeve and sleeve.

Make sure that the larger boss on the sleeve (1) is aligned with the groove (2) on the sliding sleeve. The arrow points to the front of the transfer case.
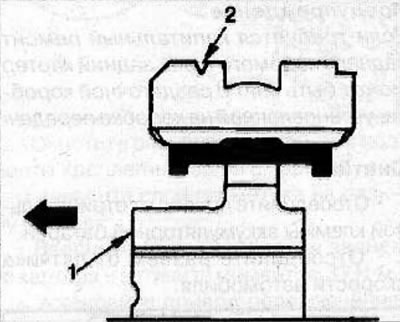
Make sure that the larger boss on the sleeve (1) is aligned with the groove (2) on the sliding…


Using a special device KM-468-C, hold the drive flange from turning, screw on and tighten the flange mounting nut to a torque of 137 N·m, then pin the nut in two places.
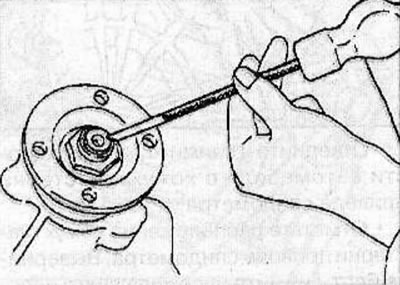


Using a special device KM-468-C, hold the drive flange from turning, screw on and tighten the…


Install the oil spray plate (1), locking ball, inner race, input gear needle bearing (2), input gear (3), and transfer case high/low shift clutch (4) onto the main shaft.
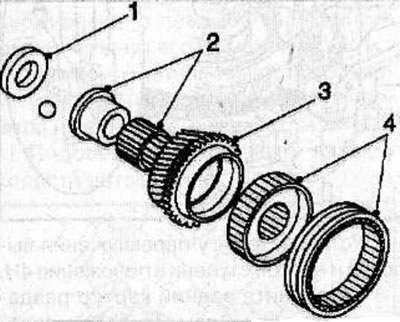
Install the oil spray plate (1), locking ball, inner race, input gear needle bearing (2), input…


Caution: Install the high/low clutch so that the larger lug on the sleeve faces the input gear.


Using the special tool KM-776-A, hold the main shaft from turning, use the special tool KM-468-C to tighten the main shaft nut to a torque of 137 N·m, then calk the nut in two places.
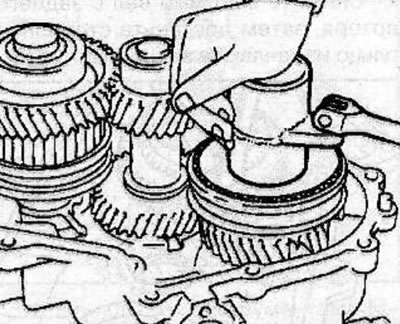
Using the special tool KM-776-A, hold the main shaft from turning, use the special tool KM-468-C to…


Using a tubular mandrel of the appropriate diameter, install the rear bearing onto the input shaft and secure it with a retaining ring.
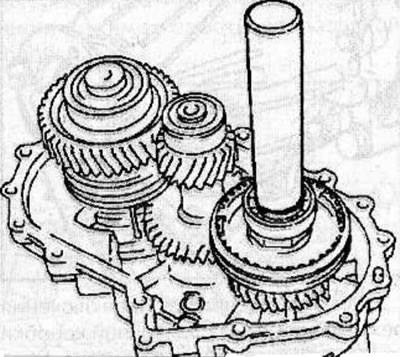


Using a tubular mandrel of the appropriate diameter, install the rear bearing onto the input shaft…


Apply a thin layer of sealant to the mating surfaces of the transfer case housing and rear case.

Make sure the tab (A) on the high/low shift block fits into the 4x2/4x4 shift block.
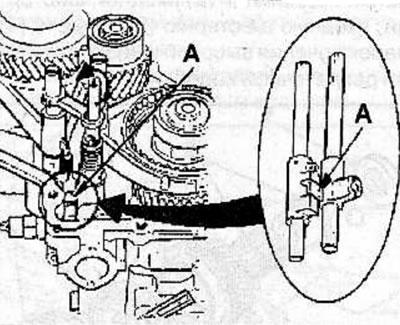
Make sure the tab (A) on the high/low shift block fits into the 4x2/4x4 shift block.


Set the high and low gear shift rod to position 4H.

Install the rear transfer case housing. Align the shift rod (B) with the D-shaped hole (C) in the rear case.
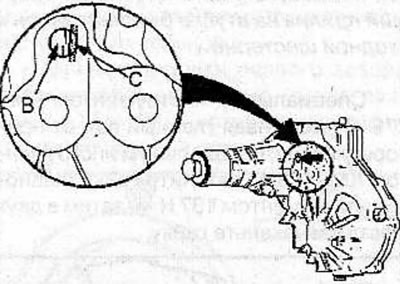
Install the rear transfer case housing. Align the shift rod (B) with the D-shaped hole (C) in the…


Clean the threaded holes for the rear crankcase mounting bolts, then apply a layer of sealant to the bolt threads.


Install the rear crankcase mounting bolts and tighten to 37 Nm.

Using a special device KM-468-C, hold the drive flange from turning, screw on and tighten the flange mounting nut to a torque of 167 N·m, then pin the nut in two places.

[Material published on the website OPELBOOK]
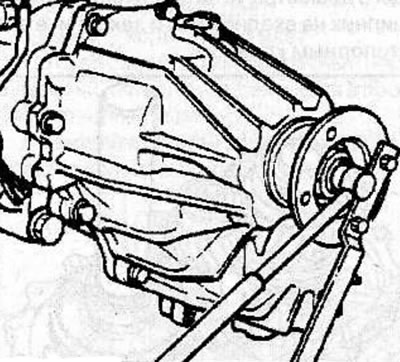
Using a special device KM-468-C, hold the drive flange from turning, screw on and tighten the…


Install the transfer case mode switching drive (see the relevant chapter).

Install the rectangular gearshift housing onto the transmission (see the relevant chapter).
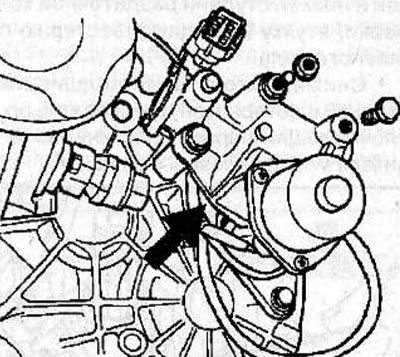
Install the rectangular gearshift housing onto the transmission (see the relevant chapter).


Install new washers on the plugs and screw the oil drain plugs back into place.

Remove the oil level check plugs and washers. Pour the required amount of required oil through the oil level check plug holes until its level reaches the lower edge of the threaded hole.


Install new washers and tighten the oil level plugs.

Install the gearbox together with the transfer case (see the relevant chapter).

Connect the cable to the negative terminal of the battery.


This article is available at russian, bulgarian, belarusian, ukrainian, serbian, croatian, romanian, polish, slovak, hungarian
Checking the article: Chernov Alexander

Share information:

Previous articles
Opel Frontera B: Manual gearbox MUA5C
Next articles

Shafts and gears
Shift forks and rods
Disassembly and assembly of the gearbox
Replacing the front input shaft seal
Reverse light switch
Transmission support
Transfer case rear housing
Transfer case rods and forks
Transfer case mode switching drive
Four-wheel drive control unit
Replacing the front seal of the output shaft of the transfer case
Replacing the rear seal of the output shaft of the transfer case


See similar ones from other Opel car manuals:
▶ Transfer case replacement Opel Insignia A (2008-2017)
▶ Checking the level and adding oil to the transfer case Opel Vectra A (1988-1995)
▶ Removal and installation the ceiling handle/glasses case Opel Astra H (2004-2009)
▶ Removal and installation of the timing case (Z10XE, Z10XEP) Opel Corsa C (2000-2006, petrol)
▶ Removal and installation of the timing case (OHV) Opel Kadett D (1979-1984)
Link to this page in different formats

Visitor comments


No comments yet


How much will 18 + 34 =


Vivaro A (2001-2014) 
  • General information
  • User manual
  • Power unit
  • Petrol engine F4R
  • Diesel engine F9Q
  • Diesel engine G9U
  • Transmission
  • Clutch and drive shafts
  • Manual gearbox
  • Chassis
  • Front suspension
  • Rear suspension
  • Brake system
  • Body
  • Exterior
  • Interior
  • Electrical equipment
  • Heating and ventilation
  • Air conditioner
  • Equipment and devices
  • Electrical diagrams
Ascona C (1981-1988) 
  • General information
  • Maintenance
  • Power unit
  • Gasoline engines
  • Diesel engines
  • Cooling system
  • Fuel and exhaust system
  • Contact ignition system
  • Contactless ignition system
  • Transmission
  • Clutch
  • Mechanical gearbox
  • Automatic gearbox
  • Drive shafts
  • Chassis
  • Steering
  • Brake system
  • Car suspension
  • Body
  • Exterior
  • Interior
  • Doors and windows
  • Electrical equipment
  • Equipment and devices
  • Power devices
  • Electrical circuits
Frontera B (1998-2004) 
  • General information
  • User manual
  • Maintenance
  • Power unit
  • Petrol engines 2.2 l
  • Petrol engines 3.2 l
  • Diesel engines 2.2 l
  • Cooling system
  • Fuel system (petrol)
  • Fuel system (diesel)
  • Ignition system
  • Transmission
  • Clutch
  • Manual gearbox MUA5C
  • Automatic gearbox 4L30E
  • Chassis
  • Suspension and axles
  • Steering
  • Brake system
  • Body
  • Exterior
  • Interior
  • Doors, locks and windows
  • Heating and air conditioning
  • Electrical equipment
  • Power devices
  • Equipment and devices
  • Lighting and signaling
  • Electrical diagrams
Frontera A (1991-1998, petrol) 
  • General information
  • Introduction to guide
  • User manual
  • Maintenance
  • Power unit
  • Engine repair
  • Lubrication system
  • Cooling system
  • Power and exhaust system
  • Engine electrics
  • Transmission
  • Clutch
  • Mechanical gearbox
  • Cardan shafts
  • Chassis
  • Brake system
  • Front suspension
  • Rear suspension
  • Steering
  • Body
  • Repair and care
  • Electrical equipment
  • Equipment and devices
  • Electrical circuits
OpelBook.ru © 2017–2026 · Mobile version · · Sitemap: EN BG BY UA RS HR RO PL SK HU · Feedback · Site search
Astra F, petrol · Astra G, petrol · Astra G · Astra H · Astra J, petrol · Corsa B · Corsa C, petrol · Corsa C · Insignia A · Kadett D · Kadett E · Omega A · Omega B · Omega B2 · Vectra A, petrol · Vectra A · Vectra B, petrol · Vectra B · Vectra C · Zafira A, petrol · Frontera A, petrol · Frontera B · Ascona C · Vivaro A ·
We want your visit to be comfortable 🤝! We use cookies 🍪 to make that happen.