
OpelBook.ru
Cars AvtoVAZ Cars Mitsubishi Cars BMW Cars Mercedes Cars Nissan Cars Toyota Cars Chevrolet
English Русский
Български
Беларускі
Український
Српски
Hrvatski
Română
Polski
Slovenský
Magyar
 |  Sitemap  |  Contacts  |    


Main Astra Corsa Insignia Kadett Omega Vectra Zafira Others Articles
Frontera A (1991-1998, petrol) Frontera B (1998-2004) Ascona C (1981-1988) Vivaro A (2001-2014)
  • Main
  • Opel
  • Ascona C
  • Power unit
  • Contact ignition system
  • Spark plugs and high tension wires — common part

Spark plugs and high tension wires — common part (Opel Ascona C)

            0

1. Proper spark plug operation is critical to efficient engine operation. It is necessary to use only spark plugs approved for your engine (see Specifications). Then, provided the engine is in good condition, you do not need to deal with the spark plugs more often than their current maintenance requires. Cleaning spark plugs is rarely required, and it is better not to resort to it if you do not have special equipment, since you can easily damage the spark plug electrodes.

2. Spark plugs must be replaced at intervals specified in the section "Routine maintenance" at the beginning of this Guide.

3. To remove the spark plugs, open the hood and pull the spark plug wires off the spark plugs. You should grab the rubber cap, not the wire. Remove the heat shields from the spark plugs, which may be a very tight fit (to remove them you will need pliers or a screwdriver, which is used as a lever). Be very careful not to damage the spark plugs.

4. Use a brush to remove dirt from the recesses of the spark plug holes in the cylinder head, as it may get into the combustion chambers when removing the spark plugs.
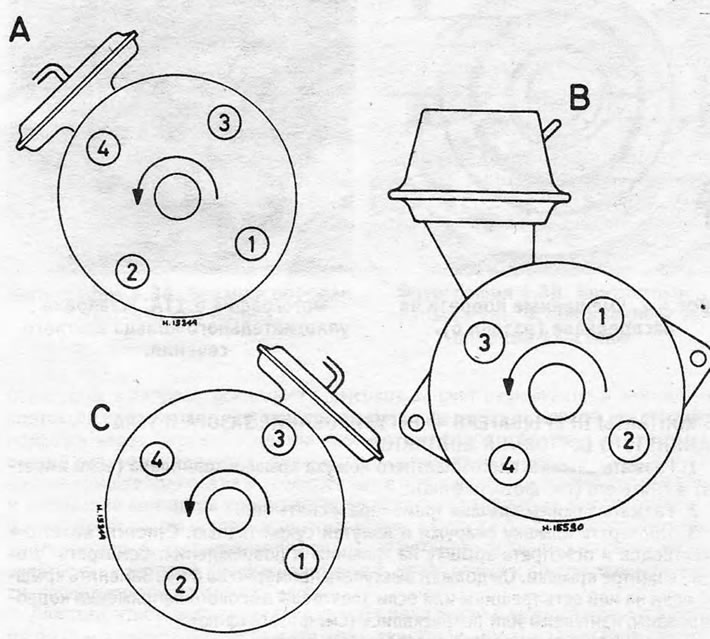
Figure 4.4. Connecting the ignition wires to the distributor cap: A. Distributor with mechanical…

Figure 4.4. Connecting the ignition wires to the distributor cap: A. Distributor with mechanical contact breaker; B. AC Delco Contactless Distributor; C. Bosch contactless distributor.


5. Remove the spark plugs using a spark plug wrench. Be careful not to tilt the key, as this may damage the ceramic spark plug insulator.

Source is on the website opelbook.ru

6. A thorough inspection of the spark plugs can tell a lot about the condition of the engine.

7. If the spark plug's heat cone is clean and white, without any dark coating, this is a sign of a too lean mixture or a spark plug that is too hot (a hot spark plug slowly transfers heat from the electrode, a cold spark plug quickly).

8. If the heat cone is covered with a light brown to gray-brown coating, this means that the mixture has the correct composition and the engine is most likely in good condition.

9. The size of the spark gap is of great importance. If it is too big or too small, the spark plug's performance will be greatly reduced. For correct spark gap value see. v Specifications at the beginning of this chapter.

10. The gap size is adjusted by bending the side electrode. Do not attempt to bend the central electrode under any circumstances, as this may damage the insulator.

11. There are special tools available for adjusting the spark plug gap.

12. After inspecting the spark plugs, screw them back into place by hand so as not to damage the threads.

13. Tighten the spark plugs to the required torque. If you don't have a torque wrench, just tighten them (it is better to have the spark plugs under-tightened than over-tightened).

14. When connecting the ignition wires, make sure that they are connected in the correct order (1-3-4-2). Cylinder No. 1 is on the camshaft belt side.

15. Ignition wires do not require routine maintenance. It is enough to keep them clean and wipe them regularly. Every 10,000 km, each wire should be removed one by one and its ends cleaned of the white coating formed as a result of corrosion.


This article is available at russian, bulgarian, belarusian, ukrainian, serbian, croatian, romanian, polish, slovak, hungarian
Checking the article: Kornev Georgy

Share information:

Previous articles
Opel Ascona C: Contact ignition system
Next articles

Ignition timing angle — adjustment
Distributor — disassembly, inspection and assembly
Distributor — removal and installation
Capacitor — removal, inspection and installation
Breaker contacts — removal and installation
Breaker contacts — adjustment of the gap and angle of the closed state of the contacts
Ignition coil — common part
TDC position sensor
Ignition Switch — Removal and Installation
Ignition system with mechanical contact breaker — troubleshooting


See similar ones from other Opel car manuals:
▶ Removal and installation of spark plugs, ignition modules… Opel Corsa C (2000-2006)
▶ Replacing spark plugs, checking the condition of… Opel Astra G (1998-2004)
▶ Determining engine faults by the condition of spark plugs Opel Insignia A (2008-2017)
▶ Checking the spark plugs Opel Kadett D (1979-1984)
▶ High Voltage Wires — General Description Opel Omega A (1986-1993)
Link to this page in different formats

Visitor comments


No comments yet


How much will 36 + 43 =


Vivaro A (2001-2014) 
  • General information
  • User manual
  • Power unit
  • Petrol engine F4R
  • Diesel engine F9Q
  • Diesel engine G9U
  • Transmission
  • Clutch and drive shafts
  • Manual gearbox
  • Chassis
  • Front suspension
  • Rear suspension
  • Brake system
  • Body
  • Exterior
  • Interior
  • Electrical equipment
  • Heating and ventilation
  • Air conditioner
  • Equipment and devices
  • Electrical diagrams
Ascona C (1981-1988) 
  • General information
  • Maintenance
  • Power unit
  • Gasoline engines
  • Diesel engines
  • Cooling system
  • Fuel and exhaust system
  • Contact ignition system
  • Contactless ignition system
  • Transmission
  • Clutch
  • Mechanical gearbox
  • Automatic gearbox
  • Drive shafts
  • Chassis
  • Steering
  • Brake system
  • Car suspension
  • Body
  • Exterior
  • Interior
  • Doors and windows
  • Electrical equipment
  • Equipment and devices
  • Power devices
  • Electrical circuits
Frontera B (1998-2004) 
  • General information
  • User manual
  • Maintenance
  • Power unit
  • Petrol engines 2.2 l
  • Petrol engines 3.2 l
  • Diesel engines 2.2 l
  • Cooling system
  • Fuel system (petrol)
  • Fuel system (diesel)
  • Ignition system
  • Transmission
  • Clutch
  • Manual gearbox MUA5C
  • Automatic gearbox 4L30E
  • Chassis
  • Suspension and axles
  • Steering
  • Brake system
  • Body
  • Exterior
  • Interior
  • Doors, locks and windows
  • Heating and air conditioning
  • Electrical equipment
  • Power devices
  • Equipment and devices
  • Lighting and signaling
  • Electrical diagrams
Frontera A (1991-1998, petrol) 
  • General information
  • Introduction to guide
  • User manual
  • Maintenance
  • Power unit
  • Engine repair
  • Lubrication system
  • Cooling system
  • Power and exhaust system
  • Engine electrics
  • Transmission
  • Clutch
  • Mechanical gearbox
  • Cardan shafts
  • Chassis
  • Brake system
  • Front suspension
  • Rear suspension
  • Steering
  • Body
  • Repair and care
  • Electrical equipment
  • Equipment and devices
  • Electrical circuits
OpelBook.ru © 2017–2026 · Mobile version · · Sitemap: EN BG BY UA RS HR RO PL SK HU · Feedback · Site search
Astra F, petrol · Astra G, petrol · Astra G · Astra H · Astra J, petrol · Corsa B · Corsa C, petrol · Corsa C · Insignia A · Kadett D · Kadett E · Omega A · Omega B · Omega B2 · Vectra A, petrol · Vectra A · Vectra B, petrol · Vectra B · Vectra C · Zafira A, petrol · Frontera A, petrol · Frontera B · Ascona C · Vivaro A ·
We want your visit to be comfortable 🤝! We use cookies 🍪 to make that happen.