
Older cars and cars with high mileage require more frequent inspections.
Once a week or before a long trip
- Engine (Chapter 1)
- Check the oil level in the crankcase.
- Cooling system (chapter 2)
- Check the coolant level.
- Brake system (chapter 9)
- Check the fluid level in the hydraulic system.
- Suspension (chapter 10)
- Check tire pressure (cold), including the spare wheel.
- Electrical equipment (chapter 12)
- Check the operation of all lights, washers and horn
- Check the battery electrolyte level or battery charge
- Check the fluid level in the washer reservoirs and add detergent to the water (e.g. Turtle Wax High Tech Screen Wash).
Models before 1982
Every 15,000 km or every six months (whichever comes first)
- Engine (Chapter 1)
- Change the oil and oil filter.
- Cooling system (chapter 2)
- Check the tension and condition of the drive belt (belts).
- Fuel and exhaust system (chapter 3)
- Check idle speed and mixture adjustment
- Clean the fuel pump strainer (carburetor models)
- Check the condition and reliability of the exhaust system fastening
- Check the throttle control cable adjustment.
- Ignition system (chapter 4)
- Clean or replace breaker contacts. Check the angle of the closed state of the contacts (early models with 1.3 l engine)
- Lubricate the distributor (early models with 1.3 l engine)
- Check the ignition timing.
- Transmission (chapter 6)
- Check the oil/transmission fluid level in the gearbox.
- Half shafts (chapter 7)
- Check the condition of the constant velocity joints and bellows.
- Brake system (chapter 9)
- Check brake pads, drums and discs for wear
- Check the condition and reliability of fastening of brake pipes and hoses
- Check rear brake adjustment.
- Suspension and steering (chapters 8 and 10)
- Check tires for wear and damage
- Check the alignment angles of the front wheels
- Check the condition and reliability of fastening of all parts.
Every 30,000 km or once a year (whichever comes first)
In addition to or instead of the above procedures:
- Cooling system (chapter 2)
- Check the concentration of antifreeze in the coolant.
- Fuel and exhaust system (chapter 3)
- Replace the fuel filter (on injection models)
- Clean the carburetor inlet fuel filter.
- Ignition system (chapter 4)
- Replace spark plugs.
- Clutch (chapter 5)
- Check the clutch pedal adjustment.
- Brake system (chapter 9)
- Replace brake fluid (annually, regardless of mileage)
- Check handbrake adjustment
- Check the condition of the handbrake cable drive.
- Suspension and steering (chapters 8 and 10)
- Check rear wheel bearing adjustment
- Check the fluid level in the power steering.
- Electrical equipment (chapter 12)
- Check the headlight beam adjustment.
Every 45,000 km or every 18 months (whichever comes first)
In addition to or instead of the above procedures:
- Fuel and exhaust system (chapter 3)
- Replace the air filter
- Replace the fuel pump strainer (carburetor models).
- Every 2 years (regardless of mileage)
- Cooling system (chapter 2)
- Replace coolant.
Every 90,000 km or every 3 years (whichever comes first)
In addition to or instead of the above procedures:
- Transmission (chapter 6)
- Replace the strainer and automatic transmission fluid.
Models since 1983
Every 15,000 km or every six months (whichever comes first)
- Engine (Chapter 1)
- Change the oil and oil filter.
Every 15,000 km or once a year (whichever comes first)
In addition to or instead of the above procedures:
- Cooling system (chapter 2)
- Check the concentration of antifreeze in the coolant
- Check the tension and condition of the drive belt (belts).
- Fuel and exhaust system (chapter 3)
- Check idle speed and mixture adjustment (except injection models since 1987)
- Check the condition and reliability of the exhaust system fastening
- Check the throttle control cable adjustment.
- Ignition system (chapter 4)
- Check and replace spark plugs if necessary.
- Transmission (chapter b)
- Check the oil/transmission fluid level in the gearbox.
- Half shafts (chapter 7)
- Check the condition of the constant velocity joints and bellows.
- Brake system (chapter 9)
- Check brake pads, drums and discs for wear
- Check the condition and reliability of fastening of brake pipes and hoses
- Replace brake fluid (annually, regardless of mileage)
- Check rear brake adjustment (if applicable).
- Suspension and steering (chapters 8 and 10)
- Check tires for wear and damage
- Check the condition and reliability of fastening of all parts
- Check the alignment angles of the front wheels.
- Electrical equipment (chapter 12)
- Check the headlight beam adjustment.
- General inspection
- Lubricate all handles and hinges.
Every 30,000 km or every 2 years (whichever comes first)
In addition to or instead of the above procedures:
- Cooling system (chapter 2)
- Replace coolant (every 2 years, regardless of mileage).
- Fuel and exhaust system (chapter 3)
- Replace the air filter
- Replace the fuel filter (injection models) (every 2 years, regardless of mileage)
- Replace the fuel pump strainer (if applicable).
- Brake system (chapter 9)
- Check handbrake adjustment
- Check the condition of the handbrake cable drive.
- Suspension and steering (chapters 8 and 10)
- Check the fluid level in the power steering.
Every 60,000 km or every 4 years (whichever comes first)
In addition to or instead of the above procedures:
- Engine (Chapter 1)
- Check the condition of the camshaft timing belt and, if necessary, adjust its tension. It is recommended to replace the belt if its condition is in doubt.
- Transmission (chapter 6)
- Replace the strainer and automatic transmission fluid.
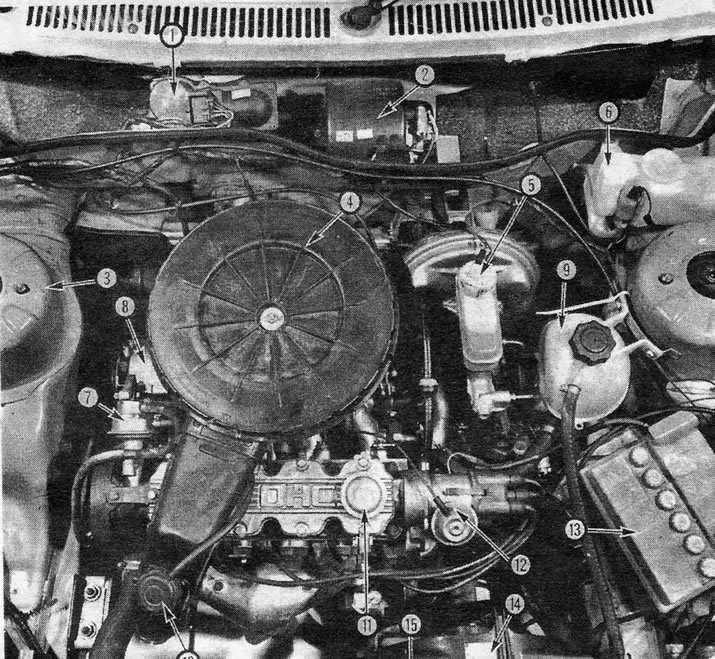
Fig.8. Engine compartment Opel Ascona 1.3:1. Wiper motor; 2. Heater blower motor; 3. Mudguard cup; 4. Air purifier; 5. Brake servo and master cylinders; 6. Windshield washer reservoir; 7. Fuel pump; 8. Generator; 9. Cooling system expansion tank; 10. Air intake temperature valve vacuum unit; 11. Crankcase oil filler plug; 12. Distributor; 13. Battery; 14. Electric radiator fan; 15. Hood cover support post.
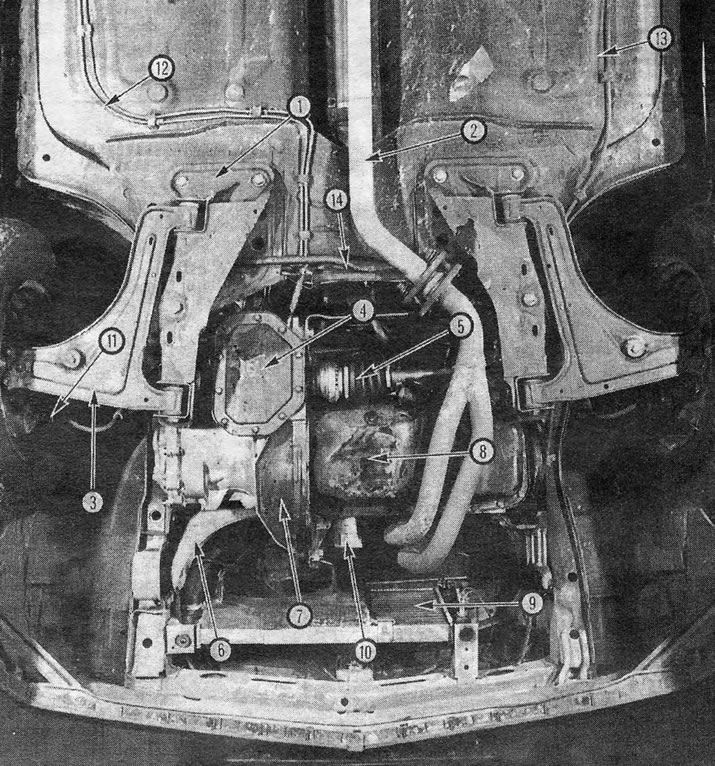
Fig.9. Front of Opel Ascona 1.3 (bottom view): 1. Suspension control arm support; 2. Exhaust pipe; 3. Suspension control arm; 4. Main gear assembly cover; 5. Internal axle joint; 6. Engine/transmission mounting bracket; 7. Flywheel housing cover; 8. Pallet; 9. Radiator; 10. Oil filter; 11. Brake hose; 12. Brake pipes; 13. Fuel line; 14. Anti-roll bar.
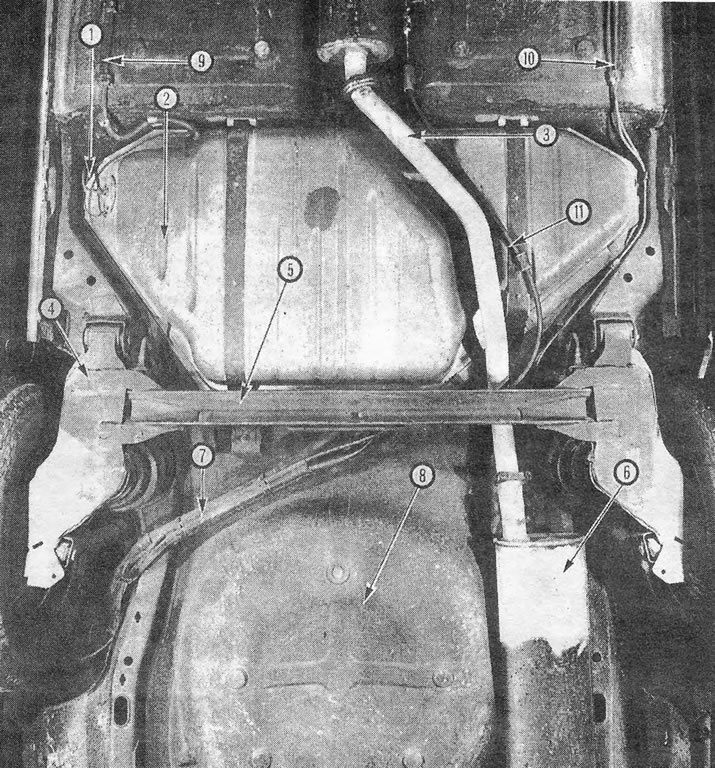
Fig. 10. Rear of Opel Ascona 1.3 (bottom view):1. Fuel level sensor; 2. Fuel tank; 3. Exhaust pipe; 4. Rear suspension trailing arm; 5. Rear axle element; 6. Muffler; 7. Fuel tank filler/breather hoses; 8. Niche for a spare wheel; 9. Fuel line; 10. Brake pipes; 11. Handbrake cable.
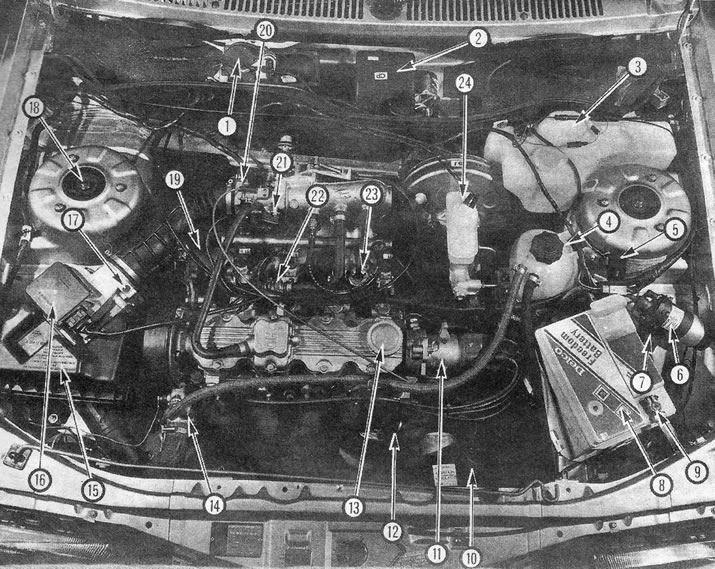
Fig. 11. Engine compartment Opel Ascona 1.8 (models before 1987): 1. Wiper motor; 2. Heater blower motor; 3. Windshield washer reservoir; 4. Cooling system expansion tank; 5. Fuel injection system command relay; 6. Ignition coil; 7. Electronic ignition system control unit; 8. Battery; 9. Negative battery terminal; 10. Electric radiator fan; 11. Distributor; 12. Crankcase oil dipstick; 13. Crankcase oil filler plug; 14. Thermostat housing; 15. Air purifier; 16. Air flow sensor; 17. Idle mixture bypass screw; 18. Upper shock absorber mount; 19. Generator; 20. Throttle body; 21. Throttle switch; 22. Auxiliary air valve; 23. Fuel pressure regulator; 24. Brake master cylinder reservoir.
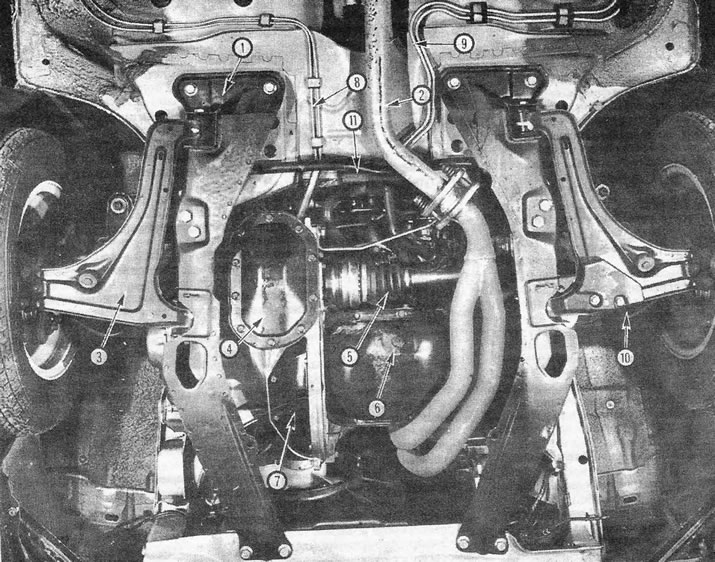
Fig. 12. Front of Opel Ascona 1.8, models before 1987 (bottom view): 1. Suspension control arm support; 2. Exhaust pipe; 3. Suspension control arm; 4. Main gear assembly cover; 5. Internal axle joint; 6. Pan drain plug; 7. Flywheel housing cover; 8. Brake pipes; 9. Fuel lines; 10. Brake hose; 11. Anti-roll bar.
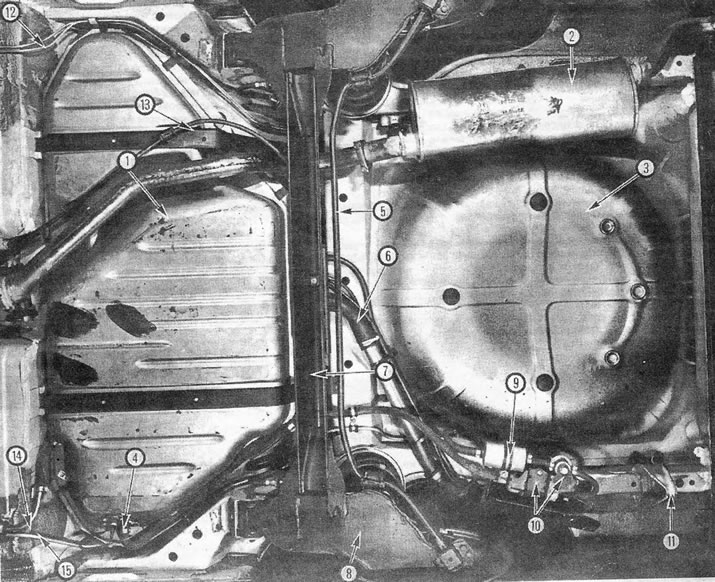
Fig. 12. Front of Opel Ascona 1.8, models before 1987 (bottom view): 1. Suspension control arm support; 2. Exhaust pipe; 3. Suspension control arm; 4. Main gear assembly cover; 5. Internal axle joint; 6. Pan drain plug; 7. Flywheel housing cover; 8. Brake pipes; 9. Fuel lines; 10. Brake hose; 11. Anti-roll bar.
Troubleshooting
The engine will not start
- The engine does not start when the starter is turned on
- The battery is low (charge the battery, start "lighting a cigarette" or "from the pusher").
- Loose or corroded battery terminals.
- Poor battery mass (check ground wire).
- Poor engine weight (check ground tire).
- Loose contacts or damaged starter wiring (or solenoid).
- The gear shift lever on the automatic transmission is incorrectly installed or the ignition interlock is faulty.
- The ignition/starter switch is faulty.
- Serious mechanical failure (engine jammed).
- Internal starter or solenoid fault (see chapter 12).
The starter cranks the engine too slowly
- Battery is partially discharged (recharge the battery, start "lighting a cigarette" or "from the pusher").
- Loose or corroded battery terminals.
- Poor battery mass (check ground wire).
- Poor engine weight (check the fastening of the ground bar).
- Loose starter wiring contacts (or solenoid).
- Starter internal fault (see chapter 12).
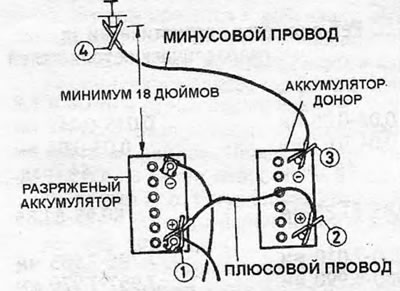
Fig. 15. Wire connection diagram for starting "lighting a cigarette" (for engines with negative mass). The sequence of connecting the wires is shown in numbers.
The starter turns but does not start the engine
- The battery is low
- Starter pinion stuck on clutch
- The flywheel ring teeth are damaged or worn.
- The starter mounting bolts are loose.
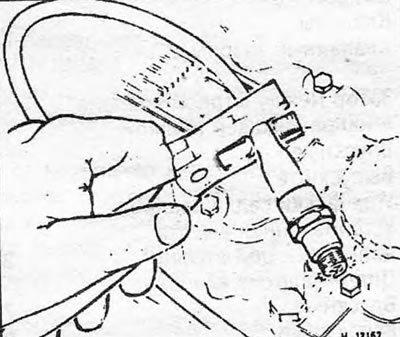
Fig. 16. Crank the engine and check for spark. The candle should be held with a tool with insulated handles. For fire safety reasons, use a spare spark plug, not one removed from the engine.
The engine cranks normally, but does not start
- The high voltage wires and the distributor cover are damp or dirty (crank the engine and check for spark. If not, try treating the wires and cover with a moisture dispersant, such as Holts Wet Start).
- Distributor electrodes are dirty or incorrectly installed (1.3 l engine until September 1982)
- Empty fuel tank (check fuel supply).
- Excessive suction (hot engine) or insufficient suction (cold engine)
- Spark plugs are fouled or have incorrect spark gap (remove and clean the spark plugs, check and adjust the spark gap).
- Other malfunctions of the ignition system (see chapter 4).
- Other fuel system malfunctions (see chapter 3).
- Poor compression.
- Serious mechanical failure (for example, the camshaft drive has failed).
Ignition of the combustible mixture occurs, but the engine does not start
- Insufficient suction (cold engine).
- It sucks air from the carburetor or intake manifold.
- Fuel starvation (see chapter 3).
- The ballast resistor is faulty or there is another malfunction in the ignition system (see chapter 4).
The engine stalls and won't start again
The engine suddenly stalls - ignition system malfunction
- The contacts of the low voltage wires have become loose or disconnected.
- High voltage wires or distributor cover are damp or dirty (for example, after driving through a deep puddle).
- Ignition coil or capacitor is faulty (check for spark) - 1.3 liter engine until September 1982
- Other malfunctions of the ignition system (see chapter 4).
The engine misfires and then stalls - fuel system malfunction
- There is no fuel in the tank.
- The fuel pump is faulty or the fuel filter is clogged (check fuel supply).
- The fuel filler vent is clogged (When you remove the tank cap you feel a suction).
- The carburetor needle valve is stuck.
- Carburetor jets clogged (dirty fuel).
- Other fuel system malfunctions (see chapter 3).
Engine stalls - other reasons
- Severe engine overheating.
- Serious mechanical failure (for example, the camshaft drive has failed).
The engine gets very hot
- Loss of coolant due to internal or external leakage (see chapter 2).
- Thermostat is faulty.
- Low oil level.
- The brakes are stuck.
- Internal or external blockage of the radiator.
- The electric fan is not working well.
- The engine water jacket channels are clogged.
- The ignition timing is incorrectly set or the automatic ignition timing does not work.
- Mixture too lean.
Note: Do not add cold water to an overheated engine as this may damage it.
Low oil pressure
The device shows low oil pressure or the warning light comes on when the engine is running
- Low oil level or incorrect oil.
- The oil pressure sensor or indicator is faulty.
- The wire leading to the pressure sensor has contacted ground.
- The engine has overheated.
- The fuel filter is clogged or the bypass valve is faulty.
- The oil pressure relief valve is faulty.
- The oil intake strainer is clogged.
- The oil pump is worn out or its mountings are loose.
- Worn main or connecting rod bearings.
Note: Low oil pressure at idle on an older engine is not necessarily a cause for concern. It is much more dangerous when the oil pressure drops sharply while driving. In any case, you should first check the pressure sensor.
Engine noise
Pre-ignition (detonation) when you press the gas pedal
- Incorrect fuel octane number.
- The ignition timing is incorrectly adjusted.
- The distributor is worn out or faulty.
- The carburetor is worn out or poorly adjusted.
- Excessive carbon deposits in the engine.
The engine whistles or "squeals"
- Vacuum hose leaks.
- Air leaking into the carburetor or through the manifold gasket.
- The cylinder head gasket is leaking.
Light knocking or rattling noise in the engine
- The valve mechanism is worn out.
- Chain worn (or belt) camshaft
- The piston ring is broken (ticking sound).
Heavy knocking or banging
- Unintended mechanical contact (for example, fan blades).
- The drive belt is worn.
- Peripheral equipment malfunction (generator, water pump, etc.).
- Worn connecting rod bearings (strong uniform knocking, may decrease with increasing engine load).
- Worn main bearings (rattling and knocking noises, may worsen as engine load increases).
- The pistons are knocking (most noticeable when the engine is cold).
Visitor comments