


Contents: Leaded fuel ⬇ High octane unleaded fuel ⬇
Leaded fuel
1. The ignition must be adjusted if it was knocked down after overhauling or removing the distributor. The following procedures are designed for a standard engine in normal condition. It is also assumed that the engine is running on the recommended high octane fuel.
2. Place the transmission in neutral and remove all 4 spark plugs.
3. Close the spark plug hole of cylinder Nin with your thumb and turn the engine clockwise using a wrench placed on the crankshaft pulley bolt so that pressure begins to be felt in cylinder N 1. This indicates that the piston of cylinder No. 1 is approaching TDC on the ignition stroke of the mixture.
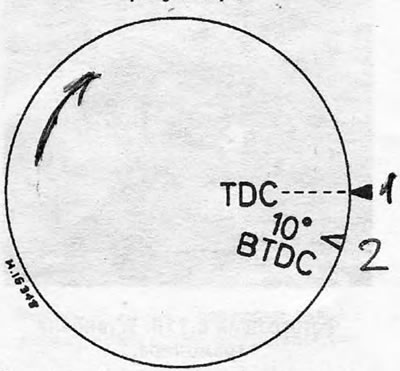
Figure 4.3. Mark on the crankshaft pulley allowing the ignition timing to be set at 10 degrees before TDC The relative position of TDC is shown:1. V.m.t.; 2. 10 degrees, before TDC
4. Continue to rotate the crankshaft until the mark on its pulley is opposite the mark or pointer on the camshaft belt cover.
5. In this position, the ignition is set to the desired angle before TDC (the alignment of the marks does not correspond to TDC, but to the required ignition timing angle).
6. Loosen the distributor clamp bolt or nut and turn the distributor housing so that the breaker contacts just begin to open. Tighten the clamp bolt or nut.
7. Sometimes it is difficult to determine the moment when the contacts begin to open.
To determine it more accurately, connect a 12 V lamp in parallel with the contacts (one wire to the "ground" and one to the low voltage terminal of the distributor). Turn on the ignition and turn the distributor housing until the lamp lights up, indicating that the contacts have just opened.
8. If you cannot correctly align the runner with the mark on the rim of the distributor housing, this means that the breaker cam is not installed correctly on the drive shaft. To install the cam correctly, you will have to partially disassemble the distributor and check the position of the cam relative to the centrifugal regulator: it may be turned 180 degrees relative to the correct position.
9. Check the ignition adjustment using a strobe lamp.
10. Apply white paint to the crankshaft pulley mark and the timing mark or pointer on the camshaft belt cover and connect a strobe light to the high voltage circuit of cylinder No. 1 in accordance with the manufacturer's instructions. Disconnect the vacuum tube from the vacuum regulator.
11. Start the engine and let it idle. Direct the light from the lamp to the alignment marks. In the light of the lamp, the marks should appear aligned. Slightly open the throttle valve and check that as the engine speed increases, the mark on the crankshaft pulley moves away from the pointer, which indicates that the centrifugal governor is working correctly.
12. If the marks do not align in the light of the lamp, loosen the distributor clamp bolt and carefully turn the distributor so that the marks align. Tighten the clamp bolt.
High octane unleaded fuel
13. The engines installed on the models in question can operate on unleaded fuel, however, if detonation occurs, the manufacturer recommends reducing the ignition advance angle by 5 degrees on carburetor engines.
[Material copied from this resource OPELBOOK]
14. There is only one mark on the crankshaft pulley, corresponding to 10 degrees before TDC, so in order to make the ignition later, it will be necessary to apply additional marks.
15. Turn the engine using a wrench placed on the crankshaft pulley bolt (or by shifting into high gear and pushing the car forward), so that piston No. 1 is at TDC on the mixture ignition stroke. (This can be checked by removing spark plug #1 and covering the spark plug hole with your thumb: pressure should be felt when the piston is raised.) You can accurately check whether the piston is at TDC by inserting a knitting needle into the spark plug hole.
16. Make a mark on the crankshaft pulley opposite the mark or indicator on the engine.
17. The original mark on the crankshaft pulley corresponds to 10 degrees BTDC, and the new mark you made corresponds to TDC. Thus, the position of 5 degrees BTDC should be in the middle between these two marks.
18. Make another mark on the pulley corresponding to 5 degrees before TDC and adjust the ignition as indicated in paragraphs 11 and 12, but already relative to the new mark for 5 degrees before TDC
19. It should be noted that 5 degrees is the maximum ignition delay angle. It is possible that detonation will be more effectively removed at a lower angle (experiment to find the optimal solution).
Visitor comments