
2. Remove the pan (see section 10).
3. Remove the oil pump intake pipe and strainer.
4. Check that the connecting rods and bearing caps are marked according to their position in the crankcase. If not, do it yourself. Note which side of the engine the marks are facing.
5. Remove the bearing cap bolts on the first connecting rod and remove the cap. If you do not intend to replace the bearing shells, secure the bearing shell to the cap with duct tape.
b. Inspect the top edges of the cylinders for ridges. If there are ridges, carefully remove them using a special tool, because otherwise, when the piston is pulled out of the cylinder, the upper piston ring may get stuck on this ridge.
7. Place the wooden handle of a hammer against the connecting rod and push the connecting rod and piston out of the cylinder.
8. In the same way, remove the remaining connecting rod and piston groups, each time turning the crankshaft so that it is easier to get to the connecting rod bolts.
9. Disconnecting the pistons from the connecting rods must be performed by a specialist, because this work requires special tools and a press.
10. Arrange the pistons and connecting rods in the correct order along with the bearing shells. Check that the bearing seats are absolutely clean and reinstall the bearings.
11. Wipe the cylinders and lubricate them. Lubricate the piston rings well and check that the locks are properly spaced (see section 34, paragraph 16).
12. Install the piston ring compressor onto the first piston to be placed in place.
13. Insert the connecting rod and piston group into the cylinder so that the compressor base rests on the cylinder block. Check that the marks on the connecting rod are pointing in the right direction. There are no marks on the bottom of the piston, but you can judge from the cutouts on its bottom surface whether it is installed correctly (see photo).
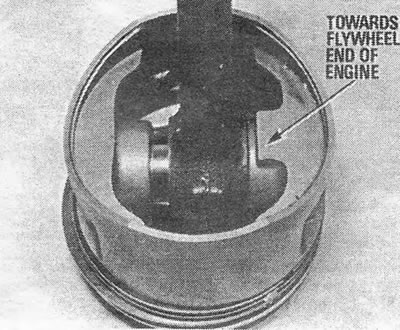
Photo 12.13. Cutouts on the bottom surface of the piston: 1. Towards the flywheel.
14. Using a wooden hammer handle, drive the piston into the cylinder while gradually removing the ring compressor (see photo).
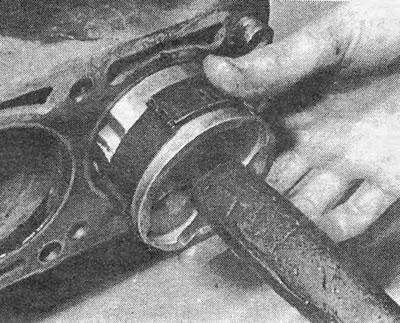
Photo 12.14. Installing the piston into the cylinder block.
15. Bring the lower head of the connecting rod to the corresponding connecting rod journal and then place it on the journal, which should be well lubricated.
16. Reinstall the bearing cap and tighten the bolts to the required torque.
17. Repeat these operations on the remaining connecting rod and piston groups.
18. Reinstall the cylinder head, oil intake pipe, strainer and pan (see previous sections).
Visitor comments