
Removing
1. Remove the outer drive belt covers as described in Chapter 11, points 1-5.
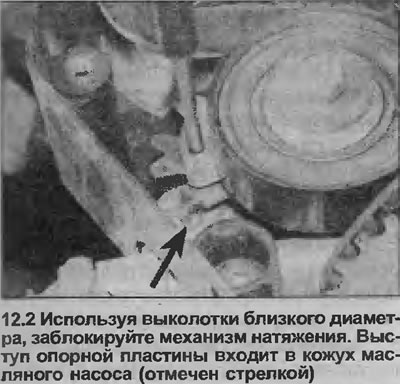
2. To lock the tensioner in the removal and installation position, move the tensioner indicator lever clockwise until the holes in the baseplate and lever align. Then insert a pin of suitable diameter to secure them (see illustration). Now you can unscrew the tension mechanism, or remove the belt.
3. Check that the tensioner roller rotates smoothly and easily, without noise, play, or jerks (jamming). Also check that there are no signs of physical wear or damage. If the tensioner has any defects, or if you are simply in doubt about the effectiveness of the spring, the entire assembly must be replaced.
Installation
4. When installing, make sure that the protrusion of the tensioner base plate has entered the hole in the oil pump casing, then tighten the tensioner bolt and remove the locking cotter pin: the tensioner should move freely.
5. Adjust belt tension as described below.
Adjustment
6. Whenever a toothed drive belt breaks, whether it is due to belt replacement or any other engine overhaul work, the tension adjustment procedure should only be performed on a cold engine.
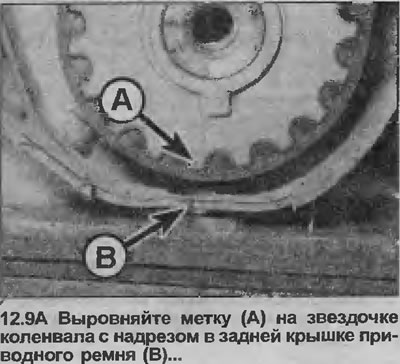
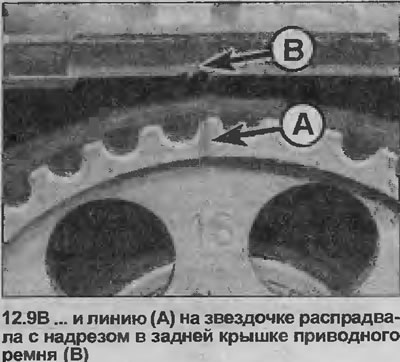
7. Assume that the belt has been removed and installed, that is, that the crankshaft pulley, timing belt, outer covers have been removed, and the tensioner has been disconnected (see above) and cylinder #1 is in ignition position (only up to TDC on the compression stroke). Temporarily install the crankshaft pulley, secure it with a bolt, and remove the spark plugs so that the crankshaft can turn freely.
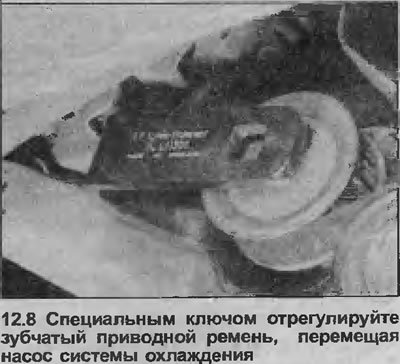
8. Note also that it is much easier to rotate the cooling system pump with the required accuracy using a special key (Kent-Moore tool No. KM-421-A). Alternatively, you can use the Sykes-Pickavani tool #031300) (see illustration).
9. Installing the belt correctly (see chapter 11), check that the mark on the crankshaft sprocket and the line on the camshaft sprocket are aligned with their respective notches on the timing belt rear cover (see illustrations).
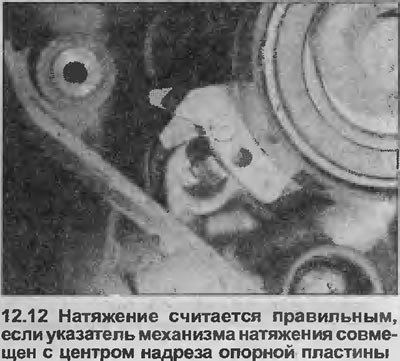
10. Tighten the belt by loosening the three mounting bolts and turning the coolant pump clockwise until the holes in the tension indicator arm and base plate line up (the tensioner indicator lever will then be able to move fully clockwise to the stop). Lightly tighten the pump mounting bolts just to prevent the pump from moving.
11. With a wrench on the bolt on the crankshaft pulley, smoothly turn the crankshaft (without jerking, otherwise the belt teeth may jump) 2 full turns (720°) clockwise until the timing marks on the camshaft and crankshaft sprocket align as described in step 13. The position of the coolant pump must not change.
12. Loosen the toothed drive belt by turning the coolant pump counterclockwise until the tensioner indicator pointer is in the center of the base plate notch; in this position, the tension of the toothed drive belt is considered correct (see illustration). Tighten the coolant pump bolts to the specified torque specifications (see Section 3). then rotate the crankshaft two turns clockwise and recheck the installation.
13. If the pointer is not aligned with the notch, repeat the procedure from step 7. Finally, install all removed components.
Visitor comments