
OpelBook.ru
Cars AvtoVAZ Cars Mitsubishi Cars BMW Cars Mercedes Cars Nissan Cars Toyota Cars Chevrolet
English Русский
Български
Беларускі
Український
Српски
Hrvatski
Română
Polski
Slovenský
Magyar
 |  Sitemap  |  Contacts  |    


Main Astra Corsa Insignia Kadett Omega Vectra Zafira Others Articles
Vectra A (1988-1995, petrol) Vectra A (1988-1995) Vectra B (1995-2002, petrol) Vectra B (1995-2002) Vectra C (2002-2008)
  • Main
  • Vectra
  • Vectra A
  • Power unit
  • SOHC engine
  • Engine and Transmission Mounting Brackets — Replacement

Engine and Transmission Mounting Brackets — Replacement (Opel Vectra A)

            0

Contents: Right mounting bracket ⬇ Left mounting bracket ⬇ Rear mounting bracket ⬇
Note: New left and right engine/transmission to body mount bracket bolts must be used during installation.


1. The engine/transmission assembly is held in the engine bay by three brackets, two of which are attached to the transmission and one to the engine.

Right mounting bracket


2. Apply the handbrake, then jack up the front of the vehicle and support it on axle stands.

3. Attach a lifting device and a winch to the lifting eyes on the cylinder head, slightly raise the engine.

4. Working under the car, unscrew the engine mounting bracket from the cylinder block, and also unscrew it from the body. Then remove the assembly (see illustration).
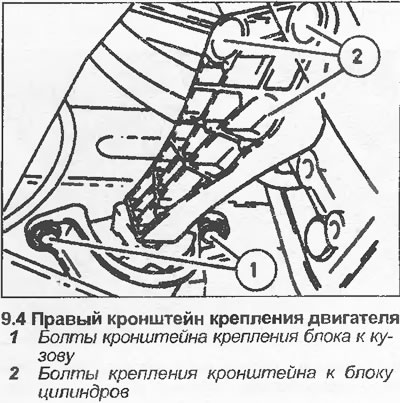
4. Working under the car, unscrew the engine mounting bracket from the cylinder block, and also…


5. Unscrew the mounting block from the bracket.

6. Install the new mounting block on the bracket, tighten the mounting bolts with the specified tightening force Specifications.

7. Install the mounting bracket on the cylinder block, tighten the mounting bolts with the specified tightening force Specifications.

8. Install new bracket-to-body mounting bolts and tighten them to the specified tightening torque Specifications.


9. Disconnect the lifting device and winch from the engine.

10. Lower the car to the ground.

Left mounting bracket


11. Proceed as described in points 2 and 3.

12. Working under the vehicle, unscrew the mounting block from the bracket and the body (see illustration).
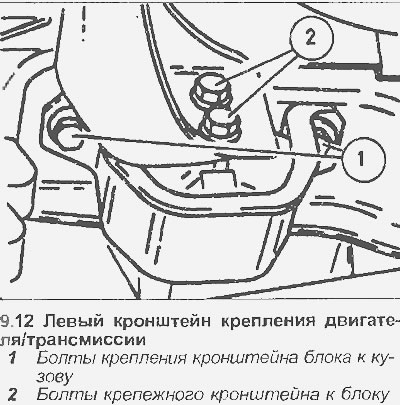
12. Working under the vehicle, unscrew the mounting block from the bracket and the body (see…


13. Before installation, check that the bolts securing the cushion to the car body are screwed freely into their threaded holes. If necessary, renew the thread with an M10x1.25 mm tap.

14. Install the new mounting block onto the bracket, tighten the mounting bolts to the tightening torque specified in the Specifications.

15. Install new bracket-to-body mounting bolts - tighten them to the tightening torque specified in the Specifications.

16. Proceed as described in points 9 and 10.

Rear mounting bracket


17. Proceed as described in points 2 and 3.

18. Working underneath the vehicle, unscrew the mounting block from the lower frame and bracket.

19. Install the new mounting block on the lower frame and bracket, tighten the mounting bolts to the specified tightening torque Specifications.

20. Proceed as described in points 9 and 10.


This article is available at russian, bulgarian, belarusian, ukrainian, serbian, croatian, romanian, polish, slovak, hungarian
Checking the article: Chernov Alexander

Share information:

Previous articles
Opel Vectra A: SOHC engine
Next articles

Engine and transmission — removal, separation, connection and installation
Engine — removal and installation (transmission remains in the car)
Engine Removal Method
Basic operations requiring engine removal
Basic operations performed without removing the engine from the vehicle
Compression Test — Description
Disassembling and assembling the engine — general description
Toothed drive belt and sprockets (without automatic tensioning mechanism) — removal, installation and adjustment
Toothed drive belt and tensioner (1.4 and 1.6L models, except C16NZ2) — removal, installation and adjustment
Timing Belt Cover Opening, 1.4L and 1.6L Models — General Description
Toothed drive belt and tensioner mechanism (C16NZ2, 1.8 and 2.0 l) — removal, installation and adjustment
Front camshaft oil seal — removal and installation


See similar ones from other Opel car manuals:
▶ Engine Mounting Brackets — Replacement Opel Omega A (1986-1993)
▶ Engine — removal and installation (automatic transmission… Opel Astra F (1991-1998, petrol)
▶ Engine and manual transmission — disconnecting after… Opel Ascona C (1981-1988)
▶ Starting the engine from an auxiliary power source Opel Corsa B (1993-2000)
▶ Engine compartment fuse box Opel Insignia A (2008-2017)
Link to this page in different formats

Visitor comments


No comments yet


How much will 31 + 35 =


Vectra C (2002-2008) 
  • General information
  • User manual
  • Vehicle device
  • Maintenance
  • Troubleshooting
  • Power unit
  • Engine repair
  • Cooling system
  • Power and control system
  • Engine electrics
  • Transmission
  • Clutch
  • Car gearbox
  • Drive shafts
  • Chassis
  • Car suspension
  • Steering
  • Brake system
  • Body
  • Exterior
  • Interior
  • Doors, locks and windows
  • Heating and ventilation
  • Electrical equipment
  • Equipment and devices
  • Headlights and lighting
  • Electrical circuits
Vectra B (1995-2002) 
  • General information
  • User manual
  • Weekly checks
  • Maintenance (gasoline)
  • Maintenance (diesel)
  • Troubleshooting
  • Power unit
  • SOHC gasoline engine
  • DOHC petrol engine
  • Diesel engine 1.7 liter
  • Diesel engine 2.0 liters
  • Engine repair
  • Cooling system
  • Fuel system (gasoline)
  • Fuel system (diesel)
  • Charging system
  • Launch system
  • Ignition and preheat
  • Transmission
  • Clutch
  • Mechanical gearbox
  • Automatic gearbox
  • Drive shafts
  • Chassis
  • Brake system
  • Wheel suspension
  • Steering
  • Body
  • Exterior
  • Interior
  • Doors and windows
  • Heating and ventilation
  • Electrical equipment
  • Equipment and devices
  • Electrical circuits
Vectra B (1995-2002, petrol) 
  • General information
  • Maintenance
  • Help with malfunctions
  • Power unit
  • Engine repair
  • Exhaust system
  • Cooling system
  • Fuel system
  • Multec injection system
  • Four point injection
  • Transmission
  • Clutch
  • Gearbox and drive
  • Chassis
  • Wheel suspension
  • Steering
  • Brake system
  • Wheels and tires
  • Body
  • Exterior
  • Interior
  • Electrical equipment
  • Fuses and electronics
  • Power devices
  • Ignition system
  • Lighting and signaling
  • Equipment and devices
  • Heating and ventilation
  • Electrical circuits
Vectra A (1988-1995) 
  • Power unit
  • Engine repair
  • Ignition system
  • Lubrication system
  • Cooling system
  • Injection system
  • Fuel system (carburetor)
  • Fuel system (diesel)
  • Exhaust system
  • Transmission
  • Clutch
  • Car gearbox
  • Chassis
  • Front suspension
  • Rear suspension
  • Steering
  • Brake system
  • Wheels and tires
  • Body
  • Exterior
  • Interior
  • Electrical equipment
  • Electrical circuits
Vectra A (1988-1995, petrol) 
  • General information
  • User manual
  • Maintenance
  • Power unit
  • SOHC engine
  • DOHC engine
  • Cooling and ventilation
  • Fuel system (carburetor)
  • Fuel system (injector)
  • Exhaust converter
  • Transmission
  • Clutch
  • Mechanical gearbox
  • Automatic gearbox
  • Drive shafts
  • Chassis
  • Brake system
  • Car suspension
  • Steering
  • Body
  • Body elements
  • Electrical equipment
  • Power devices
  • Equipment and devices
  • Electrical circuits
OpelBook.ru © 2017–2026 · Mobile version · · Sitemap: EN BG BY UA RS HR RO PL SK HU · Feedback · Site search
Astra F, petrol · Astra G, petrol · Astra G · Astra H · Astra J, petrol · Corsa B · Corsa C, petrol · Corsa C · Insignia A · Kadett D · Kadett E · Omega A · Omega B · Omega B2 · Vectra A, petrol · Vectra A · Vectra B, petrol · Vectra B · Vectra C · Zafira A, petrol · Frontera A, petrol · Frontera B · Ascona C · Vivaro A ·
We want your visit to be comfortable 🤝! We use cookies 🍪 to make that happen.