
OpelBook.ru
Cars AvtoVAZ Cars Mitsubishi Cars BMW Cars Mercedes Cars Nissan Cars Toyota Cars Chevrolet
English Русский
Български
Беларускі
Український
Српски
Hrvatski
Română
Polski
Slovenský
Magyar
 |  Sitemap  |  Contacts  |    


Main Astra Corsa Insignia Kadett Omega Vectra Zafira Others Articles
Frontera A (1991-1998, petrol) Frontera B (1998-2004) Ascona C (1981-1988) Vivaro A (2001-2014)
  • Main
  • Opel
  • Ascona C
  • Power unit
  • Cooling system
  • Thermostat — Removal, Checking and Installation

Thermostat — Removal, Checking and Installation (Opel Ascona C)

            0

Contents: Engine 1.3 ⬇ Engines 1.6 and 1.8 ⬇
1. Typical signs of a faulty thermostat include slow engine warm-up (longer than 7-8 minutes) or its overheating, which is indicated by boiling of the coolant or detonation of the engine after it is turned off.

2. Before removing the thermostat, some of the coolant should be drained (see section 3).

Engine 1.3


3. Loosen the mounting bolts and remove the camshaft belt cover. Disconnect the upper radiator hose from the engine - this is where the thermostat housing is located.

4. Unscrew the 2 mounting bolts and remove the housing to access the thermostat located in the cylinder head. Remove the thermostat, paying attention to how it was installed (see photos).
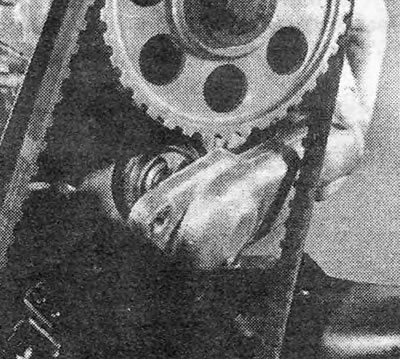
Photo 8.4A. Removing the thermostat housing (engine 1.3).
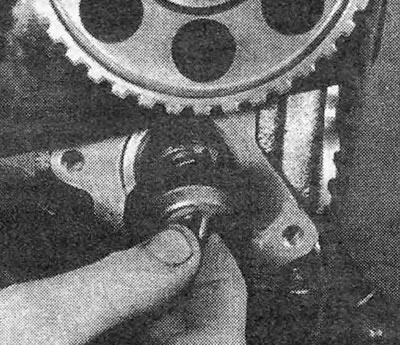
Photo 8.4A. Removing the thermostat housing (engine 1.3).


Photo 8.4B. Removing the thermostat with the sealing ring (engine 1.3).

Photo 8.4B. Removing the thermostat with the sealing ring (engine 1.3).


5. To check the operation of the thermostat, lower it on a thread into boiling water. When immersed in boiling water, the thermostat should open. Remove the thermostat and check if it closes. This is a fairly simple functional test that can help identify a faulty thermostat. Using a thermometer, you can check the opening temperature of the thermostat (see Specifications), however, you can no longer check the temperature of full opening, since it exceeds the boiling point of water. When replacing the thermostat, check that it matches the temperature characteristics of your model (see photo).
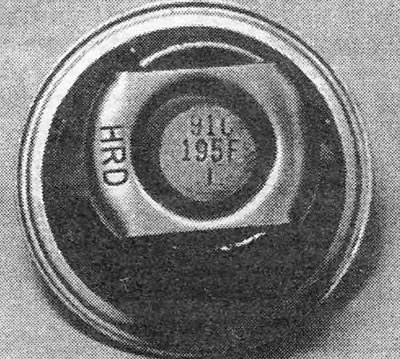
Photo 8.5. The opening temperature is indicated on the thermostat.

Photo 8.5. The opening temperature is indicated on the thermostat.


6. The thermostat is installed in the reverse order. Replace the thermostat sealing ring and reinstall it correctly (see photos).
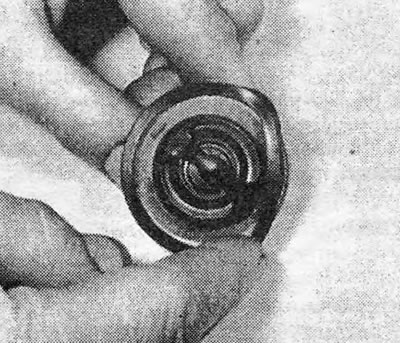
Photo 8.6A. Installing a new sealing ring on the thermostat.
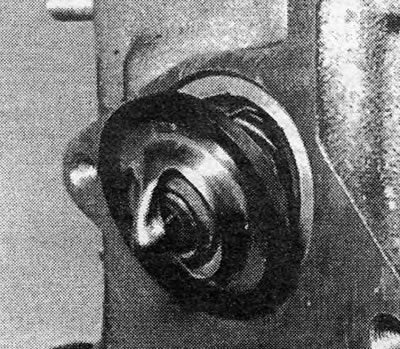
Photo 8.6A. Installing a new sealing ring on the thermostat.


Photo 8.6B. Installing the thermostat on the cylinder head (engine 1.3).

Photo 8.6B. Installing the thermostat on the cylinder head (engine 1.3).


7. Tighten the thermostat housing bolts to the required torque and add coolant to the system.

Engines 1.6 and 1.8


8. The procedure for removing, checking and installing the thermostat on these engines is basically similar to that given for the 1.3 engine, with the difference that the thermostat is located on the outside of the camshaft belt cover, and access to it is much easier (see photos).
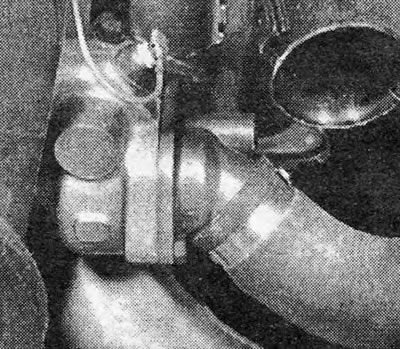
Photo 8.8. Thermostat housing and cover (engine 1.6).

Photo 8.8. Thermostat housing and cover (engine 1.6).


9. On carburetor models, remove the air cleaner. Drain the coolant and remove the bolts securing the thermostat housing cover.

10. Remove the thermostat and check its operation if necessary (see paragraph 5).


11. When installing the thermostat, always replace the seal on its housing cover.

12. If it is necessary to remove the thermostat housing, first remove the camshaft timing belt and the rear belt shield (see chapter 1).

13. Disconnect all hoses from the thermostat housing, noting their relative position.

14. Unscrew the 2 bolts securing the thermostat housing and remove it. Remove the sealing ring.

15. Installation of the thermostat housing is carried out in the reverse order. Install a new O-ring and tighten the housing bolts to the specified torque.

16. Fill the cooling system with liquid (see section 6).


This article is available at russian, bulgarian, belarusian, ukrainian, serbian, croatian, romanian, polish, slovak, hungarian
Checking the article: Kornev Georgy

Share information:

Previous articles
Opel Ascona C: Cooling system
Next articles

Radiator — removal, inspection and installation
Cooling system — filling with fresh coolant
Antifreeze mixture
Cooling system — flushing
Cooling system — draining liquid
Cooling system — routine maintenance
Water pump — removal and installation
Generator Drive Belt — Removal, Installation and Tensioning
Electric Radiator Fan — Removal and Installation
Fan Thermal Switch — Removal and Installation
Coolant Temperature Sensor — Removal and Installation
Heater — description


See similar ones from other Opel car manuals:
▶ Thermostat — Removal, Checking and Installation Opel Astra F (1991-1998, petrol)
▶ Removal, installation and checking of the thermostat… Opel Corsa B (1993-2000)
▶ Checking the Thermostat Opel Insignia A (2008-2017)
▶ Removal and installation and checking the thermostat Opel Kadett D (1979-1984)
▶ Thermostat — checking operation Opel Vectra A (1988-1995, petrol)
Link to this page in different formats

Visitor comments


No comments yet


How much will 49 + 46 =


Vivaro A (2001-2014) 
  • General information
  • User manual
  • Power unit
  • Petrol engine F4R
  • Diesel engine F9Q
  • Diesel engine G9U
  • Transmission
  • Clutch and drive shafts
  • Manual gearbox
  • Chassis
  • Front suspension
  • Rear suspension
  • Brake system
  • Body
  • Exterior
  • Interior
  • Electrical equipment
  • Heating and ventilation
  • Air conditioner
  • Equipment and devices
  • Electrical diagrams
Ascona C (1981-1988) 
  • General information
  • Maintenance
  • Power unit
  • Gasoline engines
  • Diesel engines
  • Cooling system
  • Fuel and exhaust system
  • Contact ignition system
  • Contactless ignition system
  • Transmission
  • Clutch
  • Mechanical gearbox
  • Automatic gearbox
  • Drive shafts
  • Chassis
  • Steering
  • Brake system
  • Car suspension
  • Body
  • Exterior
  • Interior
  • Doors and windows
  • Electrical equipment
  • Equipment and devices
  • Power devices
  • Electrical circuits
Frontera B (1998-2004) 
  • General information
  • User manual
  • Maintenance
  • Power unit
  • Petrol engines 2.2 l
  • Petrol engines 3.2 l
  • Diesel engines 2.2 l
  • Cooling system
  • Fuel system (petrol)
  • Fuel system (diesel)
  • Ignition system
  • Transmission
  • Clutch
  • Manual gearbox MUA5C
  • Automatic gearbox 4L30E
  • Chassis
  • Suspension and axles
  • Steering
  • Brake system
  • Body
  • Exterior
  • Interior
  • Doors, locks and windows
  • Heating and air conditioning
  • Electrical equipment
  • Power devices
  • Equipment and devices
  • Lighting and signaling
  • Electrical diagrams
Frontera A (1991-1998, petrol) 
  • General information
  • Introduction to guide
  • User manual
  • Maintenance
  • Power unit
  • Engine repair
  • Lubrication system
  • Cooling system
  • Power and exhaust system
  • Engine electrics
  • Transmission
  • Clutch
  • Mechanical gearbox
  • Cardan shafts
  • Chassis
  • Brake system
  • Front suspension
  • Rear suspension
  • Steering
  • Body
  • Repair and care
  • Electrical equipment
  • Equipment and devices
  • Electrical circuits
OpelBook.ru © 2017–2026 · Mobile version · · Sitemap: EN BG BY UA RS HR RO PL SK HU · Feedback · Site search
Astra F, petrol · Astra G, petrol · Astra G · Astra H · Astra J, petrol · Corsa B · Corsa C, petrol · Corsa C · Insignia A · Kadett D · Kadett E · Omega A · Omega B · Omega B2 · Vectra A, petrol · Vectra A · Vectra B, petrol · Vectra B · Vectra C · Zafira A, petrol · Frontera A, petrol · Frontera B · Ascona C · Vivaro A ·
We want your visit to be comfortable 🤝! We use cookies 🍪 to make that happen.