
Attention: When working with AT, cleanliness is of great importance! The ingress of the smallest particles of dirt or abrasive into the ATF can lead to failure of the AT! Before starting work, carefully wipe the adjacent to the control (aspic) surface hole, use only a completely clean, lint-free cloth/rag to wipe the probe!
40. Correct ATF level is one of the critical performance parameters for AT equipped models. An excessive drop in the ATF level can cause the rotation converter to slip, while an excessive amount of fluid leads to its foaming, leakage and is fraught with transmission failure.
41. When performing work in a service station or in the presence of portable diagnostic equipment, first check the presence of an on-board self-diagnosis system in the processor memory (see chapter 5) AT failure information.
42. Checking the ATF level can be done with the transmission warmed up to normal operating temperature (15-20 km run, 72-80°С), or when «cold» transmission (after approximately 1 minute of engine idling after a long stop).
Attention: Do not check the ATF level immediately after driving the car at high speeds, in urban conditions in hot weather, or after towing a trailer - let the fluid cool down for about 30 minutes beforehand!
43. Park the car on a flat, level surface with a hard surface, firmly cock the parking brake. If the engine is cold, start it and warm it up at idle. With the engine running, depress the foot brake pedal and move the AT selector lever through all positions in turn, finally returning it to the position «R».
44. Without turning off the engine, remove the dipstick (see resist. illustration). Use your fingers to remove traces of ATF from the dipstick blade and evaluate its condition by touch.
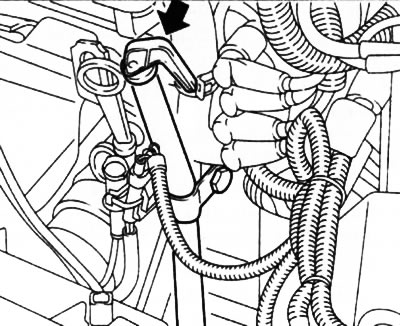
4.44. ATF dipstick
Attention: If the check is made after the trip, be careful not to burn your fingers!
Note: A more detailed description of the procedure for checking the condition and replacing the AT fluid is given in Chapter 7.
45. Wipe the blade thoroughly with a clean rag and insert the probe back into the guide tube, seating the cap firmly on the mouth.
46. Remove the dipstick from the throat again and determine the ATF level in the transmission case using the length of the wetted area of the blade (see resist. illustration). If necessary, make appropriate adjustments by adding the correct grade of fluid to the transmission through a fine mesh funnel. Add ATF in small portions in several steps, each time checking the level - if necessary, remove excess oil using a syringe or a special tool.
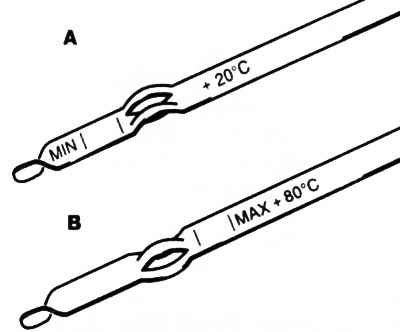
4.46. The ATF level must be within the range indicated on the dipstick blade by the MIN and MAX marks; try not to pour excessive amounts of fluid into the transmission:
A - Marking for checking the ATF level with a cold transmission
B - Marking for checking the ATF level at operating temperature
Attention: Before refueling, read the instructions for using ATF, which are usually given on the packaging container - some types of fluid may have important features and a number of additional operations are required when refueling ATF. Failure to comply with these requirements can lead to transmission failure while the vehicle is moving!
47. Upon completion of the level adjustment, reinstall the dipstick, depress the brake pedal and move the AT selector lever through all positions, then check the oil level again. Stop the engine.
Visitor comments