
OpelBook.ru
Cars AvtoVAZ Cars Mitsubishi Cars BMW Cars Mercedes Cars Nissan Cars Toyota Cars Chevrolet
English Русский
Български
Беларускі
Український
Српски
Hrvatski
Română
Polski
Slovenský
Magyar
 |  Sitemap  |  Contacts  |    


Main Astra Corsa Insignia Kadett Omega Vectra Zafira Others Articles
Corsa B (1993-2000) Corsa C (2000-2006, petrol) Corsa C (2000-2006)
  • Main
  • Corsa
  • Corsa C
  • General information
  • Maintenance
  • Manual transmission oil — check

Manual transmission oil — check (Opel Corsa C)

            0

Note: Checking and adjusting the level should only be done if oil leaks from the manual transmission are detected. In other cases, there is no need to do this.


32. First of all, it is necessary to carry out a thorough visual inspection of the box for possible oil leaks. To do this, clean the box body from dust, dirt and traces of oil, sprinkle possible leaks with talc. The most likely leaks are:
  • Mating surfaces of the engine and manual transmission;
  • Primary shaft seals for manual transmission;
  • Filler cap;
  • Drain plug.

Before the control check, it is necessary to warm up the manual transmission oil thoroughly during a short (up to 30 km) trip.

33. Drive the car onto a ramp or inspection pit, or jack it up and place it on supports in a strictly horizontal position. If an oil leak is detected, first eliminate its cause, and then adjust the oil level in the manual transmission.

34. Carefully wipe the surface of the gearbox housing around the inspection plug. If necessary, remove the protective cover of the engine compartment. The inspection hole is located on the left rear of the gearbox (behind the drive shaft) (see accompanying illustration).
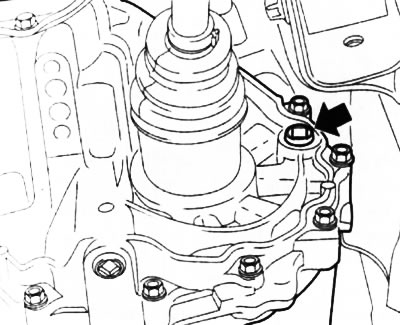
4.34. Location of the manual transmission inspection hole

4.34. Location of the manual transmission inspection hole


35. To check, unscrew the plug of the inspection hole and measure the oil level in the manual transmission crankcase using a wire bent at 90° - the oil level should not fall below the edge of the inspection hole by more than 20 mm (minimum acceptable level).

[Article posted on an online resource: opelbook]

36. If necessary, the level is adjusted using a special syringe/oiler through the hole for installing the reverse light switch sensor (F13/F17/F17+ manual transmission), or through a special hole located on top of the gearbox housing (F23 manual transmission) - disconnect the electrical wiring connector (with appropriate equipment) and unscrew the sensor/plug. On models equipped with the Easytronic robotic gearbox, to adjust the oil level, it is necessary to unscrew the crankcase ventilation breather located on the gearshift mechanism cover. Oil should be poured until its level reaches the lower edge of the inspection hole.

Note: Transmission oil is very viscous - it takes time for it to spread evenly throughout the entire volume of the gearbox housing. Make adjustments in several stages, do not add too much oil at once, check its level periodically. If oil starts to leak out of the edge of the inspection hole, allow the excess to drain.


37. After completing the adjustment, tighten the inspection hole plug back to approximately 4 Nm and tighten it with a wrench approximately another 1/8, maximum 3/8 of a turn (45°-135°). On a robotic gearbox, tighten the breather with the same force. When installing the reverse light switch sensor, first replace the sealing gasket and tighten it to 20 Nm. For the F23 transmission, the tightening force for both the inspection and filler hole plugs is 35 Nm.


38. To ventilate the crankcase, a special breather with a cover is screwed into the manual transmission housing. Every time you inspect the manual transmission, check the breather cover - it should fit loosely onto the breather. If the breather is clogged, (fixed seated lid) increased pressure is created in the manual transmission housing, which can cause malfunction of the manual transmission, as well as lead to extrusion of seals and leakage of transmission oil.

39. After completing the work, remove traces of oil from the gearbox, remove the tool from under the car and lower the latter to the ground if it was jacked up or lifted. During the first trips, check the gearbox for leaks.


This article is available at russian, bulgarian, belarusian, ukrainian, serbian, croatian, romanian, polish, slovak, hungarian
Checking the article: Kornev Georgy

Share information:

Previous articles
Opel Corsa C: Maintenance
Next articles

Brake system and clutch drive fluid
Windshield and rear window/headlight washer fluid
Engine Coolant — Check
Engine oil — check
Checking Fluid Levels — General Information
General information about settings and adjustments
Automatic transmission fluid (ATF) — check
Wheels and tires — general information and designation
Wheels and tires — checking condition and pressure
Wheel rotation
Changing engine oil and oil filter
Checking the condition and replacing the multi-rib drive belt of the units


See similar ones from other Opel car manuals:
▶ General information about manual transmission Opel Astra F (1991-1998, petrol)
▶ Replacing transmission oil in a manual gearbox M32-6 Opel Insignia A (2008-2017)
▶ Manual transmission Opel Kadett E (1984-1995)
▶ Input shaft of a manual transmission — disassembly and… Opel Omega A (1986-1993)
▶ Manual transmission Opel Vectra A (1988-1995, petrol)
Link to this page in different formats

Visitor comments


No comments yet


How much will 13 + 44 =


Corsa C (2000-2006) 
  • General information
  • Introduction to guide
  • Troubleshooting
  • Vehicle device
  • User manual
  • Maintenance
  • Power unit
  • Engine repair
  • Cooling system
  • Power and exhaust system
  • Control system
  • Engine electrical equipment
  • Transmission
  • Clutch
  • Mechanical gearbox
  • Automatic gearbox
  • Drive shafts
  • Chassis
  • Brake system
  • Wheel suspension
  • Steering
  • Body
  • Exterior
  • Interior
  • Doors and windows
  • Heating and air conditioning
  • Electrical equipment
  • Equipment and devices
  • Lamps and lighting
  • Electrical circuits
Corsa C (2000-2006, petrol) 
  • User manual
  • Car access
  • Governing bodies
  • Seat control
  • Heating and air conditioning
  • Driving and maintenance
  • Engines 1.0 and 1.2 l
  • Engine repair
  • Cooling and lubrication system
  • Injection system
  • Engines 1.4, 1.6 and 1.8 l
  • Engine repair
  • Cooling and lubrication system
  • Injection system
  • Transmission
  • Clutch
  • Mechanical gearbox
  • Automatic gearbox
  • Drive shafts
  • Chassis
  • Wheels and tires
  • Wheel suspension
  • Steering
  • Brake system
  • Body
  • Exterior
  • Doors and windows
  • Electrical equipment
  • Equipment and devices
  • Lighting system
  • Electrical circuits
Corsa B (1993-2000) 
  • General information
  • Introduction to guide
  • User manual
  • Maintenance
  • Power unit
  • SOHC gasoline engines
  • DOHC gasoline engines
  • Diesel engines
  • Engine repair
  • Cooling system
  • Supply system
  • Injection system (gasoline)
  • Injection system (diesel)
  • Exhaust systems
  • Control system (gasoline)
  • Preheat system (diesel)
  • Charge and launch system
  • Transmission
  • Mechanical gearbox
  • Automatic gearbox
  • Clutch and drive shafts
  • Chassis
  • Brake system
  • Front suspension
  • Rear suspension
  • Steering
  • Body
  • Ventilation and heating
  • Exterior
  • Interior
  • Doors and windows
  • Electrical equipment
  • Equipment and devices
  • Lamps and lighting
  • Electrical circuits
OpelBook.ru © 2017–2026 · Mobile version · · Sitemap: EN BG BY UA RS HR RO PL SK HU · Feedback · Site search
Astra F, petrol · Astra G, petrol · Astra G · Astra H · Astra J, petrol · Corsa B · Corsa C, petrol · Corsa C · Insignia A · Kadett D · Kadett E · Omega A · Omega B · Omega B2 · Vectra A, petrol · Vectra A · Vectra B, petrol · Vectra B · Vectra C · Zafira A, petrol · Frontera A, petrol · Frontera B · Ascona C · Vivaro A ·
We want your visit to be comfortable 🤝! We use cookies 🍪 to make that happen.