
Caution: Performing battery health and maintenance checks requires some special precautions. Remember that the hydrogen released by the electrolyte is a highly explosive gas. Do not smoke, and do not approach the work area with an open flame or a lit cigarette!
Attention: The basis of the battery electrolyte is ACID! Failure to take measures in case of electrolyte contact with the skin or eyes can lead to burns or even loss of vision - immediately wash them with plenty of water, seek medical help in a timely manner! Wear safety goggles and gloves when handling the battery! After performing work, wash your hands thoroughly, do not store the rags used to wipe the surfaces of the battery. The electrolyte can also easily damage the fabric of clothing and the paintwork of body panels!
Attention: When disconnecting the battery, always disconnect the negative cable from the battery first - connect it last! Read the instructions and recommendations in Chapter 5.
General information
1. All models covered in this manual are equipped with a 12-volt battery. On Corsa C models, it is placed in the right (in the direction of travel) the rear part of the engine compartment in a niche under the windshield, between the partition of the engine compartment and the partition of the passenger compartment, and on Meriva models - in the left part of the engine compartment in front of the expansion tank. The battery consists of six cans in which positive and negative plates are placed (lamellas), immersed in a solution of sulfuric acid. The main task of the battery is to provide the current needed to start the engine, ignite/activate the glow plugs and for lighting, as well as to provide power to other on-board or auxiliary electrical consumers.
2. Modern batteries with minimal care requirements (see below) and under normal conditions do not require additional maintenance and are designed, on average, for 4 years.
3. When installing additional electrical and electronic equipment on the vehicle, the load on the battery may increase and a larger battery may be required - consult an Opel Dealership about the possibility of using such a battery.
Attention: The battery charging system is designed for strictly defined capacity values! Installing a battery with both too large and insufficient capacity will lead to its premature failure - strictly follow the recommendations of specialists, if necessary, make appropriate adjustments at the service station.
4 If you do not plan to use the car for 30 or more days, disconnect the negative cable from the battery in order to prevent its premature discharge, and in winter, at very low outside temperatures, it is recommended to remove the battery and store it in a room with positive (but not high, up to +10°С) temperature.
Note: After connecting the battery, you must enter the security code of the infotainment system, reset the chronometer and set the date on the information display, and, if equipped, synchronize the power windows (see chapter «Controls and methods of operation»).
5. Of particular importance for ensuring the reliability of starting the engine and long-term trouble-free operation of the battery is the quality of the contact of the battery terminals with the connecting wires. Every time you look under the hood of the car, check the reliability and completeness of their contact, properly tighten the fasteners.
6. A conscientious attitude to the implementation of routine preventive maintenance of the battery is the only guarantee of a quick and trouble-free engine start. Before you start servicing the battery, make sure you have all the necessary materials and tools at hand to guarantee the safety of work (see resist. illustration), try to use only non-sparking tools.

11.6. Tools and materials required for battery maintenance:
1. Faceshield/Goggles - When removing corrosion with a stiff brush, crystallized acid particles can easily get into the eyes.
2. Baking soda - an aqueous solution of baking soda is used to neutralize traces of corrosion.
3. Acid-free vaseline - lubricating the battery terminals will help prevent future corrosion.
4. Battery Terminal/Wire Lug Stripper - Specially shaped hard wire brush heads can effectively clean battery terminals and terminal clamps.
5. Impregnated felt washers - installing this washer directly under the terminal clamp will prevent corrosion.
6. Puller - sometimes the wire clamps are very tight on the terminals and cannot be removed even if the fasteners are completely released.
7. Device for stripping battery terminals / wire lugs - despite the structural difference from that mentioned in paragraph 4, it is designed to perform the same tasks.
8. Rubber gloves - do not underestimate the importance of this protective agent - do not forget that the battery contains sulfuric acid!
7. Before starting work, be sure to turn off the engine and turn off all consumers of electricity. Disconnect the negative cable from the battery. When performing battery maintenance, wear safety goggles and gloves and keep children away from the work area.
Service
8. First of all, examine the external condition of the battery. If the positive terminal of the battery with the clip put on it is equipped with a rubber protective casing, make sure that the latter is not damaged. The cover must completely cover the metal components of the terminal connection. Check the condition and reliability of the terminal connections, inspect the battery cover for cracks and other mechanical damage. Make sure the hold-down bolts are secure. Assess the condition of the insulation of the battery wires along their entire length.
Attention: If the wire is loosely attached to the positive terminal of the battery, then before tightening its fastening, disconnect the wire from the negative terminal to eliminate the possibility of a short circuit! After tightening the positive wire, reattach the wire to the negative battery terminal (see chapter 5).
9. If there are signs of corrosion on the surface of the battery in the form of a white powdery coating (see resist. illustration), especially near the terminals, it is necessary to remove the battery from the vehicle for a thorough external cleaning. To remove and install the battery, refer to Chapter 5, Section 8.
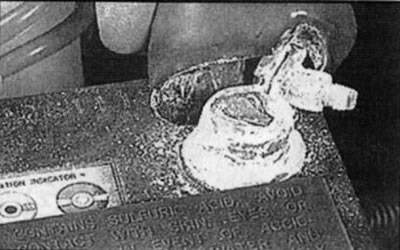
11.9. Terminal corrosion usually shows up as a white, powdery coating
10. Thoroughly clean the contact surfaces of the wire terminals and battery posts with special brushes using a 10% solution of baking soda / industrial soda (see resist. illustrations). With the same solution, clean the battery terminals and rinse the surface of its cover. Make sure that the solution does not get inside the jars. When cleaning, wear a protective mask/goggles and rubber gloves to prevent acid particles from getting into your eyes and hands. Also try to find appropriate clothes that you won't mind throwing away later. When finished cleaning, wipe all battery surfaces with a clean, slightly damp towel/rag soaked in baking soda solution.
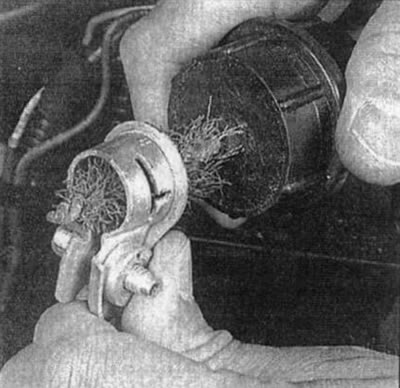
11.10.a Cleaning the terminal clamp with a special brush | 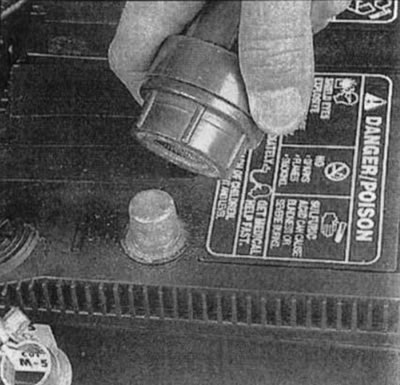
11.10b. Stripping the pole terminal |
11. Check up a condition of a place of installation and hairpins of fastening of a clamping level. Rinse the pan with a solution of baking soda, - treat the areas damaged by corrosion with a zinc-based primer, or special compounds designed to protect against corrosion and weaken the effect of acid.
12. Make sure that no tools or materials are left at the battery installation site. Install the battery and tighten the clamping bar fastening bolt - a weak fastening leads to vibration and shaking of the battery while the car is moving and, as a result, to its premature failure.
13. To protect the terminal connections from corrosion, it is recommended to put specially treated felt washers on the battery terminals. After connecting the wires, cover the terminal blocks with acid-free Vaseline. Remember that the negative wire is always connected last!
14. Track reliability of a tightening of fixture of clips.
Charger
15. Constant battery charging is performed by the generator current while the engine is running. In the event of a long break in the operation of the vehicle (more than 1 month), problems with the charging system, frequent engine starts under adverse conditions, or when the battery is nearing its end of life, it may be necessary to charge the battery and remove it from the vehicle. Regularly check the condition of the battery, do not allow it to completely discharge.
16. Almost all maintenance-free sealed type batteries equipped with a charge level indicator (see resist. illustration). Compare the color of the indicator spot in the viewing window with the indicator status map printed on a special label pasted on the battery case - as a rule, a normally charged battery has a green indicator. Some batteries are placed in a sealed case and are equipped with a built-in hydrometer that allows you to visually determine the battery level by the color of the color spot, the color of which is specified in the Battery Instructions for Use.
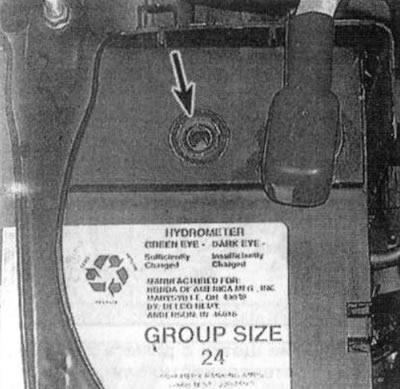
11.16. Sealed type batteries are equipped with a charge level indicator - a label with a map of the status of the indicator spot is glued to the battery case
17. In the absence of an indicator, the battery charge level can be checked using special devices - a voltmeter and a hydrometer. Before starting the test, the battery must be in a stationary and not activated state for at least 2 hours - turn off the ignition and do not start the engine. Using a voltmeter, measure the voltage between the battery output terminals - it must be at least 12.5 V. The density of the electrolyte depends on the outside temperature. For certain operating conditions, a specific density value is set - consult with specialists. When the electrolyte density decreases below the minimum allowable values, it is urgent to charge the battery, regardless of the voltmeter readings.
18. Charge a discharged battery in a well-ventilated area, equipped with all safety measures for working with batteries, and outside the car. The hydrogen released during charging is a highly flammable and flammable gas. In addition, it is chemically aggressive towards paintwork.
Attention: Charging on the car without disconnecting the wires from the battery can lead to failure of the car's electrical components!
19. When using the charger, strictly follow the manufacturer's instructions. Before connecting or disconnecting the battery to the charger, make sure that the device is powered off. If the device is equipped with a selector switch, make sure that the selector switch is set to the 12 V position. During charging, all battery jar caps (if any) should be open. Before removing the plugs, clean the adjacent surfaces from dust and dirt, do not allow foreign particles to enter the battery banks. In the absence of proper conditions, it is advisable to seek help from the service station.
Note: It may happen that the indicator does not turn green immediately after the battery is charged. Start using the battery - if it is in order, after a while the indicator acquires the required color as a result of the electrolyte mixing when the car is moving.
Checking the electrolyte level
20. On batteries with filling holes, it is necessary to periodically, especially in the hot season, check the electrolyte level in the banks. Attention: Do not allow the battery to operate for a long time with insufficient electrolyte level - this can lead to overcharging of the battery, destruction of the plates and a significant reduction in its service life!
21. The electrolyte level is checked visually, through the translucent plastic case of the battery. The level in ALL sections of the battery must be between the MIN and MAX marks on the battery case.
22. If the electrolyte level is not visible through the case, check it through the filler holes of the battery sections, it should reach the lower edge of the filler sleeve or cover the internal grid of the battery bank (depending on battery design).
23. If necessary to adjust the electrolyte level, add the required amount of DISTILLED water.
Note: Do not fill in too much water, excess electrolyte is removed using a special hand pump («pears»).
Attention: The electrolyte is an acid solution! It must be collected in special containers and disposed of properly! If you do not have sufficient experience or relevant capabilities, leave the operation to adjust the electrolyte level to the service station specialists!
24. After completing the level adjustment, tightly close the filler holes and wipe the surface of the battery with a rag soaked in an alkaline solution.
Visitor comments