
OpelBook.ru
Cars AvtoVAZ Cars Mitsubishi Cars BMW Cars Mercedes Cars Nissan Cars Toyota Cars Chevrolet
English Русский
Български
Беларускі
Український
Српски
Hrvatski
Română
Polski
Slovenský
Magyar
 |  Sitemap  |  Contacts  |    


Main Astra Corsa Insignia Kadett Omega Vectra Zafira Others Articles
Corsa B (1993-2000) Corsa C (2000-2006, petrol) Corsa C (2000-2006)
  • Main
  • Corsa
  • Corsa C
  • General information
  • Maintenance
  • Checking the condition and replacing the windshield wipers

Checking the condition and replacing the windshield wipers (Opel Corsa C)

            0

Contents: Checking the condition of the brushes ⬇ Replacing windshield wiper blades ⬇ Replacing the rear window wiper blade ⬇
Note: Instead of replacing the brushes, their rubber working elements can be replaced. This work requires a certain skill - it is recommended to contact car service specialists.


Checking the condition of the brushes


1. Good visibility is an important component of driving safety. The condition of the windshield wiper assemblies should be checked regularly in accordance with the vehicle's routine maintenance schedule (see Section 1). Over time, road film accumulates on the windshield wipers, reducing their efficiency, so the wipers should be washed regularly in a mild cleaning solution. It is recommended to replace the windshield wipers at least once a year.

2. Windscreen wiper assemblies with blades should be inspected regularly, if hardening or cracks in the rubber of the blades are found, replace them. If nothing unusual is found during inspection, wet the windscreen/rear window, turn on the wipers, let them work for a while, then turn them off. Uneven marks from the blades on the glass or streaks on clean glass indicate that the corresponding blade should be replaced.

3. If the brush does not clean the glass well enough, it is possible that wax or other material particles have gotten onto the glass or the wiper blade. In this case, it is necessary to wipe the outer surface of the glass using a soft cleaning solution. You can check the cleanliness of the glass by rinsing it with clean water. Drops of water should not form on clean glass.


Note: Using a wax-dissolving liquid to clean the glass can significantly improve the performance of the windshield wipers. Then wipe the brush with a soft cloth soaked in the cleaning solution and rinse it with water. If the brush still does not clean the glass well enough, replace the brush (see below).


4. During operation of the windscreen wiper mechanism, the mounting nuts may become loose, so they should be checked and, if necessary, tightened each time the brushes are checked.

5. Check the correct position of the brushes on the glass in the initial position of the windshield wipers. To do this, measure the distance from the edge of the windshield to the middle of the windshield wiper blade (see accompanying illustration). If necessary, make adjustments by moving the windshield wiper arms (see Chapter 12).
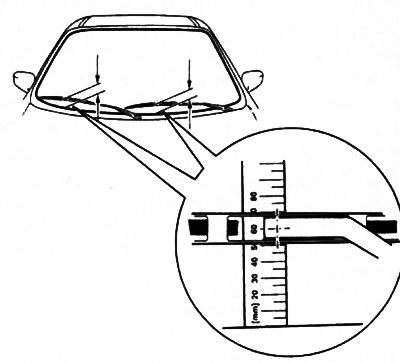
12.5. Checking the end point of lowering of the windshield wiper arms

12.5. Checking the end point of lowering of the windshield wiper arms


Replacing windshield wiper blades


6. Pull the wiper arm (leash) away from the glass surface.

Original article on the web portal www.opelbook.ru

7. Turn the brush 90° and, pressing the lock, remove it from the lever (see accompanying illustration).
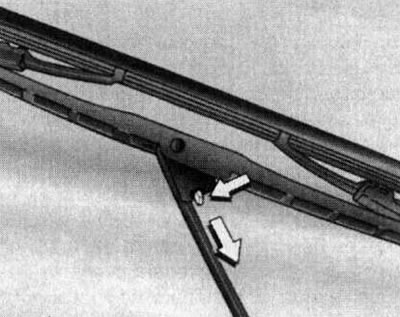


12.7. Removing the wiper blade from the windshield arm

12.7. Removing the wiper blade from the windshield arm


8. Installation is carried out in reverse order.

Replacing the rear window wiper blade


9. Move the wiper arm away from the glass surface, turn the blade 90° and remove it (see accompanying illustration).
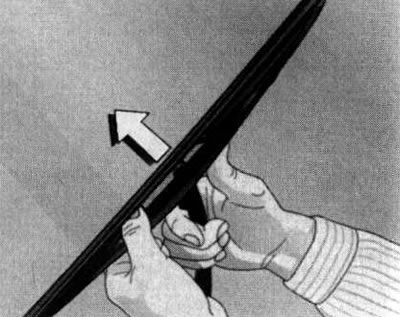
12.9. Removing the brush from the rear wiper arm

12.9. Removing the brush from the rear wiper arm


10. Place the new blade on the wiper arm and snap it into the retainer clips. Check that it is securely fastened.


This article is available at russian, bulgarian, belarusian, ukrainian, serbian, croatian, romanian, polish, slovak, hungarian
Checking the article: Kornev Georgy

Share information:

Previous articles
Opel Corsa C: Maintenance
Next articles

Checking, servicing and charging the battery
Checking the condition of the cooling system components
Checking and replacing hoses located in the engine compartment
Draining sediment, removing air from the filter (diesel models)
Checking the condition and replacing the multi-rib drive belt of the units
Changing engine oil and oil filter
Checking the condition of shock absorbers
Checking the condition of the suspension and steering components
Checking the condition of wheel bearings
Checking the condition of the protective boots of the drive shafts
Checking the brake system
Checking electrical equipment


See similar ones from other Opel car manuals:
▶ Checking the condition and replacing the windshield wipers Opel Astra H (2004-2009)
▶ Checking the condition and replacing the windshield wipers Opel Vectra C (2002-2008)
▶ Checking the condition and replacing the windshield wipers Opel Frontera A (1991-1998, petrol)
▶ Accessory Drive Belt — Checking Condition and Replacing Opel Zafira A (1999-2005, petrol)
▶ Replacing windshield wiper blades Opel Insignia A (2008-2017)
Link to this page in different formats

Visitor comments


No comments yet


How much will 45 + 35 =


Corsa C (2000-2006) 
  • General information
  • Introduction to guide
  • Troubleshooting
  • Vehicle device
  • User manual
  • Maintenance
  • Power unit
  • Engine repair
  • Cooling system
  • Power and exhaust system
  • Control system
  • Engine electrical equipment
  • Transmission
  • Clutch
  • Mechanical gearbox
  • Automatic gearbox
  • Drive shafts
  • Chassis
  • Brake system
  • Wheel suspension
  • Steering
  • Body
  • Exterior
  • Interior
  • Doors and windows
  • Heating and air conditioning
  • Electrical equipment
  • Equipment and devices
  • Lamps and lighting
  • Electrical circuits
Corsa C (2000-2006, petrol) 
  • User manual
  • Car access
  • Governing bodies
  • Seat control
  • Heating and air conditioning
  • Driving and maintenance
  • Engines 1.0 and 1.2 l
  • Engine repair
  • Cooling and lubrication system
  • Injection system
  • Engines 1.4, 1.6 and 1.8 l
  • Engine repair
  • Cooling and lubrication system
  • Injection system
  • Transmission
  • Clutch
  • Mechanical gearbox
  • Automatic gearbox
  • Drive shafts
  • Chassis
  • Wheels and tires
  • Wheel suspension
  • Steering
  • Brake system
  • Body
  • Exterior
  • Doors and windows
  • Electrical equipment
  • Equipment and devices
  • Lighting system
  • Electrical circuits
Corsa B (1993-2000) 
  • General information
  • Introduction to guide
  • User manual
  • Maintenance
  • Power unit
  • SOHC gasoline engines
  • DOHC gasoline engines
  • Diesel engines
  • Engine repair
  • Cooling system
  • Supply system
  • Injection system (gasoline)
  • Injection system (diesel)
  • Exhaust systems
  • Control system (gasoline)
  • Preheat system (diesel)
  • Charge and launch system
  • Transmission
  • Mechanical gearbox
  • Automatic gearbox
  • Clutch and drive shafts
  • Chassis
  • Brake system
  • Front suspension
  • Rear suspension
  • Steering
  • Body
  • Ventilation and heating
  • Exterior
  • Interior
  • Doors and windows
  • Electrical equipment
  • Equipment and devices
  • Lamps and lighting
  • Electrical circuits
OpelBook.ru © 2017–2026 · Mobile version · · Sitemap: EN BG BY UA RS HR RO PL SK HU · Feedback · Site search
Astra F, petrol · Astra G, petrol · Astra G · Astra H · Astra J, petrol · Corsa B · Corsa C, petrol · Corsa C · Insignia A · Kadett D · Kadett E · Omega A · Omega B · Omega B2 · Vectra A, petrol · Vectra A · Vectra B, petrol · Vectra B · Vectra C · Zafira A, petrol · Frontera A, petrol · Frontera B · Ascona C · Vivaro A ·
We want your visit to be comfortable 🤝! We use cookies 🍪 to make that happen.