
OpelBook.ru
Cars AvtoVAZ Cars Mitsubishi Cars BMW Cars Mercedes Cars Nissan Cars Toyota Cars Chevrolet
English Русский
Български
Беларускі
Український
Српски
Hrvatski
Română
Polski
Slovenský
Magyar
 |  Sitemap  |  Contacts  |    


Main Astra Corsa Insignia Kadett Omega Vectra Zafira Others Articles
Frontera A (1991-1998, petrol) Frontera B (1998-2004) Ascona C (1981-1988) Vivaro A (2001-2014)
  • Main
  • Opel
  • Frontera B
  • Electrical equipment
  • Power devices
  • Checking the 6VD1-W engine generator

Checking the 6VD1-W engine generator (Opel Frontera B)

            0

Contents: Security measures ⬇ Checking the voltage regulator ⬇ Checking the current generated by…⬇
During the testing process, the generator power and the functioning of the voltage regulator are measured, and the operation of the voltage regulator must be checked first.

Note: The generator can be tested on the vehicle or after the generator has been removed.


Security measures


When testing the generator, observe the following safety precautions:
  • The negative terminal of the battery, generator and voltage regulator must be matched.
  • Prevent the generator from operating with an open electrical circuit.
  • Eliminate short circuits between the generator and voltage regulator terminals.
  • When connecting the generator, do not reverse the polarity.

Checking the voltage regulator


The purpose of this test is to verify that the electronic voltage regulator maintains the generated voltage at the required level.

Connect a voltmeter to the generator L terminal and ground, then start the engine and let it run at about 3000 rpm.

Turn off all electrical consumers.

Check the voltage shown by the voltmeter. If voltage exceeds 16V, repair or replace the alternator.

Checking the current generated by the generator


This test determines whether the generator produces a current that is equivalent to its rated power.

Connect a voltmeter to the generator L terminal and ground.

Disconnect the wire from the L terminal of the generator.

Connect a 0-150A DC ammeter in series between the L terminal and the wire disconnected from the generator. Make sure the negative probe of the ammeter is connected to the wire disconnected from the generator.
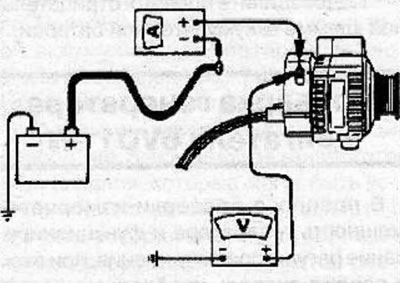


Connect a 0-150A DC ammeter in series between the L terminal and the wire disconnected from the…


Note: Connect the wires and ammeter probes very securely as a large current will flow through the circuit.


Start the engine.

Turn on the high beam headlights and the heater fan to maximum air flow. Briefly increase the engine speed to 3000 min⁻¹ and read the values on the instruments, while the ammeter will show the current generated by the generator.

Note: After the engine starts, the battery charging current decreases very quickly, so this check must be performed very quickly.


The ammeter reading should exceed the limit value. If the current value is less than the limit value and the wire connecting the generator output is normal, remove the generator from the vehicle and check it.

Current generated by the generator: 75 A

Voltage: not less than 13 V
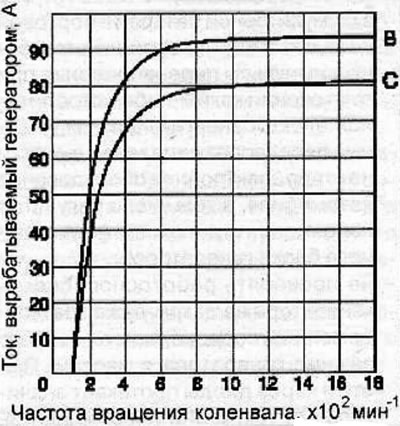

Current generated by the generator depending on the crankshaft speed: B - cold generator;

Current generated by the generator depending on the crankshaft speed: B - cold generator;

C - hot generator.


Notes:
  • The maximum current value is indicated on the plate attached to the generator housing.
  • The current produced by the generator depends on the temperature and load. Therefore, to obtain the maximum current value, partially discharge the battery, first turning on the headlights of the car with the engine off.
  • The maximum current value produced by the generator cannot be obtained if the generator or ambient air temperature is too high.

Source is on the website: Opelbook.ru


After completing the generator current limit test, idle the engine and turn off the ignition.

Disconnect the cable from the negative battery terminal.

Remove the voltmeter and ammeter.

Connect the wire to the L terminal of the generator.

Connect the cable to the negative terminal of the battery.


This article is available at russian, bulgarian, belarusian, ukrainian, serbian, croatian, romanian, polish, slovak, hungarian
Checking the article: Chernov Alexander

Share information:

Previous articles
Opel Frontera B: Power devices
Next articles

Engine Generator 6VD1-W
Charging system
Removal and installation the battery
Charging the battery
Checking the battery
Rechargeable battery
Repair of the engine generator 6VD1-W
Checking the generator elements
Engine Generator X 22 DTH


See similar ones from other Opel car manuals:
▶ Generator — General Information, Checking, Removal and… Opel Astra H (2004-2009)
▶ Checking the compression pressure in the cylinders and… Opel Corsa B (1993-2000)
▶ Checking engine compression Opel Insignia A (2008-2017)
▶ Checking the installation of the timing mechanism drive of… Opel Kadett E (1984-1995)
▶ Checking and adjusting the maximum engine speed — every… Opel Omega A (1986-1993)
Link to this page in different formats

Visitor comments


No comments yet


How much will 16 + 33 =


Vivaro A (2001-2014) 
  • General information
  • User manual
  • Power unit
  • Petrol engine F4R
  • Diesel engine F9Q
  • Diesel engine G9U
  • Transmission
  • Clutch and drive shafts
  • Manual gearbox
  • Chassis
  • Front suspension
  • Rear suspension
  • Brake system
  • Body
  • Exterior
  • Interior
  • Electrical equipment
  • Heating and ventilation
  • Air conditioner
  • Equipment and devices
  • Electrical diagrams
Ascona C (1981-1988) 
  • General information
  • Maintenance
  • Power unit
  • Gasoline engines
  • Diesel engines
  • Cooling system
  • Fuel and exhaust system
  • Contact ignition system
  • Contactless ignition system
  • Transmission
  • Clutch
  • Mechanical gearbox
  • Automatic gearbox
  • Drive shafts
  • Chassis
  • Steering
  • Brake system
  • Car suspension
  • Body
  • Exterior
  • Interior
  • Doors and windows
  • Electrical equipment
  • Equipment and devices
  • Power devices
  • Electrical circuits
Frontera B (1998-2004) 
  • General information
  • User manual
  • Maintenance
  • Power unit
  • Petrol engines 2.2 l
  • Petrol engines 3.2 l
  • Diesel engines 2.2 l
  • Cooling system
  • Fuel system (petrol)
  • Fuel system (diesel)
  • Ignition system
  • Transmission
  • Clutch
  • Manual gearbox MUA5C
  • Automatic gearbox 4L30E
  • Chassis
  • Suspension and axles
  • Steering
  • Brake system
  • Body
  • Exterior
  • Interior
  • Doors, locks and windows
  • Heating and air conditioning
  • Electrical equipment
  • Power devices
  • Equipment and devices
  • Lighting and signaling
  • Electrical diagrams
Frontera A (1991-1998, petrol) 
  • General information
  • Introduction to guide
  • User manual
  • Maintenance
  • Power unit
  • Engine repair
  • Lubrication system
  • Cooling system
  • Power and exhaust system
  • Engine electrics
  • Transmission
  • Clutch
  • Mechanical gearbox
  • Cardan shafts
  • Chassis
  • Brake system
  • Front suspension
  • Rear suspension
  • Steering
  • Body
  • Repair and care
  • Electrical equipment
  • Equipment and devices
  • Electrical circuits
OpelBook.ru © 2017–2026 · Mobile version · · Sitemap: EN BG BY UA RS HR RO PL SK HU · Feedback · Site search
Astra F, petrol · Astra G, petrol · Astra G · Astra H · Astra J, petrol · Corsa B · Corsa C, petrol · Corsa C · Insignia A · Kadett D · Kadett E · Omega A · Omega B · Omega B2 · Vectra A, petrol · Vectra A · Vectra B, petrol · Vectra B · Vectra C · Zafira A, petrol · Frontera A, petrol · Frontera B · Ascona C · Vivaro A ·
We want your visit to be comfortable 🤝! We use cookies 🍪 to make that happen.