
OpelBook.ru
Cars AvtoVAZ Cars Mitsubishi Cars BMW Cars Mercedes Cars Nissan Cars Toyota Cars Chevrolet
English Русский
Български
Беларускі
Український
Српски
Hrvatski
Română
Polski
Slovenský
Magyar
 |  Sitemap  |  Contacts  |    


Main Astra Corsa Insignia Kadett Omega Vectra Zafira Others Articles
Frontera A (1991-1998, petrol) Frontera B (1998-2004) Ascona C (1981-1988) Vivaro A (2001-2014)
  • Main
  • Opel
  • Frontera A
  • Chassis
  • Steering
  • Airbag — Removal and Installation

Airbag — Removal and Installation (Opel Frontera A)

            0

Contents: Removal and installation the airbag…⬇ Removal and installation the contact…⬇
It is worth reminding once again that it is not recommended to remove the airbag yourself. However, here are some safety precautions to take when performing this work:

1. All work with the airbag is permitted to be carried out only with certain experience. A car mechanic who does not know how an airbag works is not allowed to work. The airbag kit includes a control unit, a warning lamp, the airbag itself in the steering wheel or the front passenger airbag, a contact unit and a cable harness.

2. Work with airbags is controlled in some countries by explosives laws.

3. If the front passenger airbag is equipped, do not install additional accessories such as a telephone handset holder, a bottle holder for drinks, a cassette player, additional mirrors, etc. near the airbag deployment area. These items may interfere with the deployment of the airbag.

4. Opening of any elements of the system in question is not permitted.

5. The pillow elements are sensitive. If the airbag is dropped, its operation may be impaired.

6. If the vehicle is to be painted, the workshop must be informed of the presence of an airbag, as the airbag must not be exposed to temperatures above 90°C.

7. When performing welding work, disconnect the ground cable from the battery. If welding is performed near the control unit, it is recommended to remove the control unit. In any case, it is necessary to disconnect the cable harness.


When removing and installing, as well as when replacing steering components:

1. Turn off the ignition.

2. Disconnect the ground cable from the battery and cover the negative battery terminal so that no metal object comes into contact with it.

3. After disconnecting the battery, wait one minute to allow the control unit capacitor to discharge.

4. When working on the steering system, such as the steering wheel, steering rods, steering column, etc., set the steering system to the center position.

5. When removing the steering wheel, set the steering control to the middle position to avoid damage to the contact unit during subsequent assembly.

6. If the airbag has deployed in an emergency, then not only the airbag itself but also the control unit must be replaced.

7. The airbag steering wheel may only be replaced with another steering wheel approved for use by Opel.

8. If the airbag is removed, it should be placed with the soft side facing up.

9. The soft side of the airbag should only be cleaned with a towel dampened with water or with a cleaner recommended by Opel.

10. Before installing the airbag, make sure the battery is disconnected and locked and the ignition is off.

After the battery is disconnected, certain memory devices must be reprogrammed. This includes electric windows, clock and radio coding.

Note: The following job description only covers the removal and installation of parts required to remove the steering system.


Removal and installation the airbag assembly


1. Disconnect the ground cable from the battery and wait one minute. The control unit capacitor must be discharged.
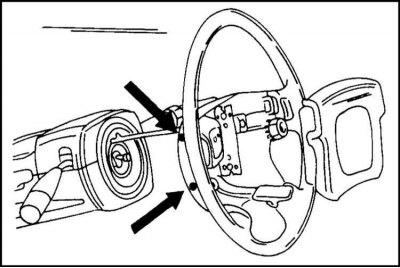


2. Remove the four mounting bolts from the steering wheel side and remove the airbag assembly. Two…


2. Remove the four mounting bolts from the steering wheel side and remove the airbag assembly. Two of the four bolts are shown in the illustration. The other two are on the opposite side. In the illustration the steering wheel is removed.

3. Disconnect the airbag assembly connector.

The airbag is installed in the reverse order of removal.
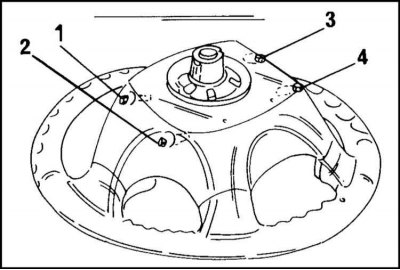
1. Tighten the bolts to a torque of 8 Nm. First tighten the two bolts on one side, then the two…


1. Tighten the bolts to a torque of 8 Nm. First tighten the two bolts on one side, then the two bolts on the other, i.e. follow the sequence as shown in the illustration.

Removal and installation the contact unit


1. Disconnect the ground cable from the battery and wait one minute.

2. Remove the airbag assembly as described above.

3. Remove the steering wheel as described above.
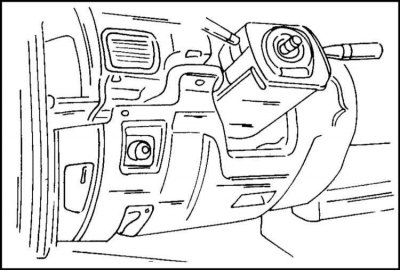


4. Remove the six bolts and remove the lower instrument panel cover shown in the illustration.


4. Remove the six bolts and remove the lower instrument panel cover shown in the illustration.

5. Remove the six bolts and remove the steering column trim cover.

6. Disconnect the plug connection of the combination switch and the contact unit.

7. Remove the four bolts and remove the contact assembly from the steering column.

8. When installing, set the contact unit exactly to the middle position. To do this, turn the coil a full turn clockwise and then 2.5 turns counterclockwise so that the two markings match. When installing, make sure the steering is in the center position.

9. Other work is carried out in the reverse order of removal. Installation of the steering wheel is described in a separate subsection.
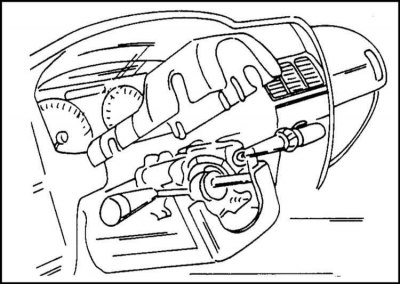
10. Install the steering wheel trim cover parts as shown and secure them with six bolts.


10. Install the steering wheel trim cover parts as shown and secure them with six bolts.

11. Finally, connect the battery. There should be no one in the car at this time.


This article is available at russian, bulgarian, belarusian, ukrainian, serbian, croatian, romanian, polish, slovak, hungarian
Checking the article: Meshcheryakov Damir

Share information:

Previous articles
Opel Frontera A: Steering
Next articles

Replacing the V-belt of the power steering pump drive
Removal and installation the power steering pump
Removal and installation the steering gear
Steering gear — general information
Disassembly and assembly of the steering column
Replacing the steering lock and steering column bearing
Steering wheel adjustment
Adjusting the steering wheel free play
Removal air from the hydraulic system


See similar ones from other Opel car manuals:
▶ Removal and installation the driver's front airbag module Opel Astra H (2004-2009)
▶ Safety precautions when handling the emergency seat belt… Opel Corsa B (1993-2000)
▶ Centering the steering airbag contact disc Opel Insignia A (2008-2017)
▶ Elements of the airbag system Opel Omega B (1993-1999)
▶ Airbag control unit — removal and installation Opel Vectra A (1988-1995, petrol)
Link to this page in different formats

Visitor comments


No comments yet


How much will 22 + 23 =


Vivaro A (2001-2014) 
  • General information
  • User manual
  • Power unit
  • Petrol engine F4R
  • Diesel engine F9Q
  • Diesel engine G9U
  • Transmission
  • Clutch and drive shafts
  • Manual gearbox
  • Chassis
  • Front suspension
  • Rear suspension
  • Brake system
  • Body
  • Exterior
  • Interior
  • Electrical equipment
  • Heating and ventilation
  • Air conditioner
  • Equipment and devices
  • Electrical diagrams
Ascona C (1981-1988) 
  • General information
  • Maintenance
  • Power unit
  • Gasoline engines
  • Diesel engines
  • Cooling system
  • Fuel and exhaust system
  • Contact ignition system
  • Contactless ignition system
  • Transmission
  • Clutch
  • Mechanical gearbox
  • Automatic gearbox
  • Drive shafts
  • Chassis
  • Steering
  • Brake system
  • Car suspension
  • Body
  • Exterior
  • Interior
  • Doors and windows
  • Electrical equipment
  • Equipment and devices
  • Power devices
  • Electrical circuits
Frontera B (1998-2004) 
  • General information
  • User manual
  • Maintenance
  • Power unit
  • Petrol engines 2.2 l
  • Petrol engines 3.2 l
  • Diesel engines 2.2 l
  • Cooling system
  • Fuel system (petrol)
  • Fuel system (diesel)
  • Ignition system
  • Transmission
  • Clutch
  • Manual gearbox MUA5C
  • Automatic gearbox 4L30E
  • Chassis
  • Suspension and axles
  • Steering
  • Brake system
  • Body
  • Exterior
  • Interior
  • Doors, locks and windows
  • Heating and air conditioning
  • Electrical equipment
  • Power devices
  • Equipment and devices
  • Lighting and signaling
  • Electrical diagrams
Frontera A (1991-1998, petrol) 
  • General information
  • Introduction to guide
  • User manual
  • Maintenance
  • Power unit
  • Engine repair
  • Lubrication system
  • Cooling system
  • Power and exhaust system
  • Engine electrics
  • Transmission
  • Clutch
  • Mechanical gearbox
  • Cardan shafts
  • Chassis
  • Brake system
  • Front suspension
  • Rear suspension
  • Steering
  • Body
  • Repair and care
  • Electrical equipment
  • Equipment and devices
  • Electrical circuits
OpelBook.ru © 2017–2026 · Mobile version · · Sitemap: EN BG BY UA RS HR RO PL SK HU · Feedback · Site search
Astra F, petrol · Astra G, petrol · Astra G · Astra H · Astra J, petrol · Corsa B · Corsa C, petrol · Corsa C · Insignia A · Kadett D · Kadett E · Omega A · Omega B · Omega B2 · Vectra A, petrol · Vectra A · Vectra B, petrol · Vectra B · Vectra C · Zafira A, petrol · Frontera A, petrol · Frontera B · Ascona C · Vivaro A ·
We want your visit to be comfortable 🤝! We use cookies 🍪 to make that happen.