
Execution sequence
1. We prepare the car for work (see «Preparing the car for maintenance and repair»).
Comment. For the convenience of working on the Zafira model, it is necessary to remove the ventilation grill and the top panel of the motor shield (see «Front wiper drive Zafira - check and replace»).
2. Drain the oil (see «Lubrication system - oil and oil filter change») and coolant (see «Coolant - replacement»).
3. Remove the air inlet (see «Throttle assembly - removal, gasket replacement and installation»).
4. Disconnect the brake booster vacuum tube from the receiver (see «Inlet receiver and pipeline of 1.4 and 1.6 DOHC engines - gasket replacement»).
5. We remove the exhaust manifold from the cylinder head (see «Exhaust manifold - gasket replacement»),
6. Disconnect the fuel line from the fuel rail (see «Nozzles - check and replacement»).
7. Disconnect the wiring harness pads from the coolant temperature sensor (see «Coolant temperature sensor - check and replace»), from the adsorber purge valve (see «Canister purge valve - check and replace»), from the camshaft position sensor (see «Camshaft position sensor - replacement»), from oxygen concentration sensors (see «Oxygen Sensors - Replacement»), from the absolute pressure sensor in the intake manifold (see «Absolute pressure sensor in the intake manifold of engines 1.4 and 1.6 DOHC - replacement»), from the exhaust gas recirculation valve (see «EGR valve - replacement») and from the throttle assembly (see «Throttle assembly - removal, gasket replacement and installation»),
8. On vehicles with a throttle cable drive, disconnect the cable from the throttle assembly (see «Throttle assembly - removal, gasket replacement and installation»).
9. Disconnect the holder of the upper wiring harness (crankcase ventilation hose removed).

10. Disconnect the wiring harness block from the crankshaft position sensor (see «Crankshaft sensor - replacement»),
11. Disconnect the wiring harness block from the ignition module (see «Ignition module - check and replace»),
12. Using the TORX E12 key, we unscrew the wire fastening bolt «masses» ECU.
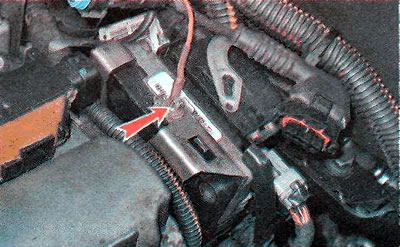
13. Remove the computer (see «Electronic control unit for engines 1.4 and 1.6 DOHC - replacement»).
14. Using the TORX E12 key, we unscrew the bolt securing the negative wire of the engine.
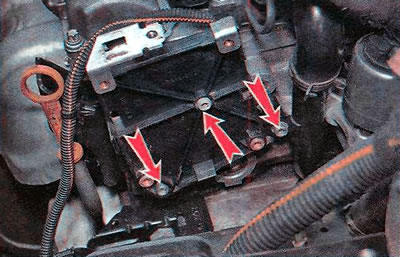
15. Using the TORX T35 key, unscrew the three bolts securing the ECU bracket and remove it.
16. Set aside the upper wiring harness of the cylinder head (see «Nozzles - check and replacement»).
17. Disconnect the hoses from the thermostat (see «Thermostat - check and replacement»).
18. Remove the rear cover of the timing belt drive (see «Camshaft seals - replacement»).
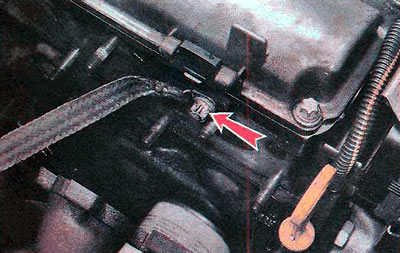
19. Unclench the hose clamp of the cylinder head pipe and remove the hose from the cylinder head pipe.
20. Remove the upper bracket for mounting the generator (see «Alternator - replacement»).
21. Disconnect the fluid supply hose to the air conditioner heater radiator (see «Inlet receiver and pipeline of 1.4 and 1.6 DOHC engines - gasket replacement»).
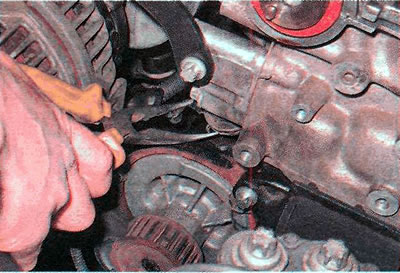
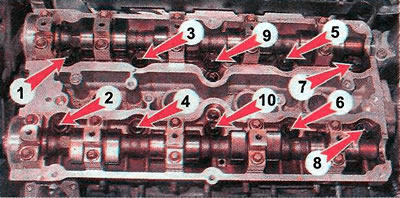
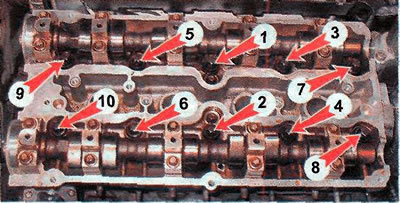
22. Using the TORX E12 key, evenly, half a turn, unscrew the ten cylinder head bolts in the specified order.
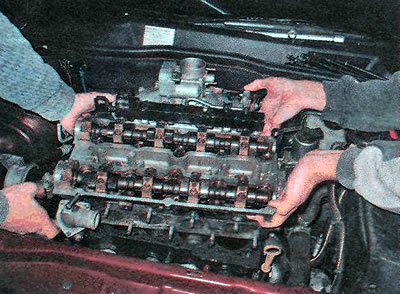
23. Once again, we make sure that all the necessary elements are disconnected from the head of the block.
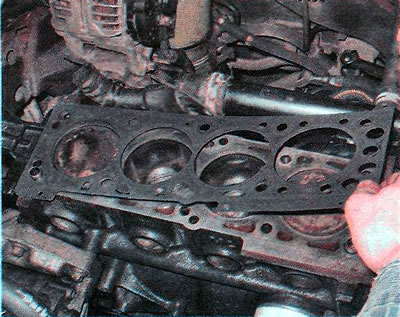
24. Remove the cylinder head assembly with the intake manifold.
25. Remove the cylinder head gasket.
Recommendation. When replacing the head gasket, we strongly recommend checking the cylinder head (see «Cylinder head - check»).
26. We clean the mating surface of the cylinder block and pistons from oil deposits, remove carbon deposits from the bottoms of the pistons with a metal brush.
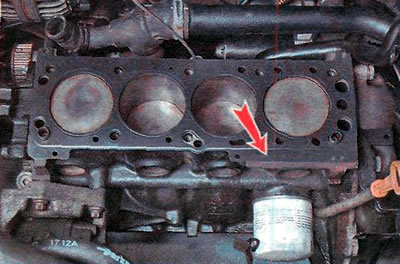
27. Install a new cylinder head gasket, aligning the holes with the block head guides. The inscription OBEN/TOP must be directed upwards.
28. We install the remaining parts in the reverse order, we tighten the bolts with the prescribed torque (see «Reference data») in that order.
Visitor comments