
OpelBook.ru
Cars AvtoVAZ Cars Mitsubishi Cars BMW Cars Mercedes Cars Nissan Cars Toyota Cars Chevrolet
English Русский
Български
Беларускі
Український
Српски
Hrvatski
Română
Polski
Slovenský
Magyar
 |  Sitemap  |  Contacts  |    


Main Astra Corsa Insignia Kadett Omega Vectra Zafira Others Articles
Zafira A (1999-2005, petrol)
  • Main
  • Zafira
  • Zafira A
  • Power unit
  • Engine repair
  • Camshaft Seals — Replacement

Camshaft Seals — Replacement (Opel Zafira A)

            0

The need for replacement should be determined during the inspection of the technical condition of the engine (see "Engine - technical condition check").

Sequence of execution


Note: The operation is shown using the example of replacing a 1.6 DOHC engine. Differences in performing the operation on other engines are indicated in the text.


1. Prepare the car for work (see "Preparing the car for maintenance and repair").

2. Remove the timing belt, timing belt tensioner and guide rollers (see "Timing Belt - Tensioner Replacement", "Timing Belt - Checking Condition, Adjusting Tension and Replacing").

3. Unscrew the camshaft position sensor mounting bolts (see "Camshaft Position Sensor - Replacement") and, without disconnecting the block of the harness of its wires, we move it to the side.

4. Remove the crankshaft gear.

5. Remove the cylinder head cover (see "Cylinder head cover for 1.4 and 1.6 DOHC engines - removal, gasket replacement and installation" or "1.8 DOHC Engine Cylinder Head Cover - Removal, Gasket Replacement and Installation").

6. On 1.4 and 1.6 DOHC engines, disconnect the coolant temperature sensor wiring harness holder from the rear cover.
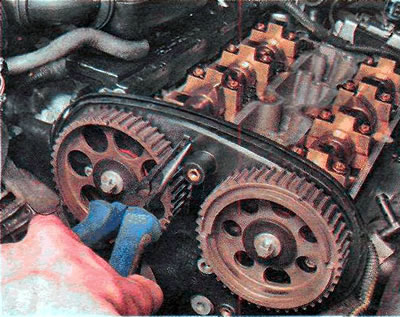
6. On 1.4 and 1.6 DOHC engines, disconnect the coolant temperature sensor wiring harness holder…


7. Holding the camshaft from turning with a 24 mm wrench, use a TORX E14 wrench to unscrew the bolt securing its pulley.
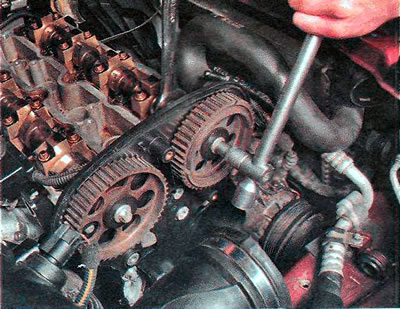


7. Holding the camshaft from turning with a 24 mm wrench, use a TORX E14 wrench to unscrew the bolt…


8. Remove the pulley by sliding it along the camshaft flange.
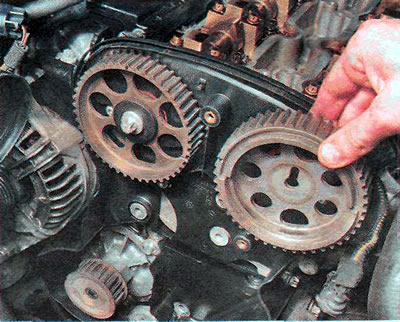
8. Remove the pulley by sliding it along the camshaft flange.


9. Remove the second camshaft pulley in a similar manner.

10. Using a TORX T30 key, unscrew the two upper bolts securing the rear cover.
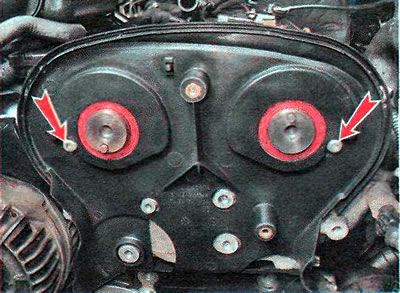
10. Using a TORX T30 key, unscrew the two upper bolts securing the rear cover.


Material taken from an internet portal [www.OPELBOOK.ru]

11. Remove the crankshaft pulley (see "Front Crankshaft Oil Seal - Replacement").


12. Using the same key, unscrew the two lower bolts securing the rear timing belt cover.
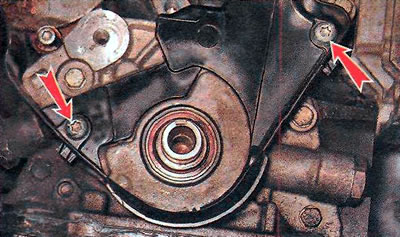
12. Using the same key, unscrew the two lower bolts securing the rear timing belt cover.


13. Remove the rear timing belt cover.
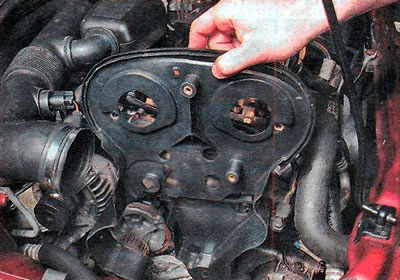
13. Remove the rear timing belt cover.


14. Using a slotted screwdriver, remove the oil seal.
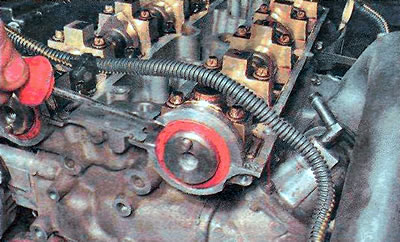
14. Using a slotted screwdriver, remove the oil seal.


15. Lubricate the working edge of the new seal with engine oil and press it in using a 48 mm diameter mandrel.
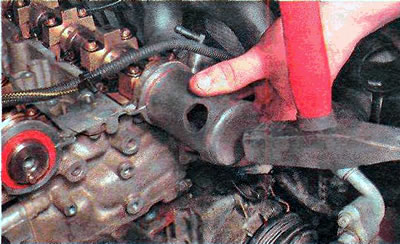
15. Lubricate the working edge of the new seal with engine oil and press it in using a 48 mm…


16. Replace the second camshaft oil seal in a similar manner.

17. Install the remaining parts in reverse order.


This article is available at russian, bulgarian, belarusian, ukrainian, serbian, croatian, romanian, polish, slovak, hungarian
Checking the article: Chernov Alexander

Share information:

Previous articles
Opel Zafira A: Engine repair
Next articles

1.8 DOHC Engine Cylinder Head Cover — Removal, Gasket Replacement and Installation
Cylinder head cover for 1.4 and 1.6 DOHC engines — removal, gasket replacement and installation
Timing Belt — Tensioner Replacement
Timing Belt — Checking Condition, Adjusting Tension and Replacing
Accessory Drive Belt — Tensioner Replacement
Accessory Drive Belt — Checking Condition and Replacing
Hydraulic valve lifters — replacement
Valve stem seals — replacement
Intake manifold and pipeline of 1.4 and 1.6 DOHC engines — replacement of gaskets
1.8 DOHC Engine Intake Manifold — Gasket Replacement
Exhaust manifold — gasket replacement
Front Crankshaft Oil Seal — Replacement


See similar ones from other Opel car manuals:
▶ Camshaft Seals — Replacement Opel Astra F (1991-1998, petrol)
▶ Replacing camshaft seals Opel Corsa C (2000-2006)
▶ Replacing the front camshaft seals of a 16-valve engine Opel Kadett E (1984-1995)
▶ Camshaft Seals — Replacement Opel Omega B2 (1999-2003)
▶ Replacing camshaft seals Opel Frontera B (1998-2004)
Link to this page in different formats

Visitor comments


No comments yet


How much will 50 + 25 =


Zafira A (1999-2005, petrol) 
  • General information
  • Governing bodies
  • User manual
  • Maintenance
  • Power unit
  • Engine repair
  • Control system
  • Cooling system
  • Exhaust system
  • Transmission
  • Clutch
  • Mechanical gearbox
  • Automatic gearbox
  • Front wheel drives
  • Chassis
  • Hubs, wheels and tires
  • Front suspension
  • Rear suspension
  • Steering
  • Brake system
  • Body
  • Maintenance and care
  • Exterior
  • Side doors
  • Climate control
  • Electrical equipment
  • Equipment and devices
  • Power devices
  • Lighting and signaling
  • Windshield wipers and washers
  • Electrical circuits
OpelBook.ru © 2017–2026 · Mobile version · · Sitemap: EN BG BY UA RS HR RO PL SK HU · Feedback · Site search
Astra F, petrol · Astra G, petrol · Astra G · Astra H · Astra J, petrol · Corsa B · Corsa C, petrol · Corsa C · Insignia A · Kadett D · Kadett E · Omega A · Omega B · Omega B2 · Vectra A, petrol · Vectra A · Vectra B, petrol · Vectra B · Vectra C · Zafira A, petrol · Frontera A, petrol · Frontera B · Ascona C · Vivaro A ·
We want your visit to be comfortable 🤝! We use cookies 🍪 to make that happen.