
OpelBook.ru
Cars AvtoVAZ Cars Mitsubishi Cars BMW Cars Mercedes Cars Nissan Cars Toyota Cars Chevrolet
English Русский
Български
Беларускі
Український
Српски
Hrvatski
Română
Polski
Slovenský
Magyar
 |  Sitemap  |  Contacts  |    


Main Astra Corsa Insignia Kadett Omega Vectra Zafira Others Articles
Zafira A (1999-2005, petrol)
  • Main
  • Zafira
  • Zafira A
  • Power unit
  • Engine repair
  • Rear Crankshaft Oil Seal — Replacement

Rear Crankshaft Oil Seal — Replacement (Opel Zafira A)

            0

Note. The operation is shown on a car with a manual transmission. On cars with an automatic transmission, the operation is associated with a number of difficulties, certain skills are required, so it is advisable to entrust the work to a specialized service.


The seal must be replaced if there is an oil leak at the joint between the clutch housing and the cylinder block at the bottom of the engine.

Sequence of execution


1. Prepare the car for work (see "Preparing the car for maintenance and repair"),

2. Remove the clutch (see "Clutch - Checking and Replacing"),

3. For ease of installation (if the flywheel is not removed for replacement) we mark the position of the flywheel relative to the crankshaft end.

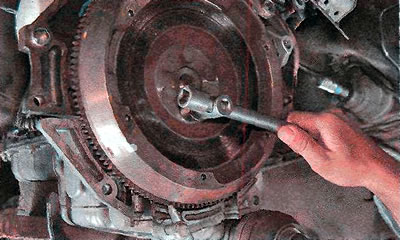
4. Keeping the flywheel from turning (similar to unscrewing the clutch basket mounting bolts), using a 17 mm socket wrench, unscrew the six flywheel mounting bolts.
4. Keeping the flywheel from turning (similar to unscrewing the clutch basket mounting bolts),…


5. Remove the flywheel from the crankshaft.

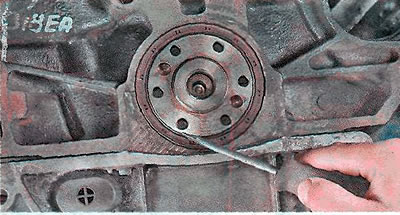
6. Using a thin slotted screwdriver, remove the old seal.
6. Using a thin slotted screwdriver, remove the old seal.


7. Lubricate the working surface of the new seal with clean engine oil.


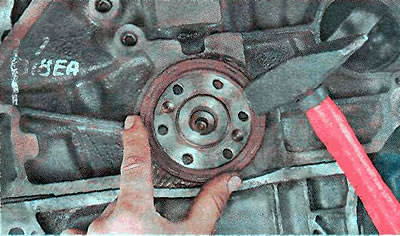
8. Press it evenly until it stops with a hammer, using the old seal as a mandrel.
8. Press it evenly until it stops with a hammer, using the old seal as a mandrel.


9. Install the flywheel on the crankshaft and align the marks made earlier.

Note. The flywheel is installed on the crankshaft in only one position. The holes of the mounting bolts on the crankshaft tailstock and on the flywheel are located asymmetrically. Therefore, when installing the flywheel not according to the marks (for example, when replacing a flywheel), it is necessary to ensure that all mounting holes of the crankshaft and flywheel are aligned.


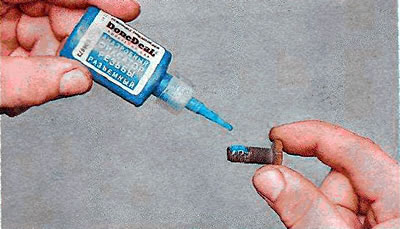
10. Apply thread locking compound to the mounting bolts.
10. Apply thread locking compound to the mounting bolts.


11. Tighten the bolts in three stages: with a torque of 35 Nm, then turn at an angle of 30°, and then at an angle of 15°.

12. Install the remaining parts in reverse order.


This article is available at russian, bulgarian, belarusian, ukrainian, serbian, croatian, romanian, polish, slovak, hungarian
Checking the article: Chernov Alexander

Share information:

Previous articles
Opel Zafira A: Engine repair
Next articles

Front Crankshaft Oil Seal — Replacement
Exhaust manifold — gasket replacement
1.8 DOHC Engine Intake Manifold — Gasket Replacement
Intake manifold and pipeline of 1.4 and 1.6 DOHC engines — replacement of gaskets
Valve stem seals — replacement
Hydraulic valve lifters — replacement
Engine oil pan — removal and installation
Oil pump — removal, inspection and installation
Cylinder head of 1.4 and 1.6 DOHC engines — gasket replacement
1.8 DOHC Engine Cylinder Head Gasket Replacement
Cylinder head — check
Valves — lapping


See similar ones from other Opel car manuals:
▶ Replacing the rear crankshaft oil seal Opel Corsa C (2000-2006, petrol)
▶ Rear Crankshaft Oil Seal — Removal and Installation Opel Omega B2 (1999-2003)
▶ Rear Crankshaft Oil Seal — Replacement Opel Vectra A (1988-1995, petrol)
▶ Rear crankshaft oil seal (flywheel side) — replacement Opel Ascona C (1981-1988)
▶ Removal and installation the front crankshaft oil seal Opel Kadett D (1979-1984)
Link to this page in different formats

Visitor comments


No comments yet


How much will 31 + 47 =


Zafira A (1999-2005, petrol) 
  • General information
  • Governing bodies
  • User manual
  • Maintenance
  • Power unit
  • Engine repair
  • Control system
  • Cooling system
  • Exhaust system
  • Transmission
  • Clutch
  • Mechanical gearbox
  • Automatic gearbox
  • Front wheel drives
  • Chassis
  • Hubs, wheels and tires
  • Front suspension
  • Rear suspension
  • Steering
  • Brake system
  • Body
  • Maintenance and care
  • Exterior
  • Side doors
  • Climate control
  • Electrical equipment
  • Equipment and devices
  • Power devices
  • Lighting and signaling
  • Windshield wipers and washers
  • Electrical circuits
OpelBook.ru © 2017–2026 · Mobile version · · Sitemap: EN BG BY UA RS HR RO PL SK HU · Feedback · Site search
Astra F, petrol · Astra G, petrol · Astra G · Astra H · Astra J, petrol · Corsa B · Corsa C, petrol · Corsa C · Insignia A · Kadett D · Kadett E · Omega A · Omega B · Omega B2 · Vectra A, petrol · Vectra A · Vectra B, petrol · Vectra B · Vectra C · Zafira A, petrol · Frontera A, petrol · Frontera B · Ascona C · Vivaro A ·
We want your visit to be comfortable 🤝! We use cookies 🍪 to make that happen.