
OpelBook.ru
Cars AvtoVAZ Cars Mitsubishi Cars BMW Cars Mercedes Cars Nissan Cars Toyota Cars Chevrolet
English Русский
Български
Беларускі
Український
Српски
Hrvatski
Română
Polski
Slovenský
Magyar
 |  Sitemap  |  Contacts  |    


Main Astra Corsa Insignia Kadett Omega Vectra Zafira Others Articles
Zafira A (1999-2005, petrol)
  • Main
  • Zafira
  • Zafira A
  • Transmission
  • Clutch
  • Clutch — Checking and Replacing

Clutch — Checking and Replacing (Opel Zafira A)

            0

Performing this operation requires a lot of effort and time, so the need to perform this operation should be determined during the inspection of the technical condition of the clutch (see "Clutch - checking technical condition").

Recommendation. When replacing the driven clutch disc, it is advisable to replace the pressure plate (basket) as well, even if there are no noticeable signs of wear on its working surface. The fact is that during operation, the working surface of the pressure plate wears out and the rigidity of the diaphragm spring decreases.


To perform the work, you will need a mandrel for centering the driven clutch disc (see "Tools, accessories and operating materials").

Sequence of execution


1. Prepare the car for work (see "Preparing the car for maintenance and repair").

2. Remove the gearbox (see "Gearbox - removal and installation").

3. The presence of deep grooves on the ends of the central spring petals is the first sign that the clutch needs to be replaced.
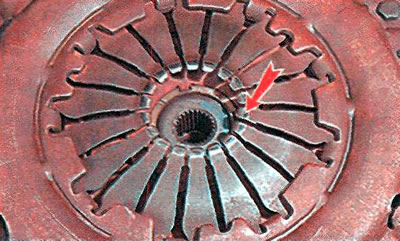
3. The presence of deep grooves on the ends of the central spring petals is the first sign that the…


4. If the clutch is not removed for replacement, mark the position of the basket relative to the flywheel.
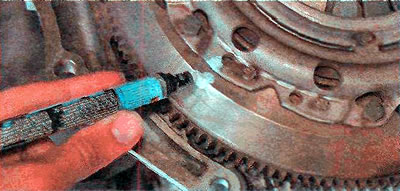
4. If the clutch is not removed for replacement, mark the position of the basket relative to the…


5. Screw in one of the gearbox mounting bolts to the engine and, holding the flywheel from turning with a mounting blade or a wide slotted screwdriver, an 11 mm socket or open-end wrench...
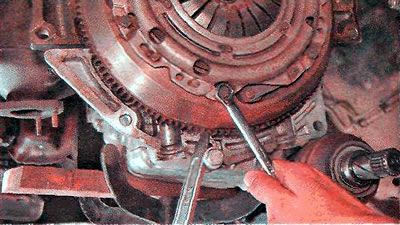


5. Screw in one of the gearbox mounting bolts to the engine and, holding the flywheel from turning…


...unscrew the six bolts securing the basket to the flywheel.
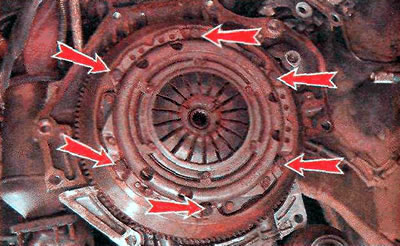
...unscrew the six bolts securing the basket to the flywheel.


6. Remove the basket and driven disk.

7. Sunken rivets of the friction linings of the driven disk by less than 0.3 mm relative to the disk surface is the second sign that the clutch needs to be replaced.
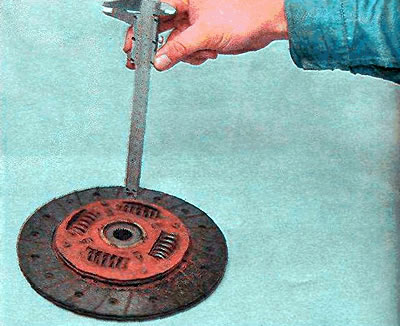
7. Sunken rivets of the friction linings of the driven disk by less than 0.3 mm relative to the…


During operation, the driven disk linings wear out. If the driven clutch disk is not replaced in a timely manner, the metal rivets securing the friction linings may touch the working surfaces of the pressure plate and flywheel (if, as a result of wear, the rivets are recessed less than the permissible value, see above), leaving furrows on them.


Having discovered such grooves, it is necessary to replace the basket together with the driven disk. And if deep grooves remain on the flywheel surface, then the flywheel will have to be replaced as well (see "Rear Crankshaft Oil Seal - Replacement"). Otherwise, jerking and twitching of the car is possible even when the clutch is smoothly engaged.

8. Loose, cracked torsional vibration damper springs (the reason for jerking and rattling even when the car starts moving smoothly) — the third sign that the clutch needs to be replaced.
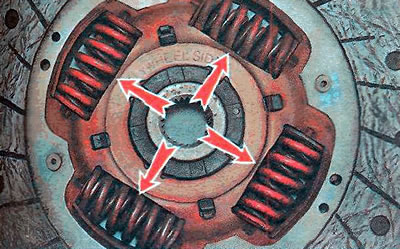
8. Loose, cracked torsional vibration damper springs (the reason for jerking and rattling even when…


9. The amount of wear on the clutch pressure plate is more than 0.2 mm - the fourth sign that the clutch needs to be replaced.
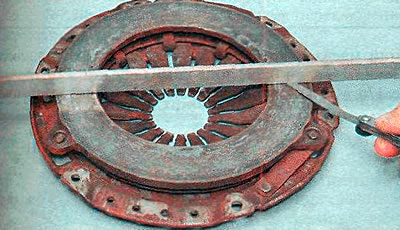
9. The amount of wear on the clutch pressure plate is more than 0.2 mm - the fourth sign that the…


10. Clean the flywheel surface from wear products and degrease its surface.


11. Check the clutch release slave cylinder (see "Clutch slave cylinder - check and replacement").

Note: In addition to the universal mandrel for centering the clutch driven disc relative to the clutch basket (see "Tools, accessories and operating materials") you can use a mandrel to center the driven clutch disc relative to the flywheel.

Note: In addition to the universal mandrel for centering the clutch driven disc relative to the…


The following is the sequence of work when using this mandrel. When using a universal mandrel to center the driven disk relative to the clutch basket, install the clutch according to the instructions attached to the mandrel.
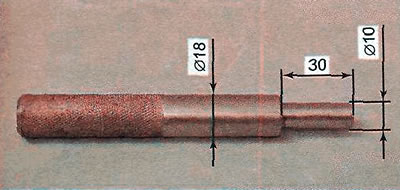

12. Place the driven clutch disc on the mandrel so that when installing the disc on the flywheel, the Getriebeseite inscription on the driven disc is on the gearbox side.
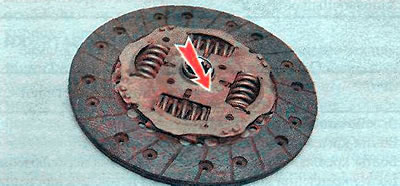
12. Place the driven clutch disc on the mandrel so that when installing the disc on the flywheel,…


13. Insert the centering mandrel together with the driven clutch disc into the central hole of the flywheel.
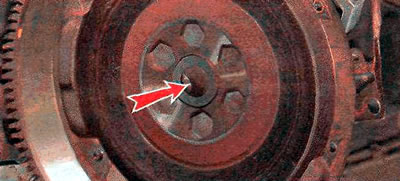


13. Insert the centering mandrel together with the driven clutch disc into the central hole of the…


14. Install the clutch basket on the flywheel and tighten its mounting bolts step by step to a torque of 15 Nm. If necessary, hold the flywheel from turning with a mounting blade or a wide slotted screwdriver (see above).

15. Remove the centering mandrel.
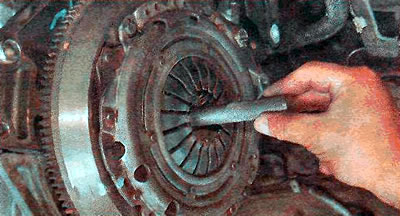
15. Remove the centering mandrel.


16. Install the remaining parts in reverse order.

Warning! When installing the gearbox, do not rest the end of the input shaft on the petals of the clutch basket spring. This may cause the clutch to break.


This article is available at russian, bulgarian, belarusian, ukrainian, serbian, croatian, romanian, polish, slovak, hungarian
Checking the article: Chernov Alexander

Share information:

Previous articles
Opel Zafira A: Clutch
Next articles

Clutch slave cylinder — check and replacement
Clutch Master Cylinder — Replacement
Clutch release hydraulic drive — bleeding
Clutch — checking technical condition
Clutch — design description
Clutch — reference data


See similar ones from other Opel car manuals:
▶ Checking the condition and replacing the auxiliary drive… Opel Astra G (1998-2004)
▶ Checking the condition and replacing the hoses located in… Opel Corsa B (1993-2000)
▶ Replacing the clutch pedal position sensor Opel Insignia A (2008-2017)
▶ Checking, adjusting and replacing the throttle position… Opel Kadett D (1979-1984)
▶ Rear Brake Pads — Checking and Replacing Opel Omega B2 (1999-2003)
Link to this page in different formats

Visitor comments


No comments yet


How much will 41 + 23 =


Zafira A (1999-2005, petrol) 
  • General information
  • Governing bodies
  • User manual
  • Maintenance
  • Power unit
  • Engine repair
  • Control system
  • Cooling system
  • Exhaust system
  • Transmission
  • Clutch
  • Mechanical gearbox
  • Automatic gearbox
  • Front wheel drives
  • Chassis
  • Hubs, wheels and tires
  • Front suspension
  • Rear suspension
  • Steering
  • Brake system
  • Body
  • Maintenance and care
  • Exterior
  • Side doors
  • Climate control
  • Electrical equipment
  • Equipment and devices
  • Power devices
  • Lighting and signaling
  • Windshield wipers and washers
  • Electrical circuits
OpelBook.ru © 2017–2026 · Mobile version · · Sitemap: EN BG BY UA RS HR RO PL SK HU · Feedback · Site search
Astra F, petrol · Astra G, petrol · Astra G · Astra H · Astra J, petrol · Corsa B · Corsa C, petrol · Corsa C · Insignia A · Kadett D · Kadett E · Omega A · Omega B · Omega B2 · Vectra A, petrol · Vectra A · Vectra B, petrol · Vectra B · Vectra C · Zafira A, petrol · Frontera A, petrol · Frontera B · Ascona C · Vivaro A ·
We want your visit to be comfortable 🤝! We use cookies 🍪 to make that happen.