
Engines Z16XE/Z18XE
2. Remove the toothed belt tensioner and toothed belt guide roller (see Section 8).
3. Remove the oil pan, remove the 3 mounting bolts and remove the oil pickup.
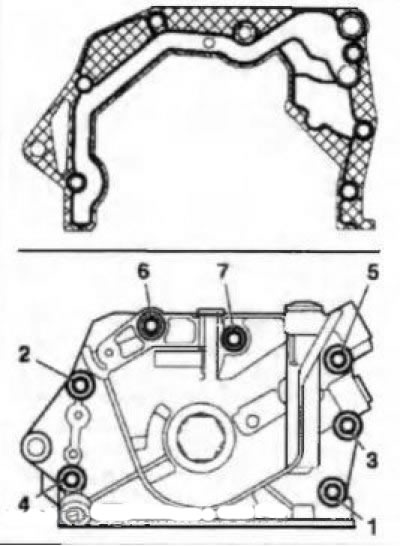
4. Remove the gears and toothed belt drive wheel, unscrew the fixing bolts and remove the rear timing cover (see illustration).
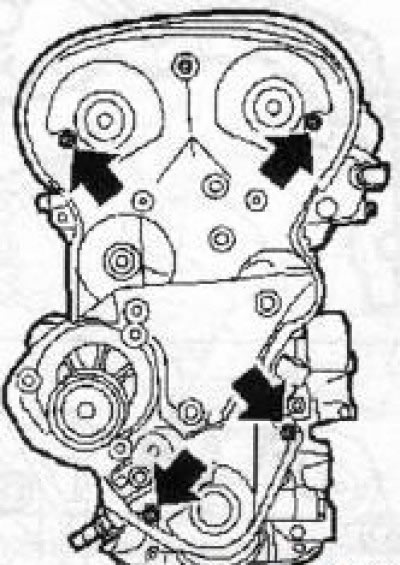
13.4 Bolts (indicated by arrows) rear timing cover mounting (engines Z16XE/Z18XE)
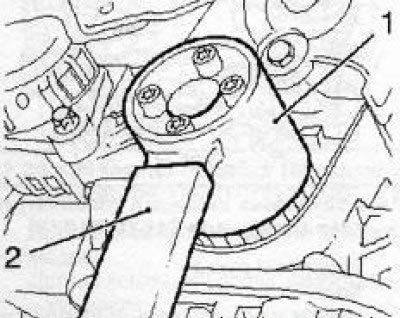
5. Disconnect the oil pressure sensor wiring connector, remove the 7 mounting bolts and remove the oil pump (see illustration). Using a suitable tool, carefully remove the crankshaft front oil seal.
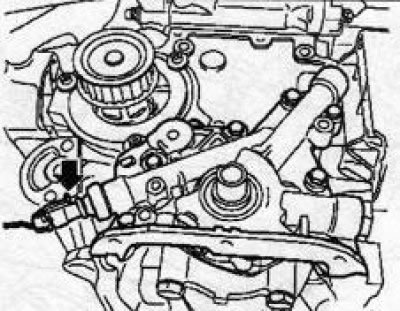
13.5 Oil pump (the arrow shows the oil pressure sensor)
6. Before installing the oil pump, clean all mating surfaces of sealant residue and pre-thread all holes.
7. Lubricate the surfaces of the new crankshaft oil seal with silicone grease (white color) fill it into the seat and press it in using a special tool (see illustration) on the crankshaft.

13.7 Fitting the crankshaft oil seal (engines Z16XE/Z18XE): 1. Protective sleeve; 2. Bolt; 3. Washer or pulley of multirib belt; 4. Adaptation KM-417
8. Installation of other removed components is made in an order, the return to an order of their removal.
Z22YH/Z22SE/Z20NET engines
9. Disconnect the wire from the negative terminal of the battery, remove the engine cover, and the air cleaner.
10. Depressurize the fuel supply system, loosen the retaining nut and disconnect the fuel supply line.
11. Using the KM tool796-A Disconnect the fuel tank vent hose.
12. Remove the right front wheel and multirib belt.
13. Turn out 3 bolts and remove forward section of system of release of the fulfilled gases.
14. Remove the rear engine mount, loosen the nut and remove the front engine mount axle bolt.
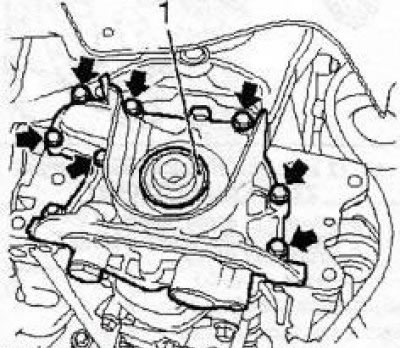
15. Hang out the power unit by means of the lifting device and remove the right support of the engine.
16. Raise the engine with a lifting device, unscrew the 3 bolts of the right support bracket to the engine block, remove them and remove the bracket.
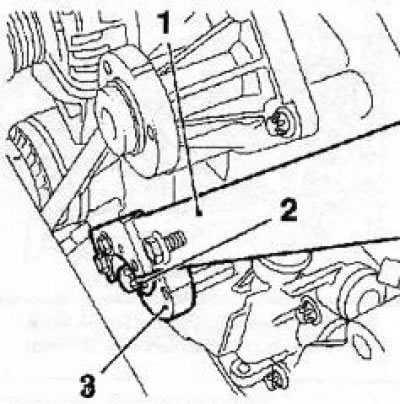
17. Turn out a fixing bolt and remove the multirib belt tensioner.
18. Turn out 4 top bolts (see illustration 8.84) fastening the timing cover, lower the engine slightly and remove the bolts.
19. Drain the oil from the engine crankcase, unscrew the fixing bolt and remove the crankshaft pulley.
20. Remove 7 bolts and remove the timing cover.
Note: Bolts are installed with washers.
21. Using a suitable tool, remove the crankshaft front oil seal. Be careful not to damage the seating surface.
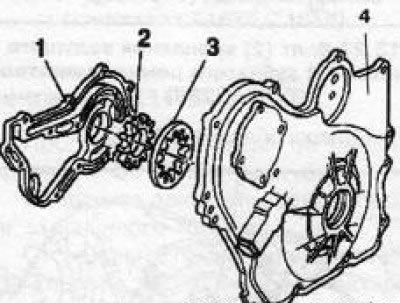
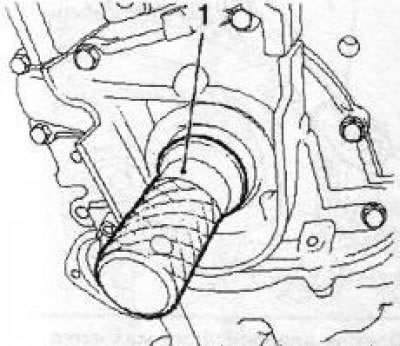
13.22 Oil pump for Z22YH/Z22SE/Z20NET engines: 1. Oil pump cover; 2. Inner rotor; 3. Outer rotor; 4. Timing cover
22. Turn out 15 fixing bolts and uncover the oil pump. Then remove the oil pump rotors (see illustration).
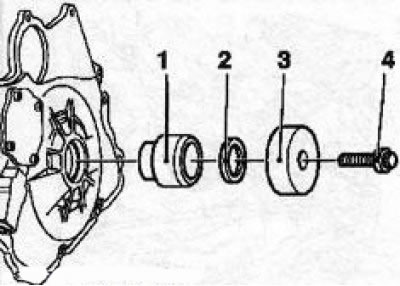
13.23 Fitting a new oil seal (2) crankshaft (motors Z22YH/ Z22SE/Z20NET) 1.3 Adaptation KM-6105: 4. Crankshaft pulley bolt
23. Installation is made in an order, the return to an order of removal. Clean all mating surfaces before installation. Lubricate the surfaces of the new crankshaft oil seal with silicone grease (white color) and with the help of KM devices6105 (see illustrations) press the seal into the seat. Tighten all threaded connections to the required torque.
Z32SE engine
24. Remove the toothed belt and oil pan.
25. Remove the camshaft gears, end plate (see illustration 11.40) and rear timing cover (see illustration 11.41).
26. Loosen the alternator mounting bolts.
27. Using a special tool (see illustration) Remove the timing belt drive wheel.
Attention! When removing the wheel, do not allow the crankshaft to turn!
13.27 Bolt (2) drive wheel mounts (3) toothed belt (Z32SE engine): 1. Adaptation KM-662-S
28. Disconnect the wiring from the sensor (see illustration).
engine oil pressure, remove the 7 oil pump mounting bolts and, using a suitable tool, separate the pump from the engine block.
29. Remove the front crankshaft oil seal. Be careful not to damage the seating surface.
30. Before installing the oil pump, clean all mating surfaces of sealant residue and pre-thread all holes.
31. Apply an even layer of sealant (Green colour) about 0.2 mm on the surface of the new gasket from the side adjacent to the oil pump (see illustration). Sealant should only be applied to the shaded areas. Lubricate the threads of the mounting bolts with a fixing compound (Red), install the pump and tighten the bolts in the order shown.
13.31 The order of tightening the bolts of the oil pump (Z32SE engine)
32. Further installation is carried out in the reverse order of removal. Lubricate the surfaces of the new crankshaft oil seal with silicone grease (white color) and with devices KM-693-A install the gland in the seat. Tighten all threaded connections to the required torque.
Z19DT engines (H)
33. Remove the toothed belt.
34. Remove the oil pan.
13.35 Removing the toothed belt drive wheel (Z19DT engines (H)): 1. Fixture EN-47630; 2. Adaptation KM-956-1
35. Remove the bolt (with a left-hand thread for fastening the drive wheel of the toothed belt, keeping it from turning with the help of special devices (see illustration) and remove the wheel.
13.36 Bolts (indicated by arrows) oil pump mounts (Z19DT engines (H)): 1. Oil pump seal
36. Remove the front oil seal (see resist. illustration) oil pump. Be careful not to damage the seating surface Remove the 7 oil pump mounting bolts and use the special toolEN-46788 threaded pin. Remove the oil pump.
37. Before installing the oil pump, clean all mating surfaces of sealant residues and pre-thread all holes.
38. Lubricate the threads of the five mounting bolts (M6x20) fixing compound (of blue color), install the pump and tighten the bolts in the order shown.
13.39 Fitting the gland with tool EN-46793 (Z19DT engines (H))
39. Further installation is carried out in the reverse order of removal. Lubricate the surfaces of the new crankshaft oil seal with silicone grease (white color) and with devices EN-46793 (see illustration) install the gland in the seat. Tighten all threaded connections to the required torque.
Y20DTH/Y22DTR engines
40. Replacement / repair of the oil pump on models equipped with these engines is carried out only after removing the engine and therefore is not considered in this manual.
Visitor comments