
OpelBook.ru
Cars AvtoVAZ Cars Mitsubishi Cars BMW Cars Mercedes Cars Nissan Cars Toyota Cars Chevrolet
English Русский
Български
Беларускі
Український
Српски
Hrvatski
Română
Polski
Slovenský
Magyar
 |  Sitemap  |  Contacts  |    


Main Astra Corsa Insignia Kadett Omega Vectra Zafira Others Articles
Vectra A (1988-1995, petrol) Vectra A (1988-1995) Vectra B (1995-2002, petrol) Vectra B (1995-2002) Vectra C (2002-2008)
  • Main
  • Vectra
  • Vectra C
  • Power unit
  • Engine repair
  • Measuring engine oil pressure

Measuring engine oil pressure (Opel Vectra C)

            0

Contents: Engines Z16XE/Z18XE ⬇ Z20NET Engine ⬇ Engines Z22SE/Z22YH ⬇ Z32SE Engine ⬇ Engines Y20DTH/Y22DTR/Z19DT ⬇ Y30DT Engine ⬇ Removal and installation the engine…⬇
1. The detailed procedure for measuring the pressure in the lubrication system of Z16XE/Z18XE engines is given below. For other engines, only the differences are considered.

Engines Z16XE/Z18XE


2. Warm up the engine to operating temperature (approx 80°C) temperature.

3. Turn off the engine and apply the parking brake lever.

4. Disconnect the negative battery cable. Raise the vehicle using a lift or place it on stands.

5. Remove the multi-rib belt.

6. Disconnect the oil pressure sensor wiring connector (see illustration).
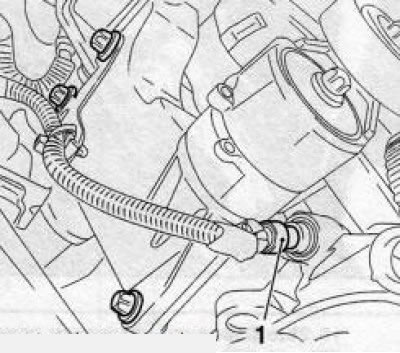
15.6 Oil pressure sensor (1) (engines Z16XE/Z18XE)

15.6 Oil pressure sensor (1) (engines Z16XE/Z18XE)


7. Loosen the generator bracket fastening by unscrewing 3 bolts and a nut, and move the generator back.

8. Place a suitable container underneath to collect the oil, unscrew the pressure sensor and install a pressure gauge in its place.

9. Reinstall the alternator and multi-ribbed belt, tighten the fasteners to the required torque. Lower the vehicle and connect the battery.


10. Start the engine and let it idle.

11. Check the oil pressure with the engine running. If the pressure in the system is below the standard, it is necessary to check the lubrication system for leaks, if necessary, replace the oil pump.

12. After completing the check, install the pressure sensor in place with a new sealing gasket and tighten to the required torque.

Z20NET Engine


13. The test procedure is similar to that described for Z16XE/Z18XE engines. There is no need to disconnect the battery, remove the multi-rib belt or move the generator. The engine oil pressure sensor is shown in the accompanying illustration.
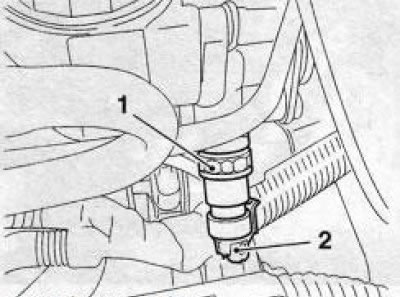
15.13 Connector (2) of the wiring of the sensor (1) of the engine oil pressure (z20NET engine)

15.13 Connector (2) of the wiring of the sensor (1) of the engine oil pressure (z20NET engine)


Engines Z22SE/Z22YH


14. The inspection procedure is similar to that described for Z16XE/Z18XE engines. There is no need to remove the multi-rib belt or move the generator.

(Text copied from a web portal www.opelbook.ru)

Z32SE Engine


15. To access the engine oil pressure sensor, simply remove the multi-rib belt cover.

Engines Y20DTH/Y22DTR/Z19DT


16. To access the oil pressure sensor, it is necessary to remove the engine crankcase protection.


Y30DT Engine


17. To access the engine oil pressure sensor, it is necessary to remove the multi-rib belt and the air conditioning compressor.

Attention! Do not open the air conditioning system lines under any circumstances!


Removal and installation the engine oil level sensor


1. This procedure is not particularly difficult. The sensor (with appropriate equipment) is installed on the oil pan. Before filling this operation, it is necessary to drain the oil, disconnect the electrical wiring connector, as a rule, remove the oil pan and remove the sensor (the mount may vary depending on the engine model).


This article is available at russian, bulgarian, belarusian, ukrainian, serbian, croatian, romanian, polish, slovak, hungarian
Checking the article: Meshcheryakov Damir

Share information:

Previous articles
Opel Vectra C: Engine repair
Next articles

Removal and installation the oil pump
Removal and installation the oil pan
Removal and installation the cylinder head
Removal, installation and inspection of camshafts and valve lifters
Checking and adjusting the timing valves
Removal and installation the timing belt/chain
Removal, checking and installation the flywheel and drive disk
Replacing crankshaft seals
Checking the condition and replacing the powertrain suspension supports
Removal the engine
Engine threaded connections tightening force (Nm)


See similar ones from other Opel car manuals:
▶ Measuring engine oil pressure Opel Corsa C (2000-2006)
▶ Measuring engine oil temperature Opel Astra H (2004-2009)
▶ Replacing the Power Steering Pressure Pipe/Hose… Opel Insignia A (2008-2017)
▶ Measuring engine oil temperature Opel Kadett D (1979-1984)
▶ Checking engine oil pressure Opel Frontera B (1998-2004)
Link to this page in different formats

Visitor comments


No comments yet


How much will 30 + 36 =


Vectra C (2002-2008) 
  • General information
  • User manual
  • Vehicle device
  • Maintenance
  • Troubleshooting
  • Power unit
  • Engine repair
  • Cooling system
  • Power and control system
  • Engine electrics
  • Transmission
  • Clutch
  • Car gearbox
  • Drive shafts
  • Chassis
  • Car suspension
  • Steering
  • Brake system
  • Body
  • Exterior
  • Interior
  • Doors, locks and windows
  • Heating and ventilation
  • Electrical equipment
  • Equipment and devices
  • Headlights and lighting
  • Electrical circuits
Vectra B (1995-2002) 
  • General information
  • User manual
  • Weekly checks
  • Maintenance (gasoline)
  • Maintenance (diesel)
  • Troubleshooting
  • Power unit
  • SOHC gasoline engine
  • DOHC petrol engine
  • Diesel engine 1.7 liter
  • Diesel engine 2.0 liters
  • Engine repair
  • Cooling system
  • Fuel system (gasoline)
  • Fuel system (diesel)
  • Charging system
  • Launch system
  • Ignition and preheat
  • Transmission
  • Clutch
  • Mechanical gearbox
  • Automatic gearbox
  • Drive shafts
  • Chassis
  • Brake system
  • Wheel suspension
  • Steering
  • Body
  • Exterior
  • Interior
  • Doors and windows
  • Heating and ventilation
  • Electrical equipment
  • Equipment and devices
  • Electrical circuits
Vectra B (1995-2002, petrol) 
  • General information
  • Maintenance
  • Help with malfunctions
  • Power unit
  • Engine repair
  • Exhaust system
  • Cooling system
  • Fuel system
  • Multec injection system
  • Four point injection
  • Transmission
  • Clutch
  • Gearbox and drive
  • Chassis
  • Wheel suspension
  • Steering
  • Brake system
  • Wheels and tires
  • Body
  • Exterior
  • Interior
  • Electrical equipment
  • Fuses and electronics
  • Power devices
  • Ignition system
  • Lighting and signaling
  • Equipment and devices
  • Heating and ventilation
  • Electrical circuits
Vectra A (1988-1995) 
  • Power unit
  • Engine repair
  • Ignition system
  • Lubrication system
  • Cooling system
  • Injection system
  • Fuel system (carburetor)
  • Fuel system (diesel)
  • Exhaust system
  • Transmission
  • Clutch
  • Car gearbox
  • Chassis
  • Front suspension
  • Rear suspension
  • Steering
  • Brake system
  • Wheels and tires
  • Body
  • Exterior
  • Interior
  • Electrical equipment
  • Electrical circuits
Vectra A (1988-1995, petrol) 
  • General information
  • User manual
  • Maintenance
  • Power unit
  • SOHC engine
  • DOHC engine
  • Cooling and ventilation
  • Fuel system (carburetor)
  • Fuel system (injector)
  • Exhaust converter
  • Transmission
  • Clutch
  • Mechanical gearbox
  • Automatic gearbox
  • Drive shafts
  • Chassis
  • Brake system
  • Car suspension
  • Steering
  • Body
  • Body elements
  • Electrical equipment
  • Power devices
  • Equipment and devices
  • Electrical circuits
OpelBook.ru © 2017–2026 · Mobile version · · Sitemap: EN BG BY UA RS HR RO PL SK HU · Feedback · Site search
Astra F, petrol · Astra G, petrol · Astra G · Astra H · Astra J, petrol · Corsa B · Corsa C, petrol · Corsa C · Insignia A · Kadett D · Kadett E · Omega A · Omega B · Omega B2 · Vectra A, petrol · Vectra A · Vectra B, petrol · Vectra B · Vectra C · Zafira A, petrol · Frontera A, petrol · Frontera B · Ascona C · Vivaro A ·
We want your visit to be comfortable 🤝! We use cookies 🍪 to make that happen.