
Note: If the transmission is being removed for repair, make sure it is the transmission itself that is damaged, not the control system (see "Troubleshooting"). The following procedure is the same as removing/installing the manual transmission shown in Section 7A. Please read the relevant chapter before starting work Section 7A as well as the text below and prepare everything you need.
Removing
1. Disconnect the negative cable from the battery.
2. Drain the transmission fluid (see above).
3. Disconnect the transmission wiring by disconnecting the five connectors from the switches, solenoid units and sensors, then release the wiring from all brackets.
4. Disconnect the shift cable from the shift lever, then either unscrew the cable bracket bolts or release the cable from the bracket. Move the cable away from the transmission and tie it to the body.
5. Remove the transmission breather hose from under the battery bracket by releasing it from all mounting brackets and zip ties.
6. Disconnect the oxygen sensor wiring (where used).
7. Disconnect the speedometer drive cable.
8. Proceeding as described above, disconnect the hoses of the additional transmission fluid cooler (either from the transmission or from the radiator).
9. Support the engine/transmission, remove the front suspension subframe and disconnect the drive shafts, proceeding as described in paragraphs 7-10 Chapter 9 Section 7A (see Sections where appropriate 8 and 10).
10. Turn off three bolts of a cover of a case of transmission, then mark relative position of the hydrotransformer and a driving disk. Place a wrench on the crankshaft pulley/sprocket bolt and turn the crankshaft to expose one of the torque converter bolts. Block the drive disc by inserting a screwdriver or similar tool into the recess between its teeth and remove the bolt. Unscrew the two remaining bolts in the same way.
11. Remove the transmission, proceeding as described in paragraphs 17-21 (except for paragraph 19) Chapter 9. Section 7A.
12. If the torque converter comes out of the transmission (even partially), a significant amount of the liquid contained in the block will pour out. To prevent this, when removing the transmission from the mounting pins and from the engine compartment, hold the torque converter or attach it by bolting a metal strip across the crankcase.
Installation
13. Installation is carried out in the reverse order of removal, paying attention to the following.
- a) If any fluid has been spilled from the torque converter, carefully refill the block. Wipe the transformer bushing to prevent damage to the transmission inlet gland when installing it, and make sure that the transformer is properly seated on the pump shaft.
- b) If the transmission is to be replaced, carefully flush the passages of the auxiliary transmission fluid cooler. Opel recommends using low pressure air for this, but be careful not to deform the radiator.
- c) Carefully inspect all components for cleanliness to avoid the risk of dirt entering the system.
- d) Use a special plug M10x1.25 to clean the threads of the torque converter holes and use new bolts when installing
- e) Inspect the hole threads of the left engine/transmission bracket (Section 7A, Chapter 9, paragraph 22) and use new bolts to assemble.
Tighten all nuts and bolts to the specified torque specifications.
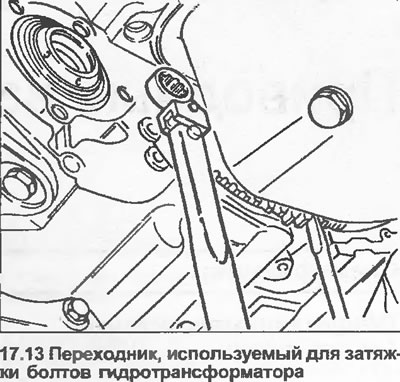
To tighten the bolts securing the torque converter to the drive plate, you will need a special adapter, which can be purchased at parts stores (see illustration).
Finally, adjust the length of the shift cable and fill the transmission with fluid (see above).
Visitor comments