
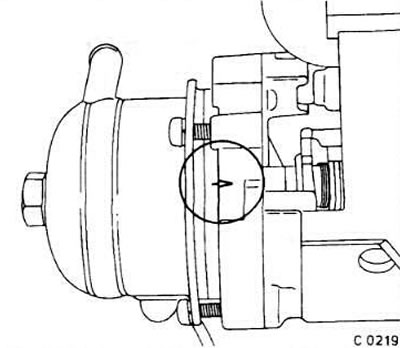
The device is installed correctly if the marks on the cover and body match (see arrow in fig.).
Removing
Disconnect wire "masses" from the battery.
Disconnect the electrical connectors from the starter.
Unscrew the three screws from the oval holes in the device case and remove the cover.
Installation
When installing the starting device, make sure that the heating coil is in place.
Replace the cover. Screw in three screws, aligning the marks on the body and cover. Tighten the screws completely.
Connect connectors.
Connect wire "masses" to the battery.
If the starter turns off too soon (engine stalls during warm up), turn the cover of the device about 5 mm (between body and cover marks).
Remove the air filter, loosen the screws securing the starter cover, turn the cover. If the air damper is to remain closed for a longer time, the cover is turned so that the damper turns in the closing direction (max 5 mm).
Tighten the cover fixing screws.
Check starter. The choke should be vertical after the warm-up phase of the engine.
If the starter is to switch off earlier, the cover must be turned in the opposite direction (max 5 mm).
Examination
The engine must be cold to carry out the test.
Remove the air filter from the carburetor.
The air damper must be closed.
Turn on the ignition.
Check that the electrical contacts are connected correctly. To do this, disconnect the connector from the starting device and turn on the test lamp between the connector and the positive battery terminal. The lamp should be on. If not, replace starter cover.
Start the engine.
Depending on the ambient temperature, the air damper should open after a longer or shorter time. If not, check the bimetal spring or the connection to the starting system relay.
Visitor comments