
OpelBook.ru
Cars AvtoVAZ Cars Mitsubishi Cars BMW Cars Mercedes Cars Nissan Cars Toyota Cars Chevrolet
English Русский
Български
Беларускі
Український
Српски
Hrvatski
Română
Polski
Slovenský
Magyar
 |  Sitemap  |  Contacts  |    


Main Astra Corsa Insignia Kadett Omega Vectra Zafira Others Articles
Frontera A (1991-1998, petrol) Frontera B (1998-2004) Ascona C (1981-1988) Vivaro A (2001-2014)
  • Main
  • Opel
  • Frontera A
  • Power unit
  • Engine electrics
  • Removal and installation the generator

Removal and installation the generator (Opel Frontera A)

            0

For all versions, disconnect the ground cable from the battery. Further, depending on the design:

Engine 2.0 l before 1995
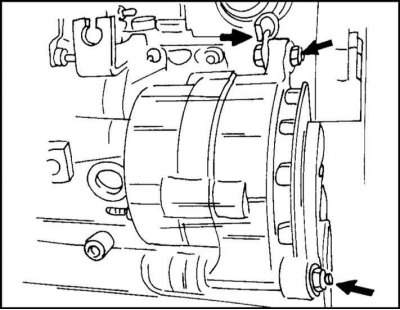


1. The generator mount is shown in the illustration. Disconnect the cables from the back of the…


1. The generator mount is shown in the illustration. Disconnect the cables from the back of the generator.

2. Remove the drive belt as described in Chapter Cooling and heating systems for this engine. This version has a belt tension adjustment device.
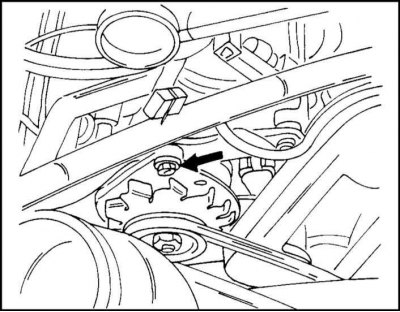
3. Remove the generator mounting bolts from the tension bar and from the lower support (arrows in…


3. Remove the generator mounting bolts from the tension bar and from the lower support (arrows in the illustration).

When installing the generator, tighten the mounting bolts by hand. Put on the V-belt and adjust its tension. After this, tighten the bolt shown in the illustration. and tighten the generator lower mount bolts and nuts.


Connect the cables to the back of the generator. Connect the battery ground cable.

2.0L engine since mid-1995


Some preparatory work needs to be done here to get to the generator.

1. Disconnect the ground cable from the battery.
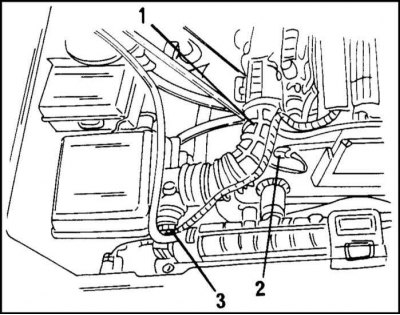
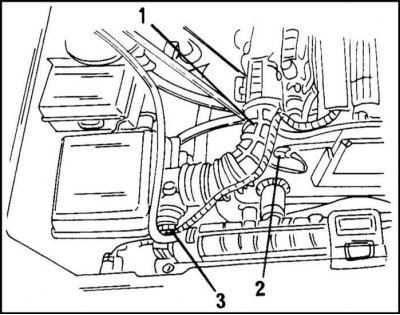
2. Remove the parts shown in the illustration. This is the air intake hose (1) between the throttle…


2. Remove the parts shown in the illustration. This is the air intake hose (1) between the throttle body and the air filter housing. Disconnect the plug connection of the cable (2) from the intake air temperature sensor and (3) the intake air mass meter.
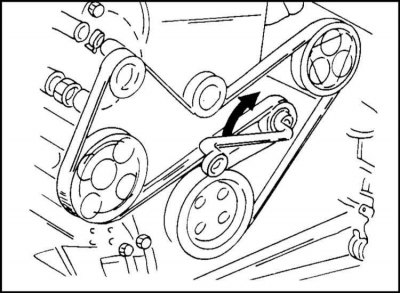
3. Mark the direction of rotation of the belt with paint on the outside and turn the tension roller…


3. Mark the direction of rotation of the belt with paint on the outside and turn the tension roller with a spanner to the right so that the belt can be removed.
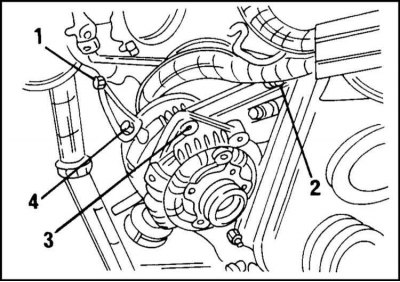
4. Remove the generator as shown in the illustration. To do this, first unscrew the mounting bolts…


4. Remove the generator as shown in the illustration. To do this, first unscrew the mounting bolts (1) and (2), and then the bolts (3) and (4). After this, the lower generator mounting bolt is loosened. Tilt the generator to the side.


5. From the back of the generator, remove the two cable entries, remove the bottom bolt completely and lift the generator upward.

The generator is installed in the reverse order of removal. Tighten the lower terminal (terminal 61) to 4 Nm, tighten the upper terminal (terminal 30) to 8 Nm. Make sure that the cable is positioned correctly.

When securing the generator, maintain the following tightening torques:
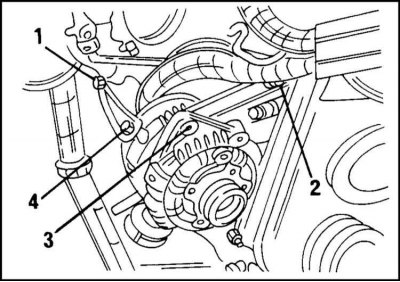
1. Mounting bolts (1) to (4) in the illustration. tighten to 18 Nm.

1. Mounting bolts (1) to (4) in the illustration. tighten to 18 Nm.

2. The lower mounting bolt is tightened to a torque of 35 Nm.


2. The lower mounting bolt is tightened to a torque of 35 Nm.

Fit the V-belt in accordance with the direction of rotation markings and tension it with the roller as described in the relevant section for the engine in question. Finally, reinstall the parts shown in the illustration.


DOHC Engine (volume 2.2 l) since mid-1995
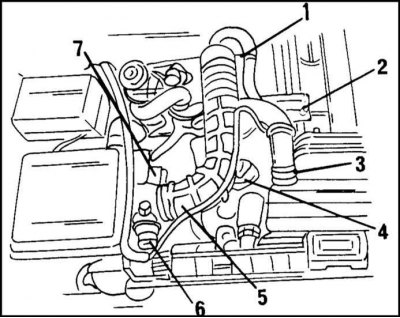


1. Just like for the 2.0L engine, some preliminary preparation is required to provide access to the…


1. Just like for the 2.0L engine, some preliminary preparation is required to provide access to the generator. To do this, disconnect the ones shown in the illustration. hose clamps (1), (2), (3) and (7). Disconnect the plug connections of the cable harness (6) of the intake air temperature sensor, the cable harness of the air mass meter and remove the intake air hose (5) between the throttle body and the air filter housing.
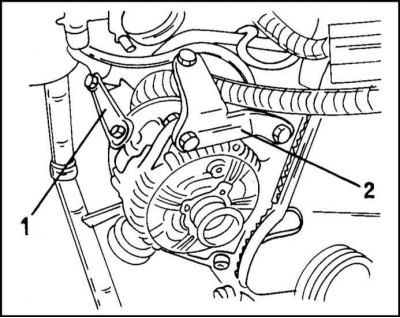
2. Other parts are removed in the same way as the 2.0L engine from mid-1995, including the…


2. Other parts are removed in the same way as the 2.0L engine from mid-1995, including the generator mount (see illustration.).

If you have air conditioning, you will need to disconnect the power steering pump to gain access to the lower generator mounting bolt. The pump hydraulic hoses are not disconnected. Put the pump aside.


The generator is installed according to the description for 2.0 l engines produced since mid-1995.

Adjusting the V-belt tension


Adjustment of the tension of the generator drive V-belt is described in Chapter Cooling and heating systems, if we are talking about a V-belt with a tensioning device (2.4L engine produced until mid-1995).


This article is available at russian, bulgarian, belarusian, ukrainian, serbian, croatian, romanian, polish, slovak, hungarian
Checking the article: Meshcheryakov Damir

Share information:

Previous articles
Opel Frontera A: Engine electrics
Next articles

Safety precautions when working with a generator and regulator
Charging and starting systems — general information
Safety precautions when working with ignition system components
Spark plugs — general description
Checking the ignition timing
Bosch Motronic M1.5 system for 2.0 and 2.4 l engines
Bosch Generator Repair
Starter — removal, installation and repair
Battery — Removal, Installation and Maintenance


See similar ones from other Opel car manuals:
▶ Generator Drive Belt — Removal, Installation and Tensioning Opel Astra F (1991-1998, petrol)
▶ Removal and installation the generator Opel Corsa B (1993-2000)
▶ Generator replacement Opel Insignia A (2008-2017)
▶ Generator Opel Kadett E (1984-1995)
▶ Generator/fan drive belt — replacement and adjustment Opel Omega A (1986-1993)
Link to this page in different formats

Visitor comments


No comments yet


How much will 47 + 36 =


Vivaro A (2001-2014) 
  • General information
  • User manual
  • Power unit
  • Petrol engine F4R
  • Diesel engine F9Q
  • Diesel engine G9U
  • Transmission
  • Clutch and drive shafts
  • Manual gearbox
  • Chassis
  • Front suspension
  • Rear suspension
  • Brake system
  • Body
  • Exterior
  • Interior
  • Electrical equipment
  • Heating and ventilation
  • Air conditioner
  • Equipment and devices
  • Electrical diagrams
Ascona C (1981-1988) 
  • General information
  • Maintenance
  • Power unit
  • Gasoline engines
  • Diesel engines
  • Cooling system
  • Fuel and exhaust system
  • Contact ignition system
  • Contactless ignition system
  • Transmission
  • Clutch
  • Mechanical gearbox
  • Automatic gearbox
  • Drive shafts
  • Chassis
  • Steering
  • Brake system
  • Car suspension
  • Body
  • Exterior
  • Interior
  • Doors and windows
  • Electrical equipment
  • Equipment and devices
  • Power devices
  • Electrical circuits
Frontera B (1998-2004) 
  • General information
  • User manual
  • Maintenance
  • Power unit
  • Petrol engines 2.2 l
  • Petrol engines 3.2 l
  • Diesel engines 2.2 l
  • Cooling system
  • Fuel system (petrol)
  • Fuel system (diesel)
  • Ignition system
  • Transmission
  • Clutch
  • Manual gearbox MUA5C
  • Automatic gearbox 4L30E
  • Chassis
  • Suspension and axles
  • Steering
  • Brake system
  • Body
  • Exterior
  • Interior
  • Doors, locks and windows
  • Heating and air conditioning
  • Electrical equipment
  • Power devices
  • Equipment and devices
  • Lighting and signaling
  • Electrical diagrams
Frontera A (1991-1998, petrol) 
  • General information
  • Introduction to guide
  • User manual
  • Maintenance
  • Power unit
  • Engine repair
  • Lubrication system
  • Cooling system
  • Power and exhaust system
  • Engine electrics
  • Transmission
  • Clutch
  • Mechanical gearbox
  • Cardan shafts
  • Chassis
  • Brake system
  • Front suspension
  • Rear suspension
  • Steering
  • Body
  • Repair and care
  • Electrical equipment
  • Equipment and devices
  • Electrical circuits
OpelBook.ru © 2017–2026 · Mobile version · · Sitemap: EN BG BY UA RS HR RO PL SK HU · Feedback · Site search
Astra F, petrol · Astra G, petrol · Astra G · Astra H · Astra J, petrol · Corsa B · Corsa C, petrol · Corsa C · Insignia A · Kadett D · Kadett E · Omega A · Omega B · Omega B2 · Vectra A, petrol · Vectra A · Vectra B, petrol · Vectra B · Vectra C · Zafira A, petrol · Frontera A, petrol · Frontera B · Ascona C · Vivaro A ·
We want your visit to be comfortable 🤝! We use cookies 🍪 to make that happen.