
Bosch starter assembly diagram
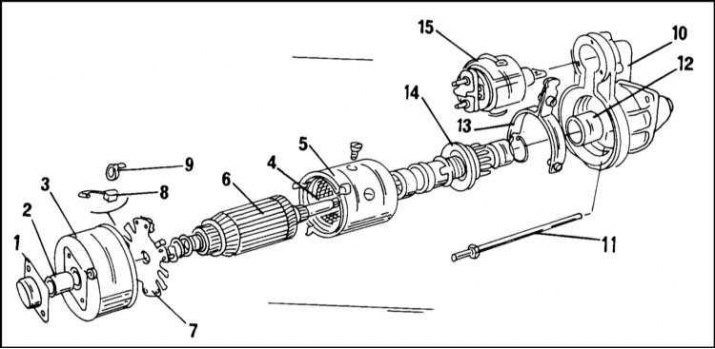
1 - cover; 2 - bushing; 3 - bearing housing; 4 - excitation winding; 5 - body; 6 - anchor; 7 - brush holder plate; 8 - brush holder; 9 - spring; 10 - back cover; 11 - coupling bolt; 12 - bushing; 13 - drive lever; 14 - gear; 15 - traction electromagnet
As mentioned above, the starter has a forced movement of the engine drive gear by means of an electromagnetic traction relay.
On the car, as a rule, a Bosch starter is installed. Can also be fitted with a Delco-Remy starter.
Starter check
Check if the battery is charged and if the battery terminals are free of oxide film. This applies especially to the ground terminal if it is not tightened sufficiently.
To test the starter at full battery voltage, connect the terminals "30" (large terminal) And "50" (the small one next to the big one) cable with a cross section of at least 4.0 mm2. If the starter now works flawlessly, you should check the wires to the starter. If the starter does not turn, it should be removed and checked.
An accurate check is carried out on a test stand or an electrical workshop.
Removal and installation of a starter
Disconnect the ground cable from the battery.
1. Raise and place the front of the vehicle on stands.
2. Before disconnecting the cables from the starter, it is necessary to remember the order of their connection. Disconnect the positive battery cable from the starter terminal and then both cables from terminals 16 and 50. If it interferes, disconnect the bottom steel sheet.
3. Now you can remove the starter. Its mounting may be different for different engine versions. The bolts can be inserted from the engine or gearbox side. You can also use a support bracket.
4. Remove the starter by unrolling it.
The starter is installed in the reverse order of removal. Various tightening torques must be taken into account. Tighten the mounting bolts on the engine side to a torque of 45 Nm, the bolt on the gearbox side to a torque of 75 Nm. starter support (if it exists) tightened with a torque of 25 Nm to the cylinder block and a torque of 7 Nm to the starter.
Starter repair
If the generator check shows that the fault is inside the generator, then it must be taken to a specialized workshop for repair. If you have experience, you can disassemble and assemble the starter yourself in accordance with the illustration.
Starter brushes wear out as a result of long-term operation and can be replaced independently. To do this, open the rear of the starter (remove the small cover, unscrew the bolts and remove the manifold) and remove the brushes.
Visitor comments