
OpelBook.ru
Cars AvtoVAZ Cars Mitsubishi Cars BMW Cars Mercedes Cars Nissan Cars Toyota Cars Chevrolet
English Русский
Български
Беларускі
Український
Српски
Hrvatski
Română
Polski
Slovenský
Magyar
 |  Sitemap  |  Contacts  |    


Main Astra Corsa Insignia Kadett Omega Vectra Zafira Others Articles
Frontera A (1991-1998, petrol) Frontera B (1998-2004) Ascona C (1981-1988) Vivaro A (2001-2014)
  • Main
  • Opel
  • Ascona C
  • Transmission
  • Mechanical gearbox
  • Gearbox type F16 and F16.4 — disassembly and assembly

Gearbox type F16 and F16.4 — disassembly and assembly (Opel Ascona C)

            0

1. The basic operations are similar to those described in the previous sections for F10 type boxes, but if you are going to overhaul the driven shaft, keep in mind that its design is slightly different from the shaft on the F10 box. In particular, some additional details have appeared:
  • a. Radial needle bearing located at the 1st gear pinion.
  • b. Needle roller bearings for gears 1, 2, 3 and 4.
  • c. Half-ring thrust washers between the 2nd and 3rd gears, equipped with a retaining ring.
  • g. 3/4 gear synchronizer retaining ring.
  • d. Composite driven shaft, combined with the main transmission pinion.
  • e. Roller bearing, half-ring thrust washers and washer retaining ring (next to the main gear pinion).

2. Presenter (part of the driven shaft) and the driven gear of the main transmission must always be replaced in pairs.

3. All synchronizer clutches are interchangeable.

4. When assembling the driven shaft, lubricate all parts well with oil and pay attention to the following points. First, you need to install a roller bearing on the shaft so that the end of its inner track, which has a smaller diameter, is adjacent to the drive gear of the main transmission.

5. Install the half-ring thrust washers and secure them with a retaining ring.

6. Install the needle bearing and 4th gear.

7. Install the cone ring of the 4th gear, synchronizer 3/4 gears (preheated in boiling water) and the synchronizer retaining ring.

8. Install the double-row needle bearing, the 3rd gear cone ring, the 3rd gear and the half-ring thrust washers with their retaining ring.


9. Install the needle bearing and the 2nd gear with its cone ring.

10. Heat the 1/2 gear synchronizer in boiling water and install it on the driven shaft so that the groove on its sleeve is on the side of the rear cover of the gearbox. Secure the synchronizer with a new retaining ring.

11. Install the next needle bearing and 1st gear with its cone ring.

12. Install the radial needle bearing so that it is adjacent to the surface of the 1st gear.

13. Install the spacer washer, having first heated it in boiling water. The washer must be placed with the larger diameter side against the axial needle bearing.

14. Install the ball bearing so that the ball retainer faces the end of the shaft. Install a new snap ring.
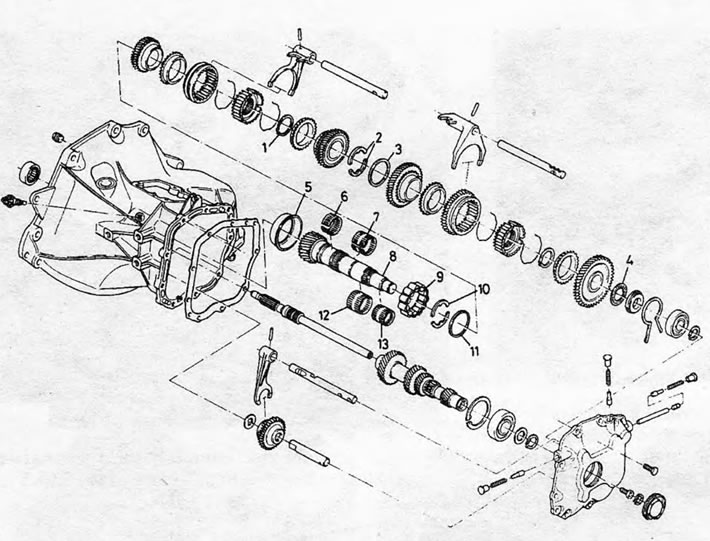
Figure 6.36. F16.4 gearbox disassembled: See explanations. according to Figure 6.19 with the…

Figure 6.36. F16.4 gearbox disassembled: See explanations. according to Figure 6.19 with the difference that the following additional parts have appeared: 1. 3/4 gear synchronizer retaining ring; 2. Half-ring thrust washers; 3. Thrust washers retaining ring; 4. Radial needle bearing; 5. Outer bearing race; 6. Needle bearing of 4th gear pinion; 7. Double-row needle bearing of 3rd gear pinion; 8. Driven shaft with main gear drive pinion; 9. Roller bearing separator; 10. Half-ring thrust washers; 11. Thrust washers retaining ring; 12. Double-row needle bearing of 2nd gear pinion; 13. Double-row needle bearing of 1st gear.


This article is available at russian, bulgarian, belarusian, ukrainian, serbian, croatian, romanian, polish, slovak, hungarian
Checking the article: Kornev Georgy

Share information:

Previous articles
Opel Ascona C: Mechanical gearbox
Next articles

Gearbox type F10.5 — disassembly and assembly
Gearbox type F10.5 — description
Gearbox type F10 and F10.4 — assembly
Synchronizers — overhaul
Driven shaft (type F10 and F 10.4 boxes) — overhaul
Drive shaft (type F10 and F 10.4 boxes) — overhaul
Gearbox type F16.5 — disassembly
Gearbox type F16.5 — assembly
Manual transmission — fault diagnosis


See similar ones from other Opel car manuals:
▶ Gear shift drive device of the F20 type gearbox Opel Kadett E (1984-1995)
▶ Gearbox Oil — Draining and Filling Opel Astra F (1991-1998, petrol)
▶ Easytronic gearbox Opel Corsa C (2000-2006, petrol)
▶ Dial type indicator Opel Insignia A (2008-2017)
▶ Manual gearbox — removal and installation Opel Omega A (1986-1993)
Link to this page in different formats

Visitor comments


No comments yet


How much will 23 + 44 =


Vivaro A (2001-2014) 
  • General information
  • User manual
  • Power unit
  • Petrol engine F4R
  • Diesel engine F9Q
  • Diesel engine G9U
  • Transmission
  • Clutch and drive shafts
  • Manual gearbox
  • Chassis
  • Front suspension
  • Rear suspension
  • Brake system
  • Body
  • Exterior
  • Interior
  • Electrical equipment
  • Heating and ventilation
  • Air conditioner
  • Equipment and devices
  • Electrical diagrams
Ascona C (1981-1988) 
  • General information
  • Maintenance
  • Power unit
  • Gasoline engines
  • Diesel engines
  • Cooling system
  • Fuel and exhaust system
  • Contact ignition system
  • Contactless ignition system
  • Transmission
  • Clutch
  • Mechanical gearbox
  • Automatic gearbox
  • Drive shafts
  • Chassis
  • Steering
  • Brake system
  • Car suspension
  • Body
  • Exterior
  • Interior
  • Doors and windows
  • Electrical equipment
  • Equipment and devices
  • Power devices
  • Electrical circuits
Frontera B (1998-2004) 
  • General information
  • User manual
  • Maintenance
  • Power unit
  • Petrol engines 2.2 l
  • Petrol engines 3.2 l
  • Diesel engines 2.2 l
  • Cooling system
  • Fuel system (petrol)
  • Fuel system (diesel)
  • Ignition system
  • Transmission
  • Clutch
  • Manual gearbox MUA5C
  • Automatic gearbox 4L30E
  • Chassis
  • Suspension and axles
  • Steering
  • Brake system
  • Body
  • Exterior
  • Interior
  • Doors, locks and windows
  • Heating and air conditioning
  • Electrical equipment
  • Power devices
  • Equipment and devices
  • Lighting and signaling
  • Electrical diagrams
Frontera A (1991-1998, petrol) 
  • General information
  • Introduction to guide
  • User manual
  • Maintenance
  • Power unit
  • Engine repair
  • Lubrication system
  • Cooling system
  • Power and exhaust system
  • Engine electrics
  • Transmission
  • Clutch
  • Mechanical gearbox
  • Cardan shafts
  • Chassis
  • Brake system
  • Front suspension
  • Rear suspension
  • Steering
  • Body
  • Repair and care
  • Electrical equipment
  • Equipment and devices
  • Electrical circuits
OpelBook.ru © 2017–2026 · Mobile version · · Sitemap: EN BG BY UA RS HR RO PL SK HU · Feedback · Site search
Astra F, petrol · Astra G, petrol · Astra G · Astra H · Astra J, petrol · Corsa B · Corsa C, petrol · Corsa C · Insignia A · Kadett D · Kadett E · Omega A · Omega B · Omega B2 · Vectra A, petrol · Vectra A · Vectra B, petrol · Vectra B · Vectra C · Zafira A, petrol · Frontera A, petrol · Frontera B · Ascona C · Vivaro A ·
We want your visit to be comfortable 🤝! We use cookies 🍪 to make that happen.