


Contents: Carburetor with automatic choke ⬇ Carburetor with manual choke ⬇ Carburetors with manual and…⬇
Carburetor with automatic choke
Fast idle
1. Check that the idle speed meets the requirements (see previous section).
2. Remove the air cleaner and plug the end of the vacuum hose that normally connects to the vacuum capsule in the air cleaner.
3. Turn off the ignition.
4. Open the throttle valve slightly so that the fast idle speed screw can be adjusted to the second highest cam ledge (see figure 3.10).
5. Without pressing the gas pedal, start the engine. Fast idle speed should be within specified limits. If this is not the case, adjust them using the fast idle speed screw (see photo 10.1A).
Adjusting the lowering (opening) of the air damper (gap A)
b. To adjust this gap, you will need a vacuum pump. Adequate vacuum can be obtained by using a modified hand pump or by connecting a hose or plastic tube between the carburetor vacuum block and the intake manifold of another vehicle whose engine is to be run.
7. Remove the air cleaner.
8. Set the fast idle screw to the upper cam shoulder. Check that the air damper is completely closed. If it has not closed yet, secure it in the closed position using a rubber ring (see figure 3.11).
9. Apply vacuum to the air damper vacuum block (see paragraph 6).
10. Measure the gap "A" between the edge of the air damper and the carburetor wall (see figure 3.12) (measurements are taken from the working side of the valve). The gap must correspond to the specified one.
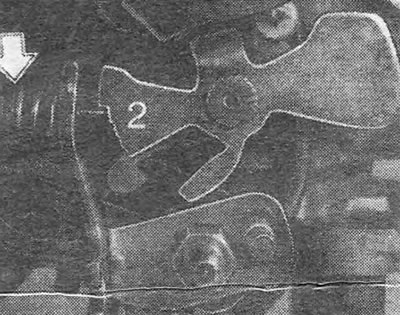
Figure 3.10. Fast idle speed screw (shown by arrow) rests on the second highest ledge of the cam (2)
11. The gap "A" can be adjusted using the screw "B". If the gap is too small, you may have to bend the rod slightly to provide enough room for the adjusting screw to move.
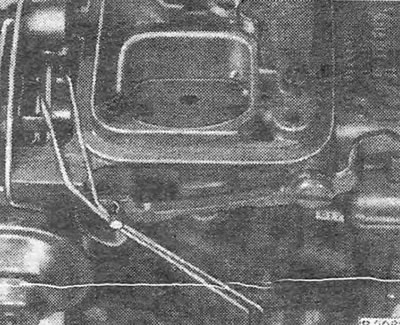
Figure 3.11. Fix the air damper in the closed position using a rubber ring
12. After completing the adjustment, lock the adjustment screw by dropping some paint or glue on it.
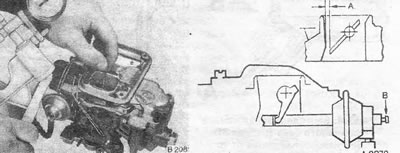
Figure 3.12. Checking the gap between the edge of the valve and the carburetor wall: A. See. Specifications; B. Adjusting screw on the vacuum block.
13. Check the gap between the deflector lever and the rod with the vacuum still applied, i.e. when the rod is extended to its maximum length (see figure 3.13). The required gap value "A" is shown in the figure. If necessary, adjust the gap by bending the rod accordingly. Adjusting the air damper for fast idle speed (gap "B")
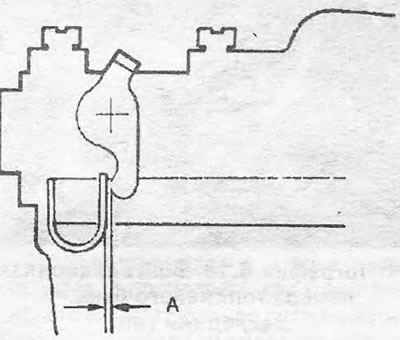
Figure 3.13. Gap between the deflector flap and the draft: A = 0.1-0.3 mm.
14. Secure the air damper in the closed position with a rubber ring (see figure 3.11).
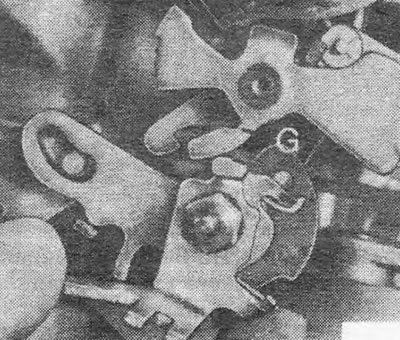
Figure 3.14. To adjust the air damper clearance, bend the tab "G"
15. Open the throttle valve and set the fast idle speed screw to the second highest cam ledge. Release the throttle and check that the screw remains on the ledge.
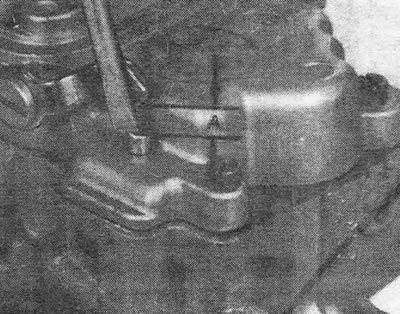
Figure 3.15. Adjusting the clearance between the lever and the accelerator pump rod: A = 7.8-8.2 mm.
16. Open the air damper slightly and release it so that it automatically returns to the correct position. Check the gap "B" in the same way as when checking the gap "A".
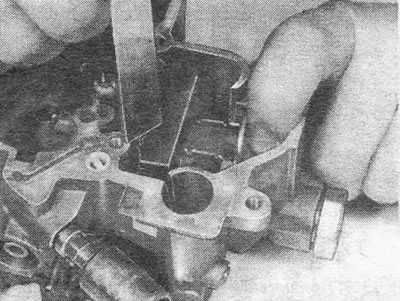
Figure 3.16. Measuring the upper position of the float
17. If necessary, adjust the gap "B" by removing the carburetor. Remove the choke cover and bend the rod connecting the fast idle cam to the choke lever until the correct clearance is achieved.
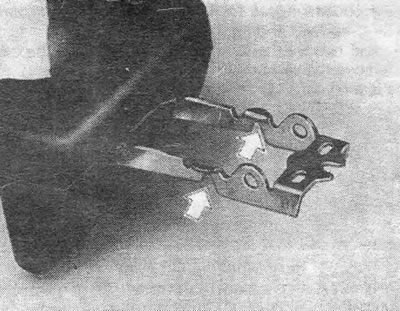
Figure 3.17. Adjusting the upper position of the float: 1. Bend at the indicated points.
18. After installing the carburetor in place, check the clearance of the lowered throttle again (gap "A").
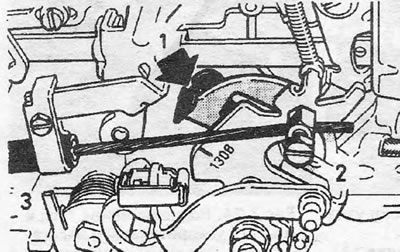
Figure 3.18. Adjusting the choke cable of a Varajet carburetor with manual choke: 1. Spring locking clamp; 2. Inner cable clamp; 3. Clamping the outer cable.
Adjusting the air damper with the throttle valve fully open (gap "C")
19. Secure the air damper in the closed position with a rubber ring. Open the throttle valve fully and hold it in the open position while measuring the "C" gap.
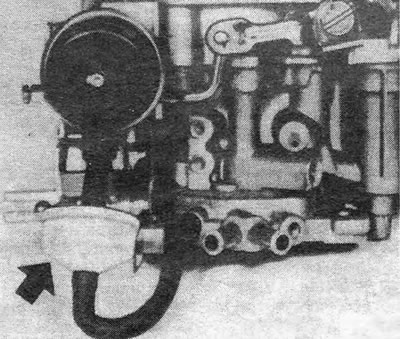
Figure 3.19. The latest models of the Varajet carburetor may be equipped with a special valve (shown by arrow) to prevent the engine from skipping a flash
20. If it is necessary to adjust the gap, bend the tongue shown in the figure 3.14. Bending the tongue to the right increases the gap, to the left decreases it.
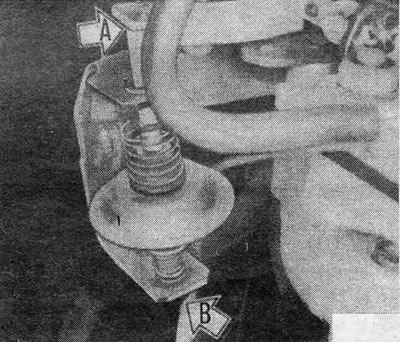
Figure 3.20. Throttle actuator damper on a Varajet carburetor: A. Damper pin; B. Lock nut.
Automatic choke cover
21. The indicator on the choke housing cover must be set to the central position. If the engine stalls or runs unsteadily during warming up, you can turn the cap 1-2 notches towards the letter "R" (rich mixture).
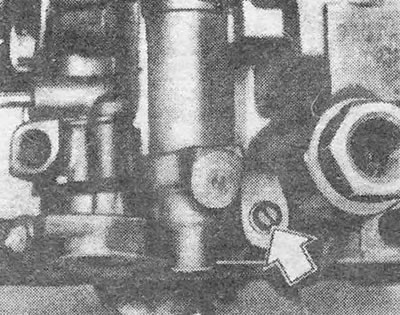
Figure 3.21. Adjusting screw (shown by arrow) varajet carburetor partial load systems
22. When starting a cold engine, it should take 2-3 minutes for the air damper to open fully. If this process takes longer, the choke cover should be replaced and the choke valve should be checked for freedom of movement.
Accelerator pump
23. With the air cleaner removed, check that with the engine at normal operating temperature, the throttle lever is in the idle position. Turn off the engine.
24. Manually smoothly move the throttle valve to the fully open position, while simultaneously monitoring the fuel supply from the pump pipe. Fuel must be supplied continuously, without interruption, throughout the entire stroke of the pump piston. If this is not the case, the pump should be disassembled and the worn seals replaced.
25. Using a screwdriver, press the pump rod until it reaches the stop, and then measure the gap between the end of the lever and the rod (see figure 3.15). The gap must not exceed the specified limits. It can be adjusted by bending the pump lever.
Upper float position
26. Remove the carburetor cover.
27. Manually press on the float levers and its shaft clamp so as to hold the fuel inlet needle valve in the closed position.
28. The upper surface of the float must be at a specified distance from the upper flange of the carburetor (see figure 3.16).
29. If necessary, bend the float levers equally at the points shown in the figure 3.17.
Carburetor with manual choke
Adjusting the lowering (opening) of the air damper
30. Remove the air cleaner.
31. Pull out the choke handle so that the mark on the cam aligns with the central part of the fast idle speed screw.
32. Apply vacuum to the carburetor vacuum block. To do this, you can use a hand suction pump or connect the vacuum unit with a hose or plastic tube to the intake manifold of another car whose engine is idling.
33. Check the gap between the edge of the air damper and the wall of the carburetor air throat (to measure the gap, you can use a drill of the required size - see Specifications).
34. If necessary, you can adjust the gap using the adjusting screw (see figure 3.12). If the gap is too small to be adjusted, adjust the fitting at the end of the rod accordingly.
Fast idle
35. Turn off the engine at normal operating temperature and remove the air cleaner.
36. Plug the end of the thin hose that was disconnected from the air cleaner and connected it to the carburetor.
37. Pull out the choke handle so that the mark on the cam aligns with the central part of the fast idle speed screw.
38. Hold the air damper in the open position manually or secure it with a rubber ring.
39. Start the engine and check that the fast idle speed is correct Specifications. To check the RPM, you can use the vehicle's tachometer or connect a temporary tachometer according to the manufacturer's instructions.
40. Fast idle speed is adjusted with the fast idle speed screw (see photo 10.1A).
Adjusting the air damper cable
41. An incorrectly adjusted cable can prevent the primary valve from fully opening and completely prevent the secondary valve from operating, preventing the engine from developing normal power when it reaches operating temperature.
42. Adjust the cable as follows.
43. Loosen the clamping screws on the outer and inner cables.
44. Push the choke handle inward until it stops (position of completely switched off choke) so that the regulator snaps into place with the spring-loaded locking clip.
45. Place the outer cable so that it stands in its clamp without distortion or tension, and tighten the screw.
46. Tighten the clamp screw on the inner cable.
47. Check the cable for freedom of movement throughout its entire range and make sure that when the choke regulator is snapped into place with the spring clamp, it is set to the position corresponding to the choke being completely turned off (see figure 3.18).
Carburetors with manual and automatic choke
Throttle Actuator Damper - Automatic Transmission Models
48. Models with automatic transmission may be equipped with a throttle actuator damper, the purpose of which is to prevent the throttle from slamming shut when the accelerator pedal is released.
49. The damper is adjusted as follows. Loosen the damper lock nut and turn it out until its pin just touches the throttle lever. From this position, screw the damper inward by 3-4 full turns and secure it with a lock nut (see figure 3.20). Partial load mode adjustment screw
50. Jerks or slow response of the car when the throttle valve is slightly opened, as well as excessive fuel consumption during gentle driving mode can be caused by incorrect adjustment of the part-load mode screw.
51. Do not attempt to adjust this screw until you have verified that the above problems cannot be caused by any other reasons.
52. Remove the carburetor from the car.
53. Pry off and remove the metal plug covering the partial load mode adjustment screw (located next to the fuel inlet fitting - see Figure 3.21).
54. If the problem is jerking or slow response of the machine (i.e. the mixture is too lean), turn the screw 1/4 turn counterclockwise.
55. If the problem is excessive fuel consumption (too rich mixture), the screw must be turned 1/4 turn clockwise.
56. Reinstall the carburetor and test drive to see if the problem is resolved. If necessary, further adjustments can be made, but be careful not to move the screw more than 1/2 turn from its original position.
57. When finished, install a new metal plug.
Other adjustments
58. The accelerator pump and the upper position of the float are adjusted in the same way as in the case of a carburetor with automatic choke (see above in the same section).
Visitor comments