


2. With the help of an electronic control unit, the injection system delivers exactly the amount of fuel that is necessary for optimal engine operation with a minimum level of emissions. This is achieved by constantly monitoring the engine using various sensors, the data from which is sent to the control unit in the form of electrical signals. Based on this constantly changing information, the control unit determines how much fuel is needed at a given engine speed and load and injects it directly into the intake manifold.
3. The main components of the injection system are:
- a. Control unit. The signals coming from various sensors are processed by the control unit, and on their basis control pulses are generated and sent to the fuel injectors. An additional circuit provided in the control unit controls the fuel cut-off valve, which is activated when the engine brakes the car and helps reduce fuel consumption, and the cold start booster device, which enriches the mixture during a cold start of the engine.
- b. Command relay. This relay consists of an electronic synchronizing element and a changeover relay that cuts off the fuel supply immediately after the engine is turned off.
- c. Air flow sensor. The amount of air entering the engine is measured by the air flow sensor to determine engine load. The air flow sensor is a flap valve, the plate of which, mounted on an axis, can rotate freely in the sensor channel under the influence of the air flow. A potentiometer is attached to the plate axis, which generates voltage depending on the angular position of the plate and supplies this voltage to the control unit. The air flow passing through the sensor is one of the main variables used by the control unit to determine the amount of fuel required by the engine at a given time.
- g. Fuel injectors. Each injector contains a solenoid-controlled needle valve that opens on command from the control unit, after which fuel from the distribution pipe enters through the injector into the intake manifold. All 4 injectors fire simultaneously, once per crankshaft rotation and regardless of the position of the intake valves. Thus, during one engine cycle, each of the injectors will fire once with the intake valve closed and once with the intake valve open. The fuel injectors always open at the same time relative to the crankshaft position, but the amount of time they remain open (i.e. injection duration) depends on a number of variables and is determined by the control unit. For a given volume of air passing through the air flow sensor, the control unit can enrich the working mixture by increasing the injection duration, or lean it by reducing the injection.
- d. Fuel pump. The fuel pump is an electric self-priming vane pump and is installed at the rear of the vehicle. Fuel from the tank is supplied by a pump under a given pressure through the fuel filter to the fuel distribution pipe. From this pipe it goes to 4 fuel injectors, and excess fuel is returned to the fuel tank using the fuel pressure regulator. The system circulates more fuel than is required for normal engine operation even under the most extreme conditions, thereby maintaining a low fuel temperature. This reduces the likelihood of vapor lock formation and ensures good starting of a warm engine.
- e. Fuel pressure regulator. This regulator is located on the fuel distribution pipe and controls the working pressure of the fuel in the system. The regulator consists of a metal body divided by a membrane into 2 chambers. Fuel from the distribution tube fills one of the regulator chambers, and the second chamber contains a compression spring, and the chamber itself is under vacuum developed in the intake manifold and is connected to it by a hose that connects to the manifold below the throttle valve. When the membrane is deflected, the valve located on it opens the return fuel line channel. When the fuel pressure in the regulator exceeds a certain value, the diaphragm deflects and the fuel returns to the fuel tank. The same thing happens when the deflection of the diaphragm is caused by a vacuum in the manifold. Thus, as the vacuum in the manifold increases, the fuel pressure decreases in the required proportion.
- f. Throttle switch. The throttle switch is connected to the throttle shaft on the throttle body. When the valve axis rotates in response to the movement of the gas pedal, the contacts inside the switch close at two extreme positions of the axis. The first contact closes in the idle position, and the second in the fully open throttle position. The signals sent by the switch are received by the control unit, which uses them to determine the position of the throttle valve.
- z. Auxiliary air valve. This valve includes a large diameter air passage connected by hoses to the throttle body and intake manifold and allows air to bypass the throttle valve. In the center of the channel there is a locking plate connected to a bimetallic spring. When the engine is cold, the shut-off plate is removed from the channel and air passes freely through the valve. As the engine warms up, the current supplied to the valve heats the bimetallic spring, which pushes the shut-off plate into the channel, gradually closing it. When the engine is warm, the channel is completely blocked. The additional air flow entering through the auxiliary valve is measured by the air flow sensor and compensated by increasing the injection duration, thereby delivering additional fuel to the engine. Thus, when starting off with an unheated engine or during its warm-up, a larger amount of working mixture is supplied to the engine.
- and. Temperature sensors. Engine temperature (coolant) and the intake air is measured by sensors, one of which is located in the engine water jacket, and the rest are in the intake air duct. The sensors consist of resistors whose resistance decreases with increasing temperature. The change in electrical resistance of the sensors is measured by the control unit, which changes the injection duration in accordance with this information.
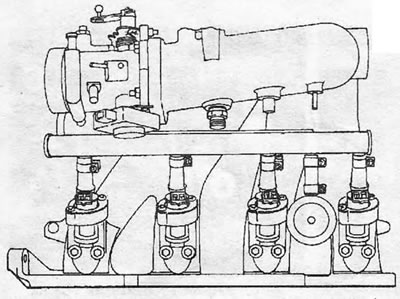
Figure 3.44. LE Jetronic injection system (top view). The relative position of the throttle body and fuel injectors is shown (engine 1.8)
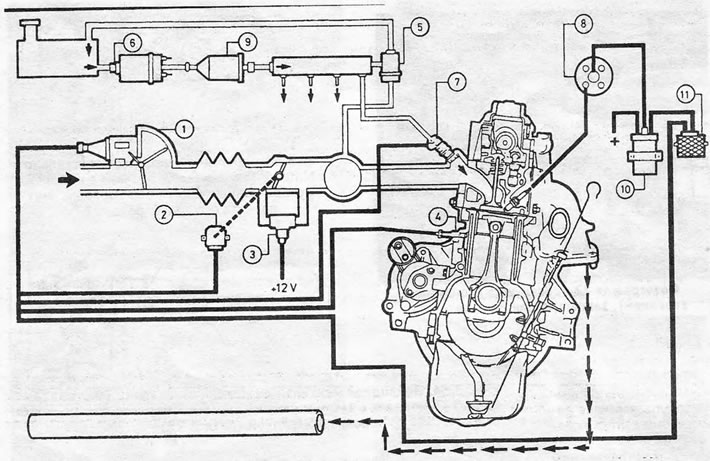
Figure 3.45. Schematic diagram and main components of the LE Jetronic injection system - 1.8 engine: 1. Air flow sensor and control unit; 2. Throttle switch; 3. Auxiliary air valve; 4. Coolant temperature sensor; 5. Fuel pressure regulator; 6. Fuel pump; 7. Fuel injector; 8. Distributor; 9. Fuel filter; 10. Ignition coil; 11. Ignition control unit.
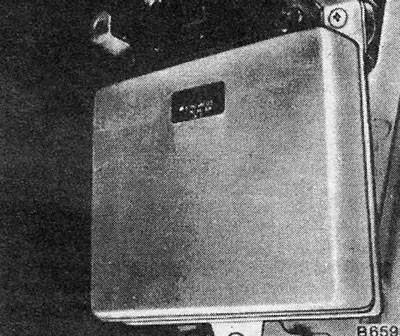
Figure 3.46. Control unit of the LE Jetronic system installed on 1.8 engines
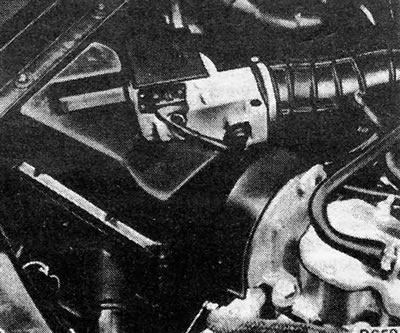
Figure 3.47. LE Jetronic air flow sensor and air cleaner - 1.8 engine
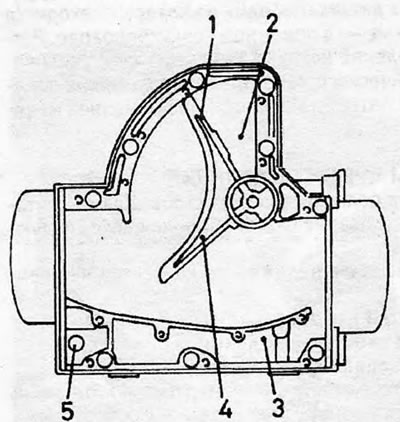
Figure 3.48. Air flow sensor with flap valve - 1.8 engine:1. Flap damper; 2. Damping chamber; 3. Bypass channel; 4. Flap valve; 5. Quality screw.
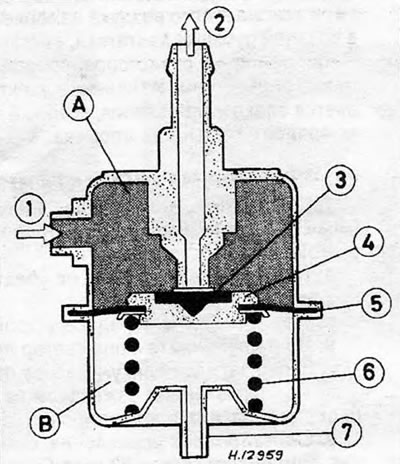
Figure 3.49. Fuel pressure regulator - engine 1.8: 1. Connecting the fuel inlet line; 2. Connecting the fuel outlet line; 3. Valve plate; 4. Valve holder; 5. Membrane; 6. Compression spring; 7. Connecting the vacuum hose; A. Fuel chamber; B. Vacuum chamber.
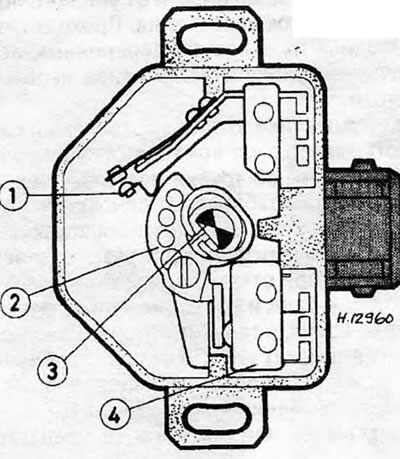
Figure 3.50. Internal parts of the throttle switch - 1.8 engine: 1. Fully open throttle position contact; 2. Contact cam; 3. Throttle shaft; 4. Idle contact.
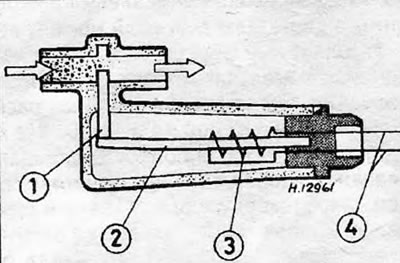
Figure 3.51. Auxiliary air valve - engine 1.8: 1. Locking plate; 2. Bimetallic spring; 3. Electric heating element; 4. Electrical wiring.
Visitor comments