
Removing
1. Remove the transmission or the entire power unit and separate the engine from the transmission. Then proceed as follows.
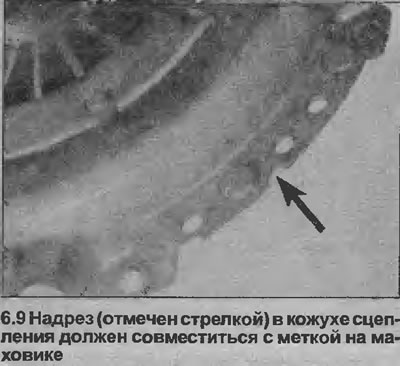
2. Note the position of the mark on the flywheel that aligns with the notch in the clutch housing. Gradually remove the six bolts with spring washers securing the clutch cover to the flywheel.
3. Remove the clutch assembly. Be prepared to catch the friction disc as it may fall out when removing the cover assembly. Remember the correct position of the disc - the side of the hub with the smaller protrusion should face the flywheel.
4. Inspect clutch components for signs of wear and damage as described in chapter 5.
Installation
5. If it is not necessary to install the engine and transmission assembly, it is recommended to install the engine first and then the clutch into the vehicle. This will eliminate the need to center the friction disc.
6. If the entire power unit has been removed, the clutch can be installed before connecting the engine and transmission as follows.
7. Make sure the friction plate linings and pressure plate and flywheel surfaces are free of oil or grease. It is recommended to install the clutch assembly with clean hands and wipe the surface of the pressure plate and flywheel with a clean rag.
8. Install the friction disc on the flywheel, making sure that the disc is correctly oriented (the side of the hub with the smaller protrusion should face the flywheel).
9. Install the clutch housing assembly, aligning the mark on the flywheel with the notch in the housing (see illustration). Insert six bolts (with spring washers) and tighten them by hand so that the friction disc is gripped but still able to move.
10. Center the friction disc so that when the transmission is installed on the engine, the grooves in the transmission input shaft can fit into the grooves in the friction disc hub.
11. To align, insert a round rod or long screwdriver into the hole in the center of the friction disc so that the end of the rod enters the bearing in the center of the crankshaft.
If a screwdriver is used, wrap the end of the screwdriver with masking tape to avoid damaging the bearing face.
Moving the rod will move the friction disc in the same direction. Remove the rod and check by eye the centering of the hub of the friction disc relative to the hole at the end of the crankshaft and the circle formed by the ends of the sectors of the diaphragms of another spring.
When the hub is exactly in the center, its position is correct. Alternatively, purchase a special centering tool, which eliminates the need for visual alignment.
12. Gradually tighten the cover bolts (in diagonal sequence) tightening force, regulated by the Specifications. Remove the centering tool.
13. Connect the engine and transmission as described in Sections 2A, 2B or 7A (depending on the model),
14. Finally, check the clutch cable adjustment as described in Chapter 3.
Visitor comments