
2. Inspect and, if necessary, replace clutch parts (see previous section).
3. To install the clutch in place, place the driven disk against the flywheel with the protruding part of the hub from the flywheel.
4. Install the clutch basket so that the notch on the clutch housing aligns with the colored dot on the flywheel.
5. Insert the bolts securing the clutch housing and gradually tighten them, but for now only by hand.
6. After this, it is necessary to center the clutch driven disc. To do this, insert the clutch alignment tool into the splines of the driven disc hub so that its end engages the guide bearing at the end of the crankshaft. Center the disc so that the transmission drive shaft can be inserted into it (see photo).
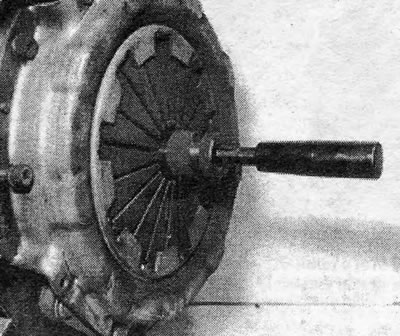
Photo 6.6. Typical clutch alignment tool.
7. You can make your own tool for centering the clutch from a metal or wooden rod, wrapping it with adhesive tape so that its diameter matches the diameter of the slotted hole in the driven disk hub.
8. Once you have achieved an easy sliding fit of the tool in the hub, tighten the clutch housing bolts to the desired torque. Pull out the tool.
9. Install and connect the engine and gearbox (see chapter 1).
Visitor comments