


Contents: Models with rear drum brakes ⬇ Long cable ⬇ Installation ⬇ Short cable ⬇ Models with rear disc brakes (single…⬇ Models with two overhead camshafts…⬇
Models with rear drum brakes
Removal
1. The handbrake cable consists of two parts. The longer part goes from the drive rod through the adjuster to the handbrake assembly on the right wheel. The shorter part goes from the adjuster to the handbrake assembly on the left wheel. The cable parts can be replaced independently of each other.
2. Where applicable, remove the hubcaps and loosen the rear wheel bolts. Block the front wheels, jack up and support the rear of the vehicle on axle stands. Remove the wheels.
3. Remember the correct location of the cables to make their subsequent installation easier.
4. Remove the appropriate brake drum (see Chapter 11).
Long cable
Removal
5. Measure the length of the portion of the handbrake cable threaded end protruding from the adjuster on the torsion beam, then unscrew the adjuster nut - threaded rod.
6. Disconnect the cable from the handbrake lever drive rod on the bottom of the vehicle.
7. Remove the cable from the guides on the bottom.
8. Disconnect the cable from the adjuster on the torsion beam.
9. Disconnect the end of the cable from the lever on the brake shoe, then use a screwdriver as a lever to remove the plate that secures the cable to the backing plate.
10. Remove the cable by releasing it from the guide on the torsion beam.
Installation
11. Perform installation in reverse order, paying attention to the following.
12. Screw the regulator nut onto the threaded rod to the position marked before removal.
13. Ensure the handbrake cable is routed as marked before removal.
14. Install the brake drum (Chapter 11).
15. Before installing the wheel and lowering the vehicle to the ground, adjust the handbrake as described in Chapter 26.
Short cable
Removal
16. Measure the length of the portion of the handbrake cable threaded end protruding from the adjuster on the torsion beam, then unscrew the adjuster nut from the threaded rod. Then proceed as described in points 8-10.
Installation
17. Proceed as described in points 11-15.
Models with rear disc brakes (single overhead camshaft engine)
General description
18. The procedure is similar to that described above for models with rear drum brakes, with the following clarifications.
19. Ignore the brake drum removal and installation procedures.
20. These models do not have a plate for attaching the cable to the support plate, the end of the cable is attached to the return spring.
21. On models with a catalytic converter, when removing the longer cable, remove the four nuts and remove the center exhaust pipe heat shield.
Models with two overhead camshafts (DOHC)
Removal
22. On these models, the handbrake cables and equalizer are removed as an assembly.
23. Loosen the rear wheel bolts, then block the front wheels and jack up and support the rear of the vehicle on axle stands. Remove the wheels.
24. Remember the correct position of the handbrake cables to make subsequent installation easier.
25. On models with a catalytic converter, remove the four nuts and center exhaust pipe heat shield.
26. Measure the length of the threaded end of the cable protruding from the equalizer, then unscrew the fastening nut and disconnect the equalizer from the handbrake lever drive rod.
27. Disconnect the ends of the cable from the brake shoe control levers and return springs (see illustration).
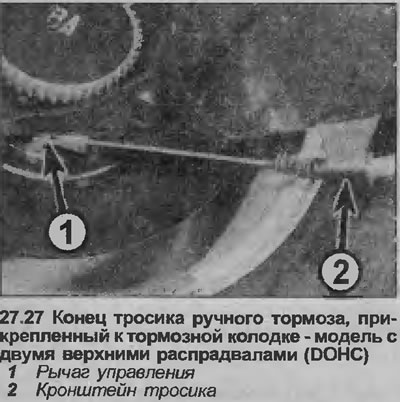
28. Separate the cable from the guides on the bottom and diagonal arms.
29. Remove the cable and equalizer assembly.
Installation
30. Perform installation in reverse order, paying attention to the following.
31. Use a new self-locking nut securing the equalizer to the handbrake lever drive rod and screw the nut onto the threaded end of the cable to the position marked before removal.
32. Ensure cables are routed as marked before removal.
33. Before installing the wheels and lowering the vehicle to the ground, adjust the handbrake as described in Chapter 26.
Visitor comments