
OpelBook.ru
Cars AvtoVAZ Cars Mitsubishi Cars BMW Cars Mercedes Cars Nissan Cars Toyota Cars Chevrolet
English Русский
Български
Беларускі
Український
Српски
Hrvatski
Română
Polski
Slovenský
Magyar
 |  Sitemap  |  Contacts  |    


Main Astra Corsa Insignia Kadett Omega Vectra Zafira Others Articles
Vectra A (1988-1995, petrol) Vectra A (1988-1995) Vectra B (1995-2002, petrol) Vectra B (1995-2002) Vectra C (2002-2008)
  • Main
  • Vectra
  • Vectra A
  • Chassis
  • Brake system
  • Handbrake lever — removal and installation

Handbrake lever — removal and installation (Opel Vectra A)

            0

Contents: Removal ⬇ Installation ⬇

Removal


1. Disconnect the negative cable from the battery.

2. Jack up the vehicle and place it on axle stands.

3. On models with a catalytic converter, remove the four nuts and the center exhaust pipe heat shield.

4. On all models with a single overhead camshaft (SOHC), measure the length of the hand brake cable threaded tip protruding from the regulator (on a torsion beam), then loosen the adjuster and disconnect the cable from the handbrake lever drive rod. Remove the rubber sealing ring from the bottom and the drive rod.

5. On models with two overhead camshafts (DOHC), measure the length of the threaded hand brake cable tip protruding from the equalizer, then unscrew the mounting nut and disconnect the equalizer from the hand brake lever drive rod. Remove the rubber O-ring from the bottom and drive rod.

6. Remove the front passenger seat as described in Section 11.

7. Remove the rear part of the central console as described in Section 11.

8. The bolts that secure the handbrake lever to the floor are accessible through the slots in the mat. If there are no slots, either carefully make them yourself or release and bend the mat.

[Material published on the website opelbook.ru]

9. Loosen the mounting bolts and lift the lever enough to disconnect the handbrake indicator switch wiring (see illustration).
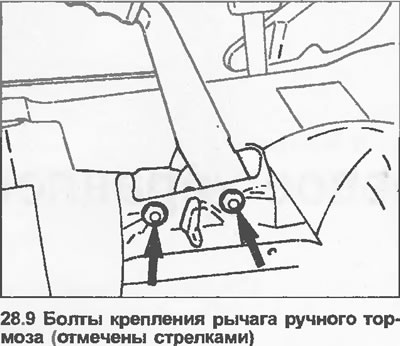
9. Loosen the mounting bolts and lift the lever enough to disconnect the handbrake indicator switch…


10. Disconnect the electrical wiring and remove the lever and its drive rod.


11. A worn ratchet toothed segment can be replaced by knocking out the mounting sleeve from the handbrake lever using a metal rod or bolt of a suitable diameter.

12. Install the new bushing and segment.

13. If required, install a new latch by drilling out the pivot pin rivet (see illustration).

14. Attach the new latch with a new rivet so that the latch can move freely.

15. To remove the handbrake indicator light switch from the lever assembly, unscrew the mounting bolt.

Installation


16. Perform installation in reverse order, paying attention to the following.

17. Install the rear part of the center console as described in Section 11.

18. Install the front passenger seat as described in Section 11.

19. On models with two overhead camshafts (DOHC), attach the equalizer to the hand brake lever drive rod with a new self-locking nut and screw the nut on the cable tip to the position marked before removing.

20. On models with a single overhead camshaft (SOHC), clamp the cable adjuster so that the protruding threaded part is measured before removing the length.

21. Before lowering the car onto its wheels, adjust the handbrake (Chapter 26).


This article is available at russian, bulgarian, belarusian, ukrainian, serbian, croatian, romanian, polish, slovak, hungarian
Checking the article: Chernov Alexander

Share information:

Previous articles
Opel Vectra A: Brake system
Next articles

Handbrake cable — removal and installation
Handbrake — adjustment
Brake pipes and hoses — general description, removal and installation
Pressure Regulating Valves — Removal and Installation
ABS Relay (ABS-2E System Only) — Removal and Installation
ABS control unit — removal and installation
Detecting brake system faults


See similar ones from other Opel car manuals:
▶ Handbrake lever — removal and installation Opel Astra G (1998-2004, petrol)
▶ Handbrake lever — removal and installation Opel Omega B (1993-1999)
▶ Handbrake lever — removal, inspection and installation Opel Ascona C (1981-1988)
▶ Removal and installation the AT selector lever assembly Opel Corsa B (1993-2000)
▶ Replacing the gear shift lever Opel Insignia A (2008-2017)
Link to this page in different formats

Visitor comments


No comments yet


How much will 40 + 28 =


Vectra C (2002-2008) 
  • General information
  • User manual
  • Vehicle device
  • Maintenance
  • Troubleshooting
  • Power unit
  • Engine repair
  • Cooling system
  • Power and control system
  • Engine electrics
  • Transmission
  • Clutch
  • Car gearbox
  • Drive shafts
  • Chassis
  • Car suspension
  • Steering
  • Brake system
  • Body
  • Exterior
  • Interior
  • Doors, locks and windows
  • Heating and ventilation
  • Electrical equipment
  • Equipment and devices
  • Headlights and lighting
  • Electrical circuits
Vectra B (1995-2002) 
  • General information
  • User manual
  • Weekly checks
  • Maintenance (gasoline)
  • Maintenance (diesel)
  • Troubleshooting
  • Power unit
  • SOHC gasoline engine
  • DOHC petrol engine
  • Diesel engine 1.7 liter
  • Diesel engine 2.0 liters
  • Engine repair
  • Cooling system
  • Fuel system (gasoline)
  • Fuel system (diesel)
  • Charging system
  • Launch system
  • Ignition and preheat
  • Transmission
  • Clutch
  • Mechanical gearbox
  • Automatic gearbox
  • Drive shafts
  • Chassis
  • Brake system
  • Wheel suspension
  • Steering
  • Body
  • Exterior
  • Interior
  • Doors and windows
  • Heating and ventilation
  • Electrical equipment
  • Equipment and devices
  • Electrical circuits
Vectra B (1995-2002, petrol) 
  • General information
  • Maintenance
  • Help with malfunctions
  • Power unit
  • Engine repair
  • Exhaust system
  • Cooling system
  • Fuel system
  • Multec injection system
  • Four point injection
  • Transmission
  • Clutch
  • Gearbox and drive
  • Chassis
  • Wheel suspension
  • Steering
  • Brake system
  • Wheels and tires
  • Body
  • Exterior
  • Interior
  • Electrical equipment
  • Fuses and electronics
  • Power devices
  • Ignition system
  • Lighting and signaling
  • Equipment and devices
  • Heating and ventilation
  • Electrical circuits
Vectra A (1988-1995) 
  • Power unit
  • Engine repair
  • Ignition system
  • Lubrication system
  • Cooling system
  • Injection system
  • Fuel system (carburetor)
  • Fuel system (diesel)
  • Exhaust system
  • Transmission
  • Clutch
  • Car gearbox
  • Chassis
  • Front suspension
  • Rear suspension
  • Steering
  • Brake system
  • Wheels and tires
  • Body
  • Exterior
  • Interior
  • Electrical equipment
  • Electrical circuits
Vectra A (1988-1995, petrol) 
  • General information
  • User manual
  • Maintenance
  • Power unit
  • SOHC engine
  • DOHC engine
  • Cooling and ventilation
  • Fuel system (carburetor)
  • Fuel system (injector)
  • Exhaust converter
  • Transmission
  • Clutch
  • Mechanical gearbox
  • Automatic gearbox
  • Drive shafts
  • Chassis
  • Brake system
  • Car suspension
  • Steering
  • Body
  • Body elements
  • Electrical equipment
  • Power devices
  • Equipment and devices
  • Electrical circuits
OpelBook.ru © 2017–2026 · Mobile version · · Sitemap: EN BG BY UA RS HR RO PL SK HU · Feedback · Site search
Astra F, petrol · Astra G, petrol · Astra G · Astra H · Astra J, petrol · Corsa B · Corsa C, petrol · Corsa C · Insignia A · Kadett D · Kadett E · Omega A · Omega B · Omega B2 · Vectra A, petrol · Vectra A · Vectra B, petrol · Vectra B · Vectra C · Zafira A, petrol · Frontera A, petrol · Frontera B · Ascona C · Vivaro A ·
We want your visit to be comfortable 🤝! We use cookies 🍪 to make that happen.