
OpelBook.ru
Cars AvtoVAZ Cars Mitsubishi Cars BMW Cars Mercedes Cars Nissan Cars Toyota Cars Chevrolet
English Русский
Български
Беларускі
Український
Српски
Hrvatski
Română
Polski
Slovenský
Magyar
 |  Sitemap  |  Contacts  |    


Main Astra Corsa Insignia Kadett Omega Vectra Zafira Others Articles
Frontera A (1991-1998, petrol) Frontera B (1998-2004) Ascona C (1981-1988) Vivaro A (2001-2014)
  • Main
  • Opel
  • Frontera B
  • Chassis
  • Suspension and axles
  • Rear axle

Rear axle (Opel Frontera B)

            0

Contents: Removal ⬇ Installation ⬇

Removal


Release the parking brake.

Remove the cap and pump out the brake fluid from the brake system reservoir.

Raise the vehicle and support it on supports.

Use a hydraulic jack to support the rear axle using a wooden block.

Remove the rear wheels.

Remove the caliper, lift it up and secure it to the rear suspension with soft wire.

Remove the ABS sensor connector (arrow) from the differential housing.
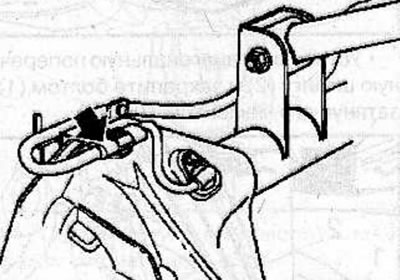
Remove the ABS sensor connector (arrow) from the differential housing.


Remove the bolts and the load sensing valve from the rear axle housing, being careful not to disturb the valve adjustment.
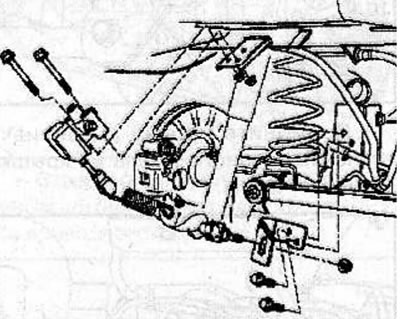
Remove the bolts and the load sensing valve from the rear axle housing, being careful not to…


Mark the relative position and disconnect the propeller shaft from the rear axle gearbox flange.

Mark the relative position and disconnect the propeller shaft from the rear axle gearbox flange.
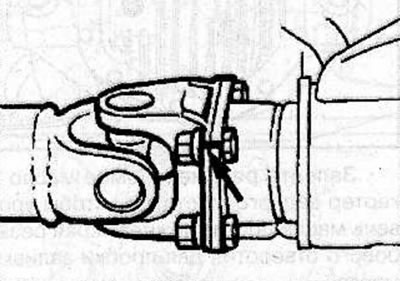

Disconnect the ventilation hose from the rear axle housing.


Disconnect the parking brake cables from the rear brake boots.

Loosen the nuts and disconnect the brake system pipes from the pipes on the vehicle chassis.

Loosen the nuts and disconnect the shock absorbers from the rear axle.

Loosen the nuts and disconnect the anti-roll bar links from the rear axle.

Lower the rear axle slightly and remove the coil springs together with the rubber vibration dampers.
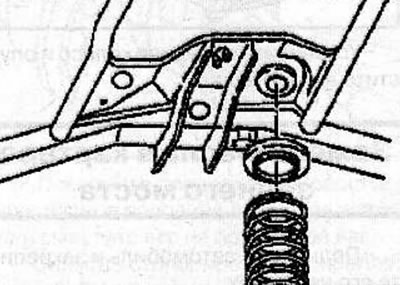
Lower the rear axle slightly and remove the coil springs together with the rubber vibration dampers.


Remove the nuts and bolts and remove the diagonal cross member from the vehicle.

Remove the nuts and bolts and remove the upper arms.

Loosen the nuts and bolts and remove the rear suspension trailing arms.

Lower the rear axle and remove it from under the vehicle.

Installation


Place the bridge on a hydraulic jack.

Raise the rear axle together with the left drive shaft.

Install the rear suspension trailing arms and secure them with bolts and nuts, tightening them to a torque of 137 N·m.

Install the upper arms and secure them with bolts and nuts, tightening them to a torque of 137 N·m.

Install the diagonal cross member and secure with the nut, tightening it to a torque of 100 Nm and the bolt and nut, tightening them to a torque of 137 Nm.
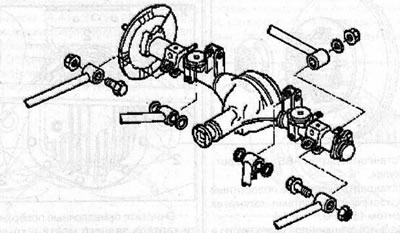


Rear axle mounting elements

Rear axle mounting elements


Warnings:
  • Do not apply lubricant to rubber bushings or surrounding parts.
  • Initially, hand tighten all the bolts and nuts securing all the rubber bushings, then tighten them to the recommended torques after the vehicle is installed on the wheels.


Install the coil springs together with the rubber vibration dampers, making sure that the marks (1) on the springs are positioned as close to the axle as possible. Make sure the spring ends are properly seated and lift the rear axle slightly to allow the springs to engage in their proper positions.
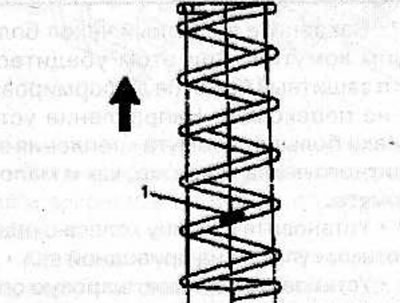
Install the coil springs together with the rubber vibration dampers, making sure that the marks (1)…


Note: Coil springs with a yellow mark are for 3-door vehicles, and coil springs with a blue mark are for 5-door vehicles.


Connect the anti-roll bar links to the rear axle and secure with nuts, tightening them to a torque of 31 Nm.


Connect the shock absorbers to the rear axle and secure with nuts, tightening them to a torque of 78 Nm.

Connect the brake system pipes to the pipes on the chassis and tighten the connecting nuts.

Install the ventilation hose to the rear axle housing.

Connect the parking brake cables to the rear brake boots.

In accordance with the previously applied marks, connect the cardan shaft to the flange of the rear axle gearbox and secure with bolts and nuts, tightening them to a torque of 63 N·m.
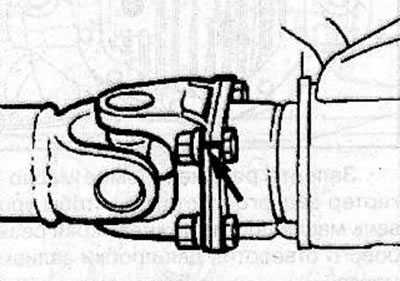
In accordance with the previously applied marks, connect the cardan shaft to the flange of the rear…


Install the rear wheels and secure with nuts, tightening them to the required torque.

Install the load sensing valve to the rear axle housing and secure with bolts, tightening them to a torque of 25 N·m.
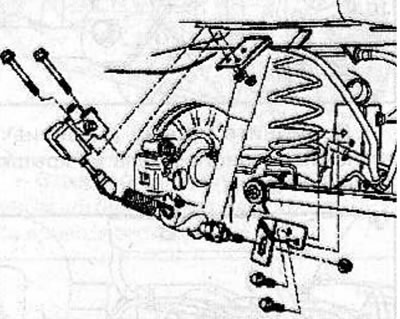
Install the load sensing valve to the rear axle housing and secure with bolts, tightening them to a…


(Article posted on a web portal OpelBook.ru)


Adjust the parking brake cables (see the relevant chapter).

Install the rear brake calipers.

Secure the ABS sensor connector (arrow) to the clamp located on the differential housing.
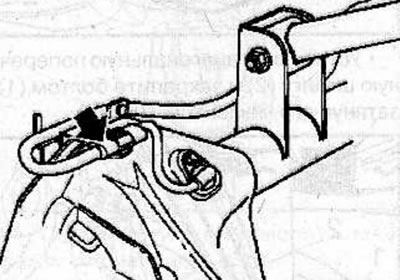
Secure the ABS sensor connector (arrow) to the clamp located on the differential housing.


Check the oil level in the rear axle housing.

Lower the car.

Fill the brake fluid into the reservoir and bleed the hydraulic drive of the brake system (see the relevant chapter).


This article is available at russian, bulgarian, belarusian, ukrainian, serbian, croatian, romanian, polish, slovak, hungarian
Checking the article: Chernov Alexander

Share information:

Previous articles
Opel Frontera B: Suspension and axles
Next articles

Changing the oil in the rear axle housing
Replacing the protective cover of the CV joint of the drive shaft
Drive shaft
Front wheel hub
Drive flange of the hub
Steering knuckle
Limited slip differential
Rear suspension shock absorber
Rear suspension trailing arms
Upper rear suspension arms
Rear suspension anti-roll bar


See similar ones from other Opel car manuals:
▶ Rear axle ride height adjustment system — general… Opel Astra G (1998-2004)
▶ Removal and installation the rear axle Opel Corsa C (2000-2006, petrol)
▶ Rear axle turning angle Opel Insignia A (2008-2017)
▶ Rear axle (assembled) — removal and installation Opel Omega A (1986-1993)
▶ Rear axle Opel Vectra B (1995-2002, petrol)
Link to this page in different formats

Visitor comments


No comments yet


How much will 31 + 32 =


Vivaro A (2001-2014) 
  • General information
  • User manual
  • Power unit
  • Petrol engine F4R
  • Diesel engine F9Q
  • Diesel engine G9U
  • Transmission
  • Clutch and drive shafts
  • Manual gearbox
  • Chassis
  • Front suspension
  • Rear suspension
  • Brake system
  • Body
  • Exterior
  • Interior
  • Electrical equipment
  • Heating and ventilation
  • Air conditioner
  • Equipment and devices
  • Electrical diagrams
Ascona C (1981-1988) 
  • General information
  • Maintenance
  • Power unit
  • Gasoline engines
  • Diesel engines
  • Cooling system
  • Fuel and exhaust system
  • Contact ignition system
  • Contactless ignition system
  • Transmission
  • Clutch
  • Mechanical gearbox
  • Automatic gearbox
  • Drive shafts
  • Chassis
  • Steering
  • Brake system
  • Car suspension
  • Body
  • Exterior
  • Interior
  • Doors and windows
  • Electrical equipment
  • Equipment and devices
  • Power devices
  • Electrical circuits
Frontera B (1998-2004) 
  • General information
  • User manual
  • Maintenance
  • Power unit
  • Petrol engines 2.2 l
  • Petrol engines 3.2 l
  • Diesel engines 2.2 l
  • Cooling system
  • Fuel system (petrol)
  • Fuel system (diesel)
  • Ignition system
  • Transmission
  • Clutch
  • Manual gearbox MUA5C
  • Automatic gearbox 4L30E
  • Chassis
  • Suspension and axles
  • Steering
  • Brake system
  • Body
  • Exterior
  • Interior
  • Doors, locks and windows
  • Heating and air conditioning
  • Electrical equipment
  • Power devices
  • Equipment and devices
  • Lighting and signaling
  • Electrical diagrams
Frontera A (1991-1998, petrol) 
  • General information
  • Introduction to guide
  • User manual
  • Maintenance
  • Power unit
  • Engine repair
  • Lubrication system
  • Cooling system
  • Power and exhaust system
  • Engine electrics
  • Transmission
  • Clutch
  • Mechanical gearbox
  • Cardan shafts
  • Chassis
  • Brake system
  • Front suspension
  • Rear suspension
  • Steering
  • Body
  • Repair and care
  • Electrical equipment
  • Equipment and devices
  • Electrical circuits
OpelBook.ru © 2017–2026 · Mobile version · · Sitemap: EN BG BY UA RS HR RO PL SK HU · Feedback · Site search
Astra F, petrol · Astra G, petrol · Astra G · Astra H · Astra J, petrol · Corsa B · Corsa C, petrol · Corsa C · Insignia A · Kadett D · Kadett E · Omega A · Omega B · Omega B2 · Vectra A, petrol · Vectra A · Vectra B, petrol · Vectra B · Vectra C · Zafira A, petrol · Frontera A, petrol · Frontera B · Ascona C · Vivaro A ·
We want your visit to be comfortable 🤝! We use cookies 🍪 to make that happen.