
OpelBook.ru
Cars AvtoVAZ Cars Mitsubishi Cars BMW Cars Mercedes Cars Nissan Cars Toyota Cars Chevrolet
English Русский
Български
Беларускі
Український
Српски
Hrvatski
Română
Polski
Slovenský
Magyar
 |  Sitemap  |  Contacts  |    


Main Astra Corsa Insignia Kadett Omega Vectra Zafira Others Articles
Frontera A (1991-1998, petrol) Frontera B (1998-2004) Ascona C (1981-1988) Vivaro A (2001-2014)
  • Main
  • Opel
  • Frontera A
  • Power unit
  • Power and exhaust system
  • Fuel injection system Bosch M1.5.4 for DOHC engine

Fuel injection system Bosch M1.5.4 for DOHC engine (Opel Frontera A)

            0

Contents: Throttle potentiometer ⬇ Fuel pressure regulator ⬇ Replacing injection valves…⬇ Replacing the air flow meter ⬇ Replacing the crankshaft TDC sensor ⬇ Replacing the knock sensor ⬇ Idle speed control valve ⬇ Intake air temperature sensor ⬇ Replacing the coolant temperature…⬇
1. The instructions given here only apply to differences that apply to this engine. If a description of any work is not given, it is assumed that it is performed in the same way as described above. It should be borne in mind that some elements of the injection system are located here in different places, which does not correspond to the illustrations provided.

Throttle potentiometer
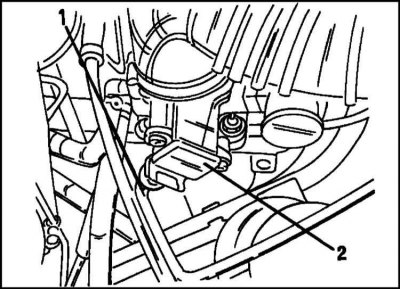


1. For a DOHC engine, the potentiometer is installed in the location shown in the illustration. To…


1. For a DOHC engine, the potentiometer is installed in the location shown in the illustration. To remove, disconnect the plug connection (1) of the potentiometer (2) and remove the potentiometer by unscrewing the bolts.

Attach the throttle body before installation. Make sure the potentiometer is seated correctly on the throttle body. Connect the plug connection.

Fuel pressure regulator


1. Relieve the pressure in the fuel system, taking precautions. The regulator is located in the center of the hoses and the intake air hose. Removal and installation is carried out in accordance with the previously given description.


Replacing injection valves (injectors)


1. The work is significantly more labor-intensive than with a 2.0L engine, as it requires some preparation to get to the fuel distribution line and injection valves. For this reason, the actual work is not described here.

Replacing the air flow meter
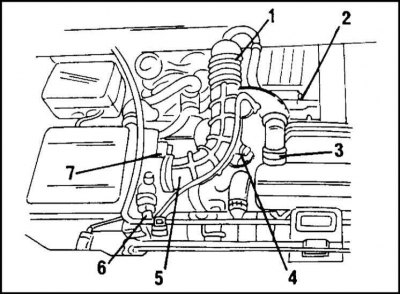


The gauge is located directly in front of the air filter and is inserted into the air intake hose.…


The gauge is located directly in front of the air filter and is inserted into the air intake hose. Removal and installation is carried out in accordance with the illustration.

1. Remove the clamp (1) from the air intake hose.

2. Disconnect the crankcase ventilation hose at point (2).

3. Remove the clamp (3) from the intake air resonator.

4. Disconnect the plug connection (4) of the intake air temperature sensor.

5. Disconnect the intake air hose (5) from the throttle body and air quantity meter (6).

6. Loosen the clamp (7) of the intake air hose.

7. Remove the air flow meter from the air filter housing. The measuring device is replaced as a set.

The installation of the measuring device is performed in the reverse order of its removal. Make connections as shown in the illustration. higher.

Replacing the crankshaft TDC sensor


Contact the Head Engine electrical equipment.


Replacing the knock sensor


Contact the Head Engine electrical equipment.

Idle speed control valve


1. To access the idle speed control valve, it is necessary to remove the parts shown in the illustration. 4.29. Removal and installation are performed similarly to the operation under consideration for the OHC engine.

[Article posted on Internet portal www.OpelBook.ru]

Intake air temperature sensor


1. The sensor is screwed into the intake air hose near the inlet to the air filter.

After disconnecting the plug connection and removing the intake air hose, the sensor can be pressed out with a sharp object (for example, with a knife) from the hose. Loosen all clamps shown in the illustration and disconnect the plug connection. Before installing the sensor in place, check the condition of the hose. Reinstall all removed parts.

Replacing the coolant temperature sensor


1. Replacement is easy. The sensor is located near the ignition module and can be unscrewed after disconnecting the plug connection.

Attention! Coolant will leak out.


This article is available at russian, bulgarian, belarusian, ukrainian, serbian, croatian, romanian, polish, slovak, hungarian
Checking the article: Meshcheryakov Damir

Share information:

Previous articles
Opel Frontera A: Power and exhaust system
Next articles

Fuel injection system Bosch M1.5.4 for OHC engine
Injection system — general information
Power supply system malfunctions
Fuel system of injection engines — general information
Power and exhaust system specifications
Bosch Motronic M1.5 system for 2.0 and 2.4 l engines
Safety precautions when working with the power supply system
Exhaust and emission control systems
Gas pedal and gas control drive
Air filter and air supply system
Exhaust gas recirculation system


See similar ones from other Opel car manuals:
▶ General information about the fuel injection system of a… Opel Corsa B (1993-2000)
▶ Bosch L3 Jetronic Fuel Injection System Components —… Opel Omega A (1986-1993)
▶ Single-point fuel injection system of the SOCH 1.6L engine Opel Vectra B (1995-2002)
▶ Multec Single Point Fuel Injection System Components —… Opel Astra F (1991-1998, petrol)
▶ Fuel system of a carburetor engine Opel Kadett E (1984-1995)
Link to this page in different formats

Visitor comments


No comments yet


How much will 20 + 29 =


Vivaro A (2001-2014) 
  • General information
  • User manual
  • Power unit
  • Petrol engine F4R
  • Diesel engine F9Q
  • Diesel engine G9U
  • Transmission
  • Clutch and drive shafts
  • Manual gearbox
  • Chassis
  • Front suspension
  • Rear suspension
  • Brake system
  • Body
  • Exterior
  • Interior
  • Electrical equipment
  • Heating and ventilation
  • Air conditioner
  • Equipment and devices
  • Electrical diagrams
Ascona C (1981-1988) 
  • General information
  • Maintenance
  • Power unit
  • Gasoline engines
  • Diesel engines
  • Cooling system
  • Fuel and exhaust system
  • Contact ignition system
  • Contactless ignition system
  • Transmission
  • Clutch
  • Mechanical gearbox
  • Automatic gearbox
  • Drive shafts
  • Chassis
  • Steering
  • Brake system
  • Car suspension
  • Body
  • Exterior
  • Interior
  • Doors and windows
  • Electrical equipment
  • Equipment and devices
  • Power devices
  • Electrical circuits
Frontera B (1998-2004) 
  • General information
  • User manual
  • Maintenance
  • Power unit
  • Petrol engines 2.2 l
  • Petrol engines 3.2 l
  • Diesel engines 2.2 l
  • Cooling system
  • Fuel system (petrol)
  • Fuel system (diesel)
  • Ignition system
  • Transmission
  • Clutch
  • Manual gearbox MUA5C
  • Automatic gearbox 4L30E
  • Chassis
  • Suspension and axles
  • Steering
  • Brake system
  • Body
  • Exterior
  • Interior
  • Doors, locks and windows
  • Heating and air conditioning
  • Electrical equipment
  • Power devices
  • Equipment and devices
  • Lighting and signaling
  • Electrical diagrams
Frontera A (1991-1998, petrol) 
  • General information
  • Introduction to guide
  • User manual
  • Maintenance
  • Power unit
  • Engine repair
  • Lubrication system
  • Cooling system
  • Power and exhaust system
  • Engine electrics
  • Transmission
  • Clutch
  • Mechanical gearbox
  • Cardan shafts
  • Chassis
  • Brake system
  • Front suspension
  • Rear suspension
  • Steering
  • Body
  • Repair and care
  • Electrical equipment
  • Equipment and devices
  • Electrical circuits
OpelBook.ru © 2017–2026 · Mobile version · · Sitemap: EN BG BY UA RS HR RO PL SK HU · Feedback · Site search
Astra F, petrol · Astra G, petrol · Astra G · Astra H · Astra J, petrol · Corsa B · Corsa C, petrol · Corsa C · Insignia A · Kadett D · Kadett E · Omega A · Omega B · Omega B2 · Vectra A, petrol · Vectra A · Vectra B, petrol · Vectra B · Vectra C · Zafira A, petrol · Frontera A, petrol · Frontera B · Ascona C · Vivaro A ·
We want your visit to be comfortable 🤝! We use cookies 🍪 to make that happen.