
OpelBook.ru
Cars AvtoVAZ Cars Mitsubishi Cars BMW Cars Mercedes Cars Nissan Cars Toyota Cars Chevrolet
English Русский
Български
Беларускі
Український
Српски
Hrvatski
Română
Polski
Slovenský
Magyar
 |  Sitemap  |  Contacts  |    


Main Astra Corsa Insignia Kadett Omega Vectra Zafira Others Articles
Frontera A (1991-1998, petrol) Frontera B (1998-2004) Ascona C (1981-1988) Vivaro A (2001-2014)
  • Main
  • Opel
  • Frontera A
  • Transmission
  • Cardan shafts
  • Replacement of the constant velocity joint boot

Replacement of the constant velocity joint boot (Opel Frontera A)

            0

When replacing the cover, it is necessary to introduce the specified amount of consistent grease into the hinges.

1. Unscrew the two bolts.

2. Remove the brake caliper from the guide

3. Secure the caliper to the chassis with wire. Do not hang the caliper by the hose.

4. Disconnect the steering knuckle from the upper and lower control arms and from the steering rod (see separate description).

5. Use a screwdriver to remove the cover mounting clamp from the hinge housing.

6. Remove the cover by pulling it inward. Pay attention to which direction the end of the clamp points.

7. Use a screwdriver to remove the retaining ring from the groove inside the hinge housing.

8. Remove the shaft from the housing and hub. Be careful not to damage the boot on the end of the shaft hub as it will need to be re-installed.

If necessary, the hinge can be disassembled further. However, this is quite a difficult job. Here is a brief description of it.

1. Thoroughly clean the inside cavity of the joint.

2. Remove the retaining ring from the joint at the end of the shaft.

3. Partially remove the hinge.
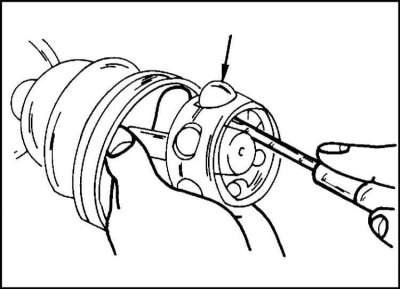
4. Use a screwdriver to remove the balls shown in the illustration.


4. Use a screwdriver to remove the balls shown in the illustration.


5. Rotate the body half a ball.

6. Slide the separator towards the cover.

7. There is a retaining ring in front of the collar that needs to be removed (using tongs).

8. Remove the collar and housing from the shaft.

9. Remove both covers by unhooking the clamps. Pay attention to how the clamps are installed.

10. Clean all parts thoroughly.

11. Check the hinges for wear. Replace worn parts.

12. Fill the outer joint with special grease. Opel uses grease No. 19 41 52 for this purpose.

13. Fill the cavity of the cover halfway with grease.

14. Secure the cover with a clamp on the outer hinge. Make sure that the cover does not twist and returns to its original place.

15. Attach the inner cover to the drive.
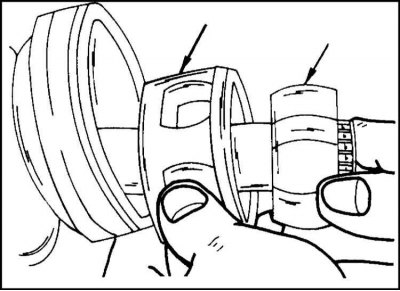
16. Assemble the separator and the clip according to the illustration.


16. Assemble the separator and the clip according to the illustration.

17. Insert the separator so that the smaller diameter points forward.

18. Secure the clip with a retaining ring.

19. The holes for the balls in the separator and the grooves in the cage are aligned by turning the cage by half the diameter of the ball.
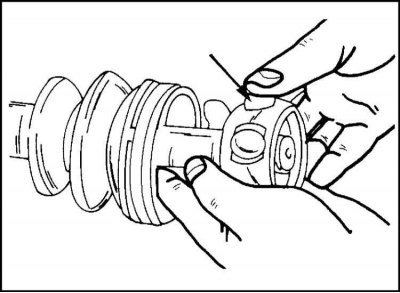
20. Press all six balls in order with your hand as shown.


20. Press all six balls in order with your hand as shown.


21. Insert the drive shaft into the hub.

22. Secure the inner joint with the retaining ring in the separator.

23. Turn the retaining ring so that its ends are located between the two grooves in the separator.

26. Fill half the volume of the boot with the grease mentioned above.

27. Place the cover on the hinge.

28. Carefully insert a blunt screwdriver under the edge of the case and release the air from the case.

29. Straighten the cover and measure the distance between the ends. It should be 147.5 mm.

30. Secure the cover with clamps. Make sure that the ends of the clamps remain in their original position.

31. Install the caliper, steering knuckle and tie rods as described in the appropriate sections.


This article is available at russian, bulgarian, belarusian, ukrainian, serbian, croatian, romanian, polish, slovak, hungarian
Checking the article: Meshcheryakov Damir

Share information:

Previous articles
Opel Frontera A: Cardan shafts
Next articles

Removal and installation front wheel drive shafts
Front propeller shaft — removal and installation
Removal and installation the front wheel hub
Front wheel drive
Cardan shaft and final drive specifications
Automatic hub lock
Manual hub lock
Rear Wheel Drive — General Information
Fixing rear axle leaks
Removal and installation rear axle shafts
Replacing the rear axle bearing


See similar ones from other Opel car manuals:
▶ Replacing the inner constant velocity joint Opel Corsa C (2000-2006, petrol)
▶ Replacement of constant velocity joint boots Opel Vectra B (1995-2002)
▶ Replacing constant velocity joints of front wheel drives Opel Astra J (2009-2015, petrol)
▶ Replacing the upper ball joint of the front suspension GNB Opel Insignia A (2008-2017)
▶ Rubber boots of the drive shaft and outer CV joint —… Opel Omega A (1986-1993)
Link to this page in different formats

Visitor comments


No comments yet


How much will 50 + 27 =


Vivaro A (2001-2014) 
  • General information
  • User manual
  • Power unit
  • Petrol engine F4R
  • Diesel engine F9Q
  • Diesel engine G9U
  • Transmission
  • Clutch and drive shafts
  • Manual gearbox
  • Chassis
  • Front suspension
  • Rear suspension
  • Brake system
  • Body
  • Exterior
  • Interior
  • Electrical equipment
  • Heating and ventilation
  • Air conditioner
  • Equipment and devices
  • Electrical diagrams
Ascona C (1981-1988) 
  • General information
  • Maintenance
  • Power unit
  • Gasoline engines
  • Diesel engines
  • Cooling system
  • Fuel and exhaust system
  • Contact ignition system
  • Contactless ignition system
  • Transmission
  • Clutch
  • Mechanical gearbox
  • Automatic gearbox
  • Drive shafts
  • Chassis
  • Steering
  • Brake system
  • Car suspension
  • Body
  • Exterior
  • Interior
  • Doors and windows
  • Electrical equipment
  • Equipment and devices
  • Power devices
  • Electrical circuits
Frontera B (1998-2004) 
  • General information
  • User manual
  • Maintenance
  • Power unit
  • Petrol engines 2.2 l
  • Petrol engines 3.2 l
  • Diesel engines 2.2 l
  • Cooling system
  • Fuel system (petrol)
  • Fuel system (diesel)
  • Ignition system
  • Transmission
  • Clutch
  • Manual gearbox MUA5C
  • Automatic gearbox 4L30E
  • Chassis
  • Suspension and axles
  • Steering
  • Brake system
  • Body
  • Exterior
  • Interior
  • Doors, locks and windows
  • Heating and air conditioning
  • Electrical equipment
  • Power devices
  • Equipment and devices
  • Lighting and signaling
  • Electrical diagrams
Frontera A (1991-1998, petrol) 
  • General information
  • Introduction to guide
  • User manual
  • Maintenance
  • Power unit
  • Engine repair
  • Lubrication system
  • Cooling system
  • Power and exhaust system
  • Engine electrics
  • Transmission
  • Clutch
  • Mechanical gearbox
  • Cardan shafts
  • Chassis
  • Brake system
  • Front suspension
  • Rear suspension
  • Steering
  • Body
  • Repair and care
  • Electrical equipment
  • Equipment and devices
  • Electrical circuits
OpelBook.ru © 2017–2026 · Mobile version · · Sitemap: EN BG BY UA RS HR RO PL SK HU · Feedback · Site search
Astra F, petrol · Astra G, petrol · Astra G · Astra H · Astra J, petrol · Corsa B · Corsa C, petrol · Corsa C · Insignia A · Kadett D · Kadett E · Omega A · Omega B · Omega B2 · Vectra A, petrol · Vectra A · Vectra B, petrol · Vectra B · Vectra C · Zafira A, petrol · Frontera A, petrol · Frontera B · Ascona C · Vivaro A ·
We want your visit to be comfortable 🤝! We use cookies 🍪 to make that happen.