
OpelBook.ru
Cars AvtoVAZ Cars Mitsubishi Cars BMW Cars Mercedes Cars Nissan Cars Toyota Cars Chevrolet
English Русский
Български
Беларускі
Український
Српски
Hrvatski
Română
Polski
Slovenský
Magyar
 |  Sitemap  |  Contacts  |    


Main Astra Corsa Insignia Kadett Omega Vectra Zafira Others Articles
Frontera A (1991-1998, petrol) Frontera B (1998-2004) Ascona C (1981-1988) Vivaro A (2001-2014)
  • Main
  • Opel
  • Frontera A
  • Transmission
  • Cardan shafts
  • Removal and installation the front wheel hub

Removal and installation the front wheel hub (Opel Frontera A)

            0

Contents: Replacing wheel bearings/seals ⬇ Replacing the front wheel hub ⬇
Removing the wheel hub requires a large wrench to loosen the wheel nut.

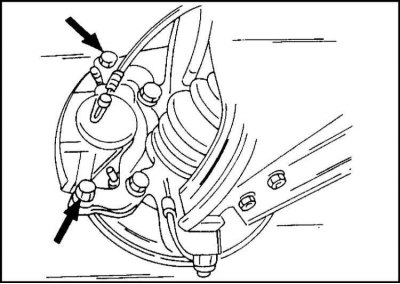
1. Remove both caliper mounting bolts shown in the illustration.


1. Remove both caliper mounting bolts shown in the illustration.

2. Tie it to the bridge with wire. Do not hang the caliper on the hose.

3. Remove the hub lock according to the above instructions.

4. Remove the bolts.

5. Remove the lock washers.
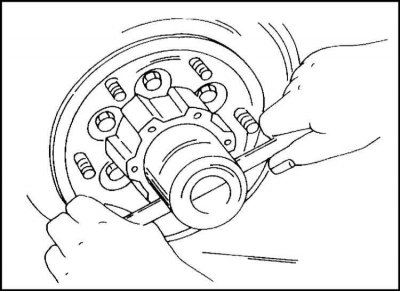
6. Loosen the wheel mounting nut. The shape of the key is shown in the illustration.


6. Loosen the wheel mounting nut. The shape of the key is shown in the illustration.

7. Remove the hub together with the brake disc from the steering knuckle.

The hub is installed in the reverse order of removal, observing the following:

1. Install the hub and brake disc onto the steering knuckle.


2. Screw on the nut.
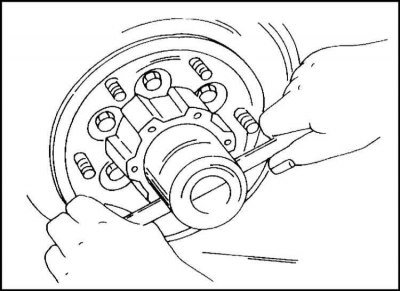
3. Tighten the nut to 29 Nm using the wrench shown in the illustration and then loosen it…


3. Tighten the nut to 29 Nm using the wrench shown in the illustration and then loosen it completely again.
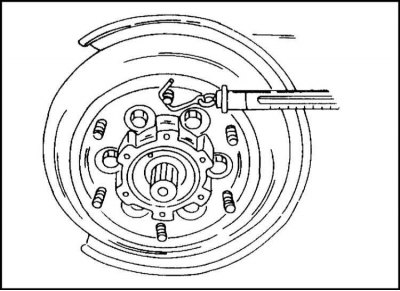
4. Hook the dynamometer onto the wheel mounting bolt as shown in the illustration and pull the…


4. Hook the dynamometer onto the wheel mounting bolt as shown in the illustration and pull the dynamometer.

5. The wheel fastening nut is tightened so that the hub with new bearings and a new seal turns with a traction force of 20-24 N (2.0-2.4 kg), and the hub with used bearings and a new seal turned with a traction force of 12-17 N (1.2-1.7 kg).

6. Install the lock washer and bolts.

7. If the holes in the washer and the holes in the bolts in the hub do not match, the washer can be installed in reverse.

8. If this still does not achieve alignment, tighten the nut a little.


9. Tighten the bolts to the surface of the washer.

10. Install the caliper and hub lock.

11. Perform other work in the reverse order of removal.

Replacing wheel bearings/seals


1. To replace the wheel bearings/seals, you must remove the wheel hub (see above).

2. Remove the seal, tapered roller bearing and inner race from the hub.

3. Place the hub on the pad.

4. Press out the outer bearing races using a brass drift from opposite sides. The hub has grooves into which a mandrel can be inserted to press out the corresponding race.

5. Clean the hub and steering knuckle thoroughly.

6. Check the bearing for damage, overheating, chrome peeling, etc. and replace if necessary.

7. Press new outer bearing races into the wheel hub using a suitable mandrel from opposite sides.

8. Fill both tapered roller bearings, seals and wheel hub cavities with bearing grease. Use a lubricant intended for this purpose.

9. Install the bearing separators.

10. Using a mandrel, press the seals in until they are flush with the outer surface.

11. Clean the wheel hub from any existing grease.

12. Install according to the instructions.

13. Install the hub locks depending on their design, as described above.

Replacing the front wheel hub


When replacing the front wheel hub, the following instructions must be observed:

1. If the vehicle is equipped with ABS, it is necessary to unscrew three bolts and remove the toothed ring from the hub.

2. When installing, tighten the bolts to a torque of 18 Nm.

3. Loosen the bolts and remove the brake disc.


4. The disk is secured with six bolts.

5. Before removing the disc, mark its position relative to the wheel hub.

6. When installing, tighten the bolts to a torque of 103 Nm.

7. The wheel mounting bolts must be installed from the old hub to the new one. They are removed and installed using a soft metal hammer.

8. When installed on a new hub, they should return to their original position and sit securely.


This article is available at russian, bulgarian, belarusian, ukrainian, serbian, croatian, romanian, polish, slovak, hungarian
Checking the article: Meshcheryakov Damir

Share information:

Previous articles
Opel Frontera A: Cardan shafts
Next articles

Front wheel drive
Cardan shaft and final drive specifications
Front propeller shaft — removal and installation
Removal and installation front wheel drive shafts
Replacement of the constant velocity joint boot
Automatic hub lock
Manual hub lock
Rear Wheel Drive — General Information


See similar ones from other Opel car manuals:
▶ Front Wheel Hub Bearing — Replacement Opel Astra F (1991-1998, petrol)
▶ Removal, repair and installation of front wheel disc brake… Opel Corsa B (1993-2000)
▶ Replacing the front wheel speed sensors Opel Insignia A (2008-2017)
▶ Front wheel drive Opel Kadett E (1984-1995)
▶ Front wheel alignment Opel Omega B (1993-1999)
Link to this page in different formats

Visitor comments


No comments yet


How much will 22 + 17 =


Vivaro A (2001-2014) 
  • General information
  • User manual
  • Power unit
  • Petrol engine F4R
  • Diesel engine F9Q
  • Diesel engine G9U
  • Transmission
  • Clutch and drive shafts
  • Manual gearbox
  • Chassis
  • Front suspension
  • Rear suspension
  • Brake system
  • Body
  • Exterior
  • Interior
  • Electrical equipment
  • Heating and ventilation
  • Air conditioner
  • Equipment and devices
  • Electrical diagrams
Ascona C (1981-1988) 
  • General information
  • Maintenance
  • Power unit
  • Gasoline engines
  • Diesel engines
  • Cooling system
  • Fuel and exhaust system
  • Contact ignition system
  • Contactless ignition system
  • Transmission
  • Clutch
  • Mechanical gearbox
  • Automatic gearbox
  • Drive shafts
  • Chassis
  • Steering
  • Brake system
  • Car suspension
  • Body
  • Exterior
  • Interior
  • Doors and windows
  • Electrical equipment
  • Equipment and devices
  • Power devices
  • Electrical circuits
Frontera B (1998-2004) 
  • General information
  • User manual
  • Maintenance
  • Power unit
  • Petrol engines 2.2 l
  • Petrol engines 3.2 l
  • Diesel engines 2.2 l
  • Cooling system
  • Fuel system (petrol)
  • Fuel system (diesel)
  • Ignition system
  • Transmission
  • Clutch
  • Manual gearbox MUA5C
  • Automatic gearbox 4L30E
  • Chassis
  • Suspension and axles
  • Steering
  • Brake system
  • Body
  • Exterior
  • Interior
  • Doors, locks and windows
  • Heating and air conditioning
  • Electrical equipment
  • Power devices
  • Equipment and devices
  • Lighting and signaling
  • Electrical diagrams
Frontera A (1991-1998, petrol) 
  • General information
  • Introduction to guide
  • User manual
  • Maintenance
  • Power unit
  • Engine repair
  • Lubrication system
  • Cooling system
  • Power and exhaust system
  • Engine electrics
  • Transmission
  • Clutch
  • Mechanical gearbox
  • Cardan shafts
  • Chassis
  • Brake system
  • Front suspension
  • Rear suspension
  • Steering
  • Body
  • Repair and care
  • Electrical equipment
  • Equipment and devices
  • Electrical circuits
OpelBook.ru © 2017–2026 · Mobile version · · Sitemap: EN BG BY UA RS HR RO PL SK HU · Feedback · Site search
Astra F, petrol · Astra G, petrol · Astra G · Astra H · Astra J, petrol · Corsa B · Corsa C, petrol · Corsa C · Insignia A · Kadett D · Kadett E · Omega A · Omega B · Omega B2 · Vectra A, petrol · Vectra A · Vectra B, petrol · Vectra B · Vectra C · Zafira A, petrol · Frontera A, petrol · Frontera B · Ascona C · Vivaro A ·
We want your visit to be comfortable 🤝! We use cookies 🍪 to make that happen.