
OpelBook.ru
Cars AvtoVAZ Cars Mitsubishi Cars BMW Cars Mercedes Cars Nissan Cars Toyota Cars Chevrolet
English Русский
Български
Беларускі
Український
Српски
Hrvatski
Română
Polski
Slovenský
Magyar
 |  Sitemap  |  Contacts  |    


Main Astra Corsa Insignia Kadett Omega Vectra Zafira Others Articles
Frontera A (1991-1998, petrol) Frontera B (1998-2004) Ascona C (1981-1988) Vivaro A (2001-2014)
  • Main
  • Opel
  • Ascona C
  • Chassis
  • Steering
  • Steering Angles and Wheel Layout — General Description

Steering Angles and Wheel Layout — General Description (Opel Ascona C)

            0

1. Correct alignment of the front wheels is essential for good steering performance and even tire wear. Before tackling the corners, check that the tires are properly inflated, that the front wheels are not bent, that the hub carriers are not worn, and that the steering links are in good condition with no looseness or wear in the joints.

2. Wheel placement involves four factors:
  • Camber is the angle at which the wheels deviate from the vertical position when viewed from the front or rear of the vehicle. Positive camber is the angle (in degrees), which the wheels deviate outward(on top of the wheel) from the vertical position.
  • Roller toe is the angle between the steering axis and a vertical line when viewed from each side of the vehicle. Roller toe-in is considered positive if the steering axle is inclined towards the rear of the vehicle with its upper end.
  • Steering axle caster is the angle, viewed from the front or rear of the vehicle, between the vertical and an imaginary line drawn between the upper and lower front suspension strut mounts.
  • Wheel toe is the difference in distance between the inside edge of the front wheel rims and the inside edge of the rear wheel rims. If the distance between the front inner edges is less than that between the rear ones, then the wheels are said to be positioned "toes in". If the distance between the front inner edges is greater than that between the rear ones, then the wheels are said to be positioned "toes out".

3. Since measuring small angles requires special precision instruments, it is preferable that wheel alignment and roller toe-in be checked at a service station that has the necessary equipment. Wheel alignment and toe-in are set at the time the vehicle is manufactured, and any deviation from these values must be due to accidental damage or severe wear in the suspension mountings.


4. To check the front wheel alignment, first make sure the lengths of both rods are equal when the steering is in position. in the "straight forward" position. If necessary, the rods can be adjusted in length by loosening the clamping bolts and turning the rods.

5. Purchase a measuring tool. These can be obtained in various types from auto supply stores, or such a tool can be made from a piece of steel pipe bent appropriately so as not to touch the pan, and having an adjusting screw and lock nut on one end.

6. Using such a tool, measure the distance between the inner rims of the two wheels (at the height of the hubs) behind the wheels. Push the car forward so that the wheel turns 180 degrees (half a turn) and measure the distance between the inner rims of the wheels, again at the height of the hubs, in front of the wheels. This last measurement must differ from the first by the appropriate amount of toe-in/toe-out in accordance with the Specifications. The machine must be on a level surface.

7. Where the toe-in/toe-out measurement is not correct, release the toe-in/toe-out clamp bolts and rotate the toe-in/toe-out rods one angle. Only turn them a quarter turn at a time before checking for alignment again. Do not touch the rod/ball joint threads when adjusting, use a wrench instead (see Figure 8.20). It is important not to allow the rods to become uneven in length during adjustment, which will result in incorrect steering wheel alignment and tire friction when cornering. The maximum difference in distance between the rods should not exceed 5 mm (0.2 in).
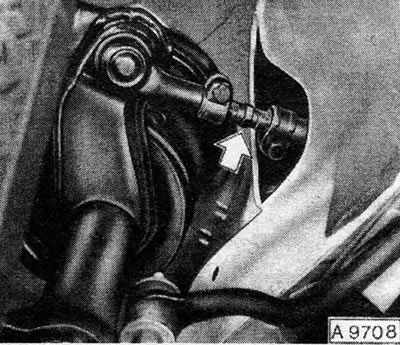


Figure 8.20 Location for the wrench on the outer rod - indicated by the arrow

Figure 8.20 Location for the wrench on the outer rod - indicated by the arrow


8. When finished, tighten the rod clamps without disturbing their settings. Check that the ball joint is in the center of its feed arc and that the notches in the clamps are aligned with the slots in the ball joint socket of the rod, and also that the clamp nuts are on top of the clamp clamp bolts.


This article is available at russian, bulgarian, belarusian, ukrainian, serbian, croatian, romanian, polish, slovak, hungarian
Checking the article: Kornev Georgy

Share information:

Previous articles
Opel Ascona C: Steering
Next articles

Steering column lock — removal and installation
Steering column — inspection
Steering column — removal and installation
Steering wheel — removal and installation
Steering wheel air freshener — removal and installation.
Steering — inspection
Power Steering — Blowing Out
Power Steering Pump Drive Belt — Tensioning
Fault Diagnosis — Steering


See similar ones from other Opel car manuals:
▶ Wheel alignment angles — general information Opel Astra G (1998-2004, petrol)
▶ Wheel alignment angles — general information Opel Corsa C (2000-2006)
▶ Wheel alignment and steering angles Opel Omega B (1993-1999)
▶ Front Wheel Alignment Angles — General Characteristics Opel Vectra A (1988-1995, petrol)
▶ Adjusting the position of the steering wheel Opel Insignia A (2008-2017)
Link to this page in different formats

Visitor comments


No comments yet


How much will 46 + 42 =


Vivaro A (2001-2014) 
  • General information
  • User manual
  • Power unit
  • Petrol engine F4R
  • Diesel engine F9Q
  • Diesel engine G9U
  • Transmission
  • Clutch and drive shafts
  • Manual gearbox
  • Chassis
  • Front suspension
  • Rear suspension
  • Brake system
  • Body
  • Exterior
  • Interior
  • Electrical equipment
  • Heating and ventilation
  • Air conditioner
  • Equipment and devices
  • Electrical diagrams
Ascona C (1981-1988) 
  • General information
  • Maintenance
  • Power unit
  • Gasoline engines
  • Diesel engines
  • Cooling system
  • Fuel and exhaust system
  • Contact ignition system
  • Contactless ignition system
  • Transmission
  • Clutch
  • Mechanical gearbox
  • Automatic gearbox
  • Drive shafts
  • Chassis
  • Steering
  • Brake system
  • Car suspension
  • Body
  • Exterior
  • Interior
  • Doors and windows
  • Electrical equipment
  • Equipment and devices
  • Power devices
  • Electrical circuits
Frontera B (1998-2004) 
  • General information
  • User manual
  • Maintenance
  • Power unit
  • Petrol engines 2.2 l
  • Petrol engines 3.2 l
  • Diesel engines 2.2 l
  • Cooling system
  • Fuel system (petrol)
  • Fuel system (diesel)
  • Ignition system
  • Transmission
  • Clutch
  • Manual gearbox MUA5C
  • Automatic gearbox 4L30E
  • Chassis
  • Suspension and axles
  • Steering
  • Brake system
  • Body
  • Exterior
  • Interior
  • Doors, locks and windows
  • Heating and air conditioning
  • Electrical equipment
  • Power devices
  • Equipment and devices
  • Lighting and signaling
  • Electrical diagrams
Frontera A (1991-1998, petrol) 
  • General information
  • Introduction to guide
  • User manual
  • Maintenance
  • Power unit
  • Engine repair
  • Lubrication system
  • Cooling system
  • Power and exhaust system
  • Engine electrics
  • Transmission
  • Clutch
  • Mechanical gearbox
  • Cardan shafts
  • Chassis
  • Brake system
  • Front suspension
  • Rear suspension
  • Steering
  • Body
  • Repair and care
  • Electrical equipment
  • Equipment and devices
  • Electrical circuits
OpelBook.ru © 2017–2026 · Mobile version · · Sitemap: EN BG BY UA RS HR RO PL SK HU · Feedback · Site search
Astra F, petrol · Astra G, petrol · Astra G · Astra H · Astra J, petrol · Corsa B · Corsa C, petrol · Corsa C · Insignia A · Kadett D · Kadett E · Omega A · Omega B · Omega B2 · Vectra A, petrol · Vectra A · Vectra B, petrol · Vectra B · Vectra C · Zafira A, petrol · Frontera A, petrol · Frontera B · Ascona C · Vivaro A ·
We want your visit to be comfortable 🤝! We use cookies 🍪 to make that happen.