
Removing
1. Apply the parking brake.
2. Remove the wheel disc cover. Remove the castellated hub nut retainer pin and loosen the nut.
In this case, the car must be on the ground.
3. Mark the position of the front wheel in relation to its hub so that the balanced wheel can then be installed in its previous position. Turn out bolts of fastening of wheels at the car standing on the earth. Jack up the front of the car, place it on jack stands and remove the front wheels.
4. Finally remove the hub nut. If the car is on a lift, then you can use a special tool (lever arm) for holding, which you can make yourself. The tool is attached with two wheel bolts.
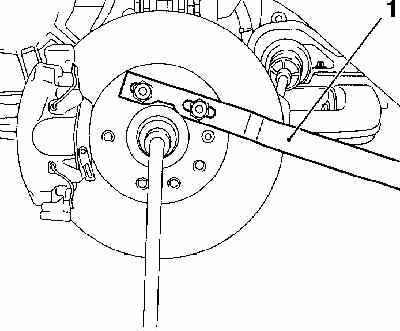
Loosening the hub nut with the wheel removed - the hub is blocked from turning with a metal bar (1)
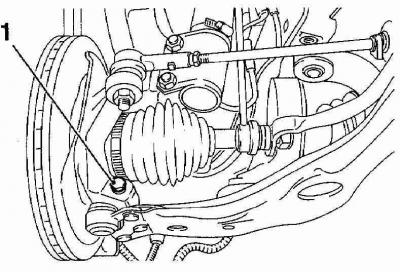
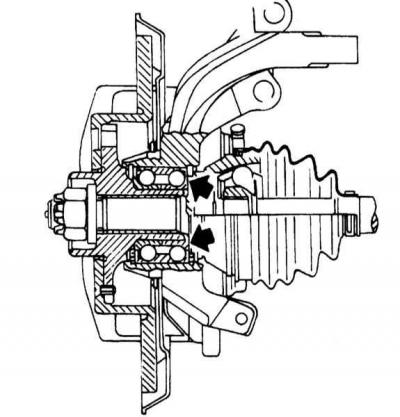
5. Remove the clamping bolt (arrow) ball bearing. Pull the transverse arm down by hand, and the ball joint will slide out of the steering knuckle.
Bolt of a collar of fastening of a spherical support to a rotary fist
6. Tie the drive shaft to the body with wire so that the hinges do not bend all the way when one side is removed.
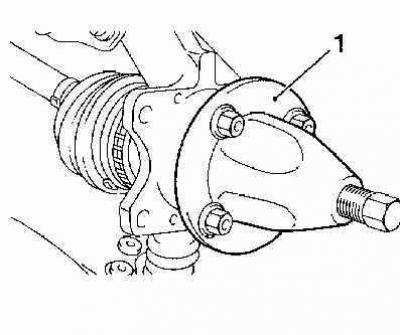
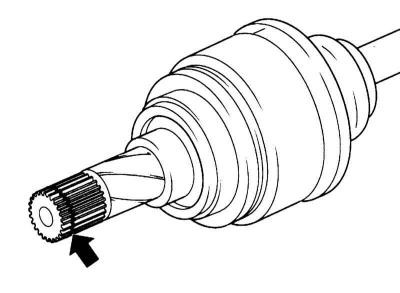
7. Remove the drive shaft from the front wheel hub by hand while pulling the suspension strut outward. If this is not possible, push the drive out using a conventional puller.
Pulling the hub off the shaft stub with a special puller
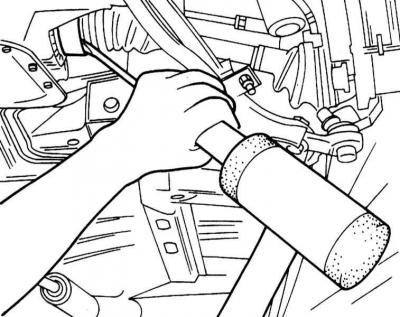
8. Knock out the drive shaft from the gearbox housing. Service stations use a special tool KM-460-2-A for this (for left drive shaft) or KM-460-1.
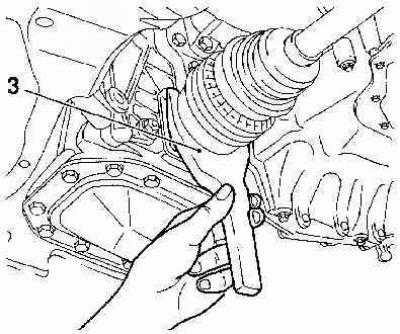
Removing the internal pin of the shaft from the differential by prying the CV joint with a forked lever
The chamfered side of the tool must face the manual transmission. When removing the drive shafts, oil flows out. Close the hole in the gearbox housing with a suitable plug, for example, OPEL (ET № 9092869).
9. If the specified tool is not available, or if the drive shaft is stuck during removal, knock it out with a flat chisel. To do this, first remove the CV joint cover.
10. Place a chisel between the end of the shaft and the bevel wheel axle and then knock out the drive shaft.
After removing the drive shaft from the wheel hub, try not to load the CV joint and not move the car so as not to damage the wheel bearings. If it is necessary to move the car, insert the drive shaft into the hub and secure it with a lock nut, or tighten the bearings with a long bolt with a nut and a pair of washers. When performing all work related to the need to dismantle the drive shaft from the gearbox housing, keep in mind that the drive shaft should be pulled out only by the hinge, and not by the shaft itself. When removing and installing the drive shaft from the hub, be aware of the presence of an internal CV joint.
Installation
The new drive shaft must be handled with care. It should not lie for a long time leaning on covers.
1. The adjacent shoulder of the outer CV joint, as well as its adjacent surface to the wheel bearing, should be thoroughly cleaned.
Surfaces to be cleaned
2. Lubricate the spline connection and bearing installation sites with impellent oil.
3. Install a new retaining ring in the groove of the shaft on the side of the manual transmission.
Retaining ring
4. Insert the drive shaft by hand into the hole in the gearbox housing. Then push the drive shaft with a screwdriver until the circlip locks into place. Install the screwdriver on the shoulder of the seam, and not on the cladding.
Screwdriver position when installing the drive shaft
5. After fixing the retaining ring, check the reliability of the CV joint by pulling the outer hinge by hand.
6. If the CV joint cap was removed, replace its seal and apply grease to the cap. Tighten the steel cover fasteners 30 Nm, and aluminum - with force 18 Nm.
7. Insert the splined end of the drive shaft into the hub.
8. Install a new washer and hand-tighten the new castle nut without tightening it.
9. Insert the ball joint into the steering knuckle. Bolt insert from behind. Tighten the new self-locking nut 30 Nm (refer to illustration).
10. Install the front wheels so that the previously marked marks match. Lower the vehicle to the ground and tighten the wheel bolts crosswise with force 110 Nm.
11. Tighten the hub nut firmly 130 Nm. Have an assistant depress the brake pedal, loosen the hub nut and re-tighten it firmly 20 Nm. In this position, tighten the nut at an angle 90 deg.
12. Insert a new cotter pin and bend it. If the cotter pin does not insert, loosen the nut slightly to the nearest cotter pin hole and insert the cotter pin.
13. Check the oil level in the manual transmission and, if necessary, add oil (see chapter Vehicle settings and routine maintenance).
Visitor comments