
OpelBook.ru
Cars AvtoVAZ Cars Mitsubishi Cars BMW Cars Mercedes Cars Nissan Cars Toyota Cars Chevrolet
English Русский
Български
Беларускі
Український
Српски
Hrvatski
Română
Polski
Slovenský
Magyar
 |  Sitemap  |  Contacts  |    


Main Astra Corsa Insignia Kadett Omega Vectra Zafira Others Articles
Corsa B (1993-2000) Corsa C (2000-2006, petrol) Corsa C (2000-2006)
  • Main
  • Corsa
  • Corsa B
  • Transmission
  • Clutch and drive shafts
  • Checking the condition of clutch components

Checking the condition of clutch components (Opel Corsa B)

            0

Remember that dust generated during wear of the clutch slave disk friction linings may contain asbestos, which is harmful to health. Do not blow off dust with compressed air and try not to inhale it. Do not use petroleum-based solvents to wipe clutch components - use only special brake cleaners or pure methyl alcohol. Place used rags in a hermetically sealed container.


1. Most often, the malfunction of the clutch is associated with wear of the friction linings of the driven disk. However, it is necessary to carefully examine the condition of all other components of the assembly.

2. Examine the flywheel working surface for cracks, traces of overheating, grooves and other damage. Minor defects can be eliminated by turning in a car service workshop (it is recommended to perform turning regardless of the surface condition). A description of the flywheel removal and installation procedures is given in Section Removal, checking condition and installing flywheel/drive disk. Also check the condition and evaluate the flatness of the mating surface of the clutch pressure plate.

Measuring the flatness of the mating surface of the clutch pressure plate
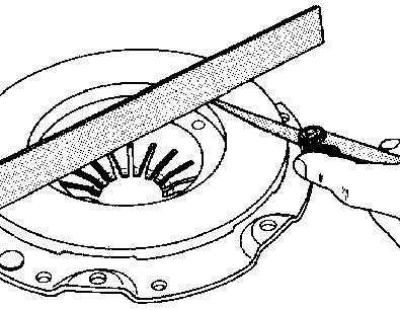
Measuring the flatness of the mating surface of the clutch pressure plate


3. Assess the degree of wear of the friction linings of the driven clutch disc. The surface of the linings should rise above the rivet heads by at least 1.6 mm. Make sure that all rivets are tightly seated, check the torsion springs/dampers for cracks, signs of deformation and other mechanical damage. Oiling of the friction linings most often occurs due to failure of the crankshaft oil seal, damage to the integrity of the oil pan gasket, sealing element of the slave cylinder assembly or oil seal of the primary shaft of the manual transmission - replace the damaged components. As mentioned above, it makes sense to replace the clutch components every time the assembly is dismantled, so pay attention to the slightest errors.


Assembling the slave disk
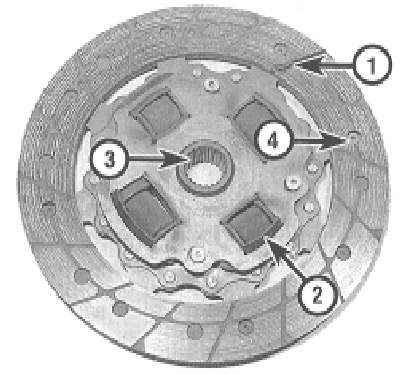
1 — Friction linings - in the picture, worn below the permissible limit

1 — Friction linings - in the picture, worn below the permissible limit

2 — Torsion springs or dampers - must be checked for cracks and signs of deformation

3 — Splined hub - should slide freely on the splines of the gearbox input shaft, the splines should not be excessively worn

4 — Rivets - are used to secure friction linings and when the latter are excessively worn, they begin to leave grooves on the working surface of the flywheel


4. The release bearing is always replaced together with the driven disk. If the driven disk is OK, check the condition of the release bearing - the bearing should rotate smoothly, without signs of jamming. The mating surfaces should be absolutely smooth and undamaged, without cracks, burrs or dents. If you are not sure of the bearing condition, replace the slave cylinder assembly (see section Removal, checking and installation the clutch release bearing).

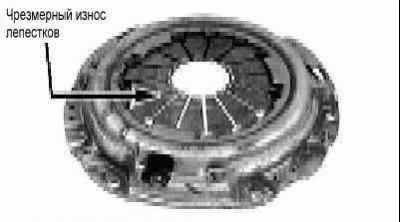
5. Assess the condition of the machined surfaces and petals of the diaphragm spring of the pressure plate. If defects are found, replace the basket assembly. Traces of light polishing can be removed using fine-grained sandpaper. A reconditioned clutch assembly can always be purchased on an exchange basis through Opel branded service stations.


Examples of diaphragm spring wear
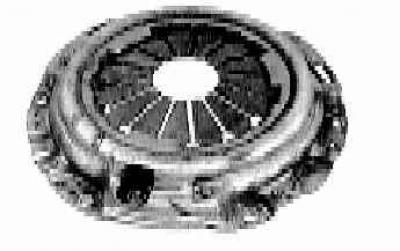
Normal wear of petals
Normal wear of petals


Excessive wear of petals
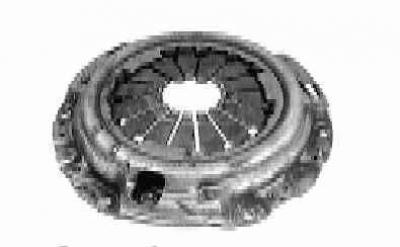
Excessive wear of petals


Petals are broken or bent

Petals are broken or bent


This article is available at russian, bulgarian, belarusian, ukrainian, serbian, croatian, romanian, polish, slovak, hungarian
Checking the article: Trifonova Emilia

Share information:

Previous articles
Opel Corsa B: Clutch and drive shafts
Next articles

Replacing the clutch cable
Removal, checking and installation the clutch release bearing
Removal and installation the clutch
Design of the clutch and its drive components
General information about clutches and drive shafts
Clutch and Drive Shaft Specifications
Drive shafts — general information
Removal and installation drive shafts
Checking the condition and replacing constant velocity joints (CV joints)
Replacement of protective covers of CV joints


See similar ones from other Opel car manuals:
▶ Removal and installation of camshafts and valve lifters,… Opel Astra H (2004-2009)
▶ Checking the condition of the cooling system components Opel Vectra C (2002-2008)
▶ Clutch — checking technical condition Opel Zafira A (1999-2005, petrol)
▶ Checking the condition of suspension and steering components Opel Frontera A (1991-1998, petrol)
▶ Cleaning and checking the technical condition of the… Opel Insignia A (2008-2017)
Link to this page in different formats

Visitor comments


No comments yet


How much will 38 + 21 =


Corsa C (2000-2006) 
  • General information
  • Introduction to guide
  • Troubleshooting
  • Vehicle device
  • User manual
  • Maintenance
  • Power unit
  • Engine repair
  • Cooling system
  • Power and exhaust system
  • Control system
  • Engine electrical equipment
  • Transmission
  • Clutch
  • Mechanical gearbox
  • Automatic gearbox
  • Drive shafts
  • Chassis
  • Brake system
  • Wheel suspension
  • Steering
  • Body
  • Exterior
  • Interior
  • Doors and windows
  • Heating and air conditioning
  • Electrical equipment
  • Equipment and devices
  • Lamps and lighting
  • Electrical circuits
Corsa C (2000-2006, petrol) 
  • User manual
  • Car access
  • Governing bodies
  • Seat control
  • Heating and air conditioning
  • Driving and maintenance
  • Engines 1.0 and 1.2 l
  • Engine repair
  • Cooling and lubrication system
  • Injection system
  • Engines 1.4, 1.6 and 1.8 l
  • Engine repair
  • Cooling and lubrication system
  • Injection system
  • Transmission
  • Clutch
  • Mechanical gearbox
  • Automatic gearbox
  • Drive shafts
  • Chassis
  • Wheels and tires
  • Wheel suspension
  • Steering
  • Brake system
  • Body
  • Exterior
  • Doors and windows
  • Electrical equipment
  • Equipment and devices
  • Lighting system
  • Electrical circuits
Corsa B (1993-2000) 
  • General information
  • Introduction to guide
  • User manual
  • Maintenance
  • Power unit
  • SOHC gasoline engines
  • DOHC gasoline engines
  • Diesel engines
  • Engine repair
  • Cooling system
  • Supply system
  • Injection system (gasoline)
  • Injection system (diesel)
  • Exhaust systems
  • Control system (gasoline)
  • Preheat system (diesel)
  • Charge and launch system
  • Transmission
  • Mechanical gearbox
  • Automatic gearbox
  • Clutch and drive shafts
  • Chassis
  • Brake system
  • Front suspension
  • Rear suspension
  • Steering
  • Body
  • Ventilation and heating
  • Exterior
  • Interior
  • Doors and windows
  • Electrical equipment
  • Equipment and devices
  • Lamps and lighting
  • Electrical circuits
OpelBook.ru © 2017–2026 · Mobile version · · Sitemap: EN BG BY UA RS HR RO PL SK HU · Feedback · Site search
Astra F, petrol · Astra G, petrol · Astra G · Astra H · Astra J, petrol · Corsa B · Corsa C, petrol · Corsa C · Insignia A · Kadett D · Kadett E · Omega A · Omega B · Omega B2 · Vectra A, petrol · Vectra A · Vectra B, petrol · Vectra B · Vectra C · Zafira A, petrol · Frontera A, petrol · Frontera B · Ascona C · Vivaro A ·
We want your visit to be comfortable 🤝! We use cookies 🍪 to make that happen.