


Contents: Removal ⬇ Installation ⬇
To remove the clutch, you will need a special tool. Clutch on 1.2 and 1.4 l engines can be removed and installed with a manual transmission installed. On cars with 1.5 and 1.6 l engines for this purpose, the manual transmission will have to be removed.
When removing the clutch disc, pay attention to the direction in which the long element of the hub points. The clutch disc must be installed in the same direction. Follow the installation instructions if any on the Opel clutch discs.
Removal
On 1.5 and 1.6 l engines remove the manual transmission (see Chapter Manual 5-speed gearbox).
Engines 1.2 and 1.4 l
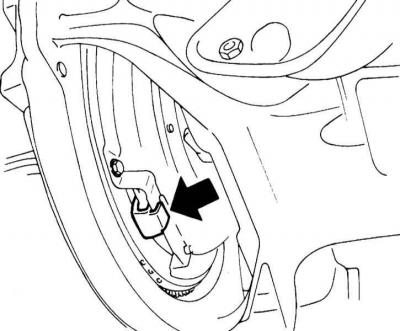
1. Using a screwdriver, remove the locking clip from the threaded rod of the clutch cable.
Locking bracket
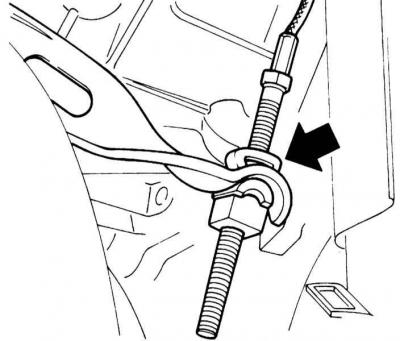
2. Use a pry bar to push back the clutch release lever and disconnect the cable.
3. Mark the position of the left front wheel in relation to its hub so that the balanced wheel can then be installed in its original position. Unscrew the wheel mounting bolts. Jack up the front of the car, place it on supports and remove the left front wheel.
4. Unscrew the mounting bolts and remove the manual transmission cover.
Gearbox cover mounting bolts
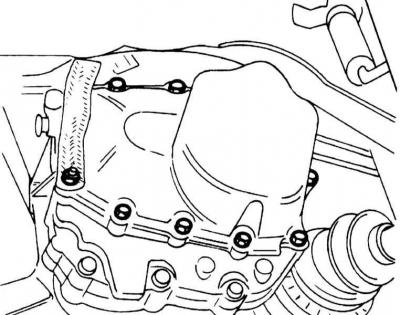
Prepare a suitable container to collect the oil that flows out.
5. Remove the retaining ring (arrow) of the cylinder bolt and unscrew the bolt.
Retaining ring
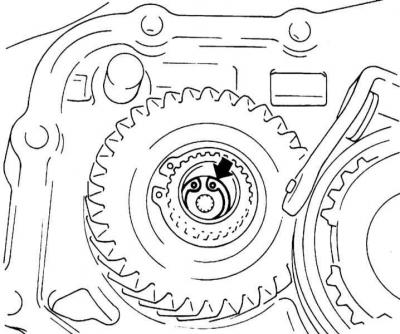
6. Mark the position of the manual transmission input shaft in relation to the gear.
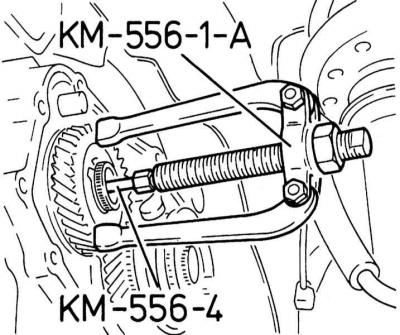
7. Pull out the primary shaft of the manual transmission using a special tool KM-556-1-A and a threaded insert 556-4 until it stops from the spline engagement. If the specified tool is not available, you can use a regular puller with an M7 thread.
Removal the primary shaft of the manual transmission
8. Unscrew the mounting bolts and remove the clutch basket cover.
9. Squeeze the clutch and fix it in this position with three KM-526 clamps, installing them evenly around the circumference. To do this, disengage the clutch using a crowbar, i.e. press it back or ask an assistant to press the clutch pedal.
Clutch locking
All engines
1. Loosen the mounting bolts and disconnect the clutch basket assembly from the flywheel and remove it together with the driven disk.
Material provided by this website (OpelBook.ru)
Do not drop the clutch slave and pressure plates when removing them.
2. Wipe the flywheel with a rag soaked in gasoline.
Installation
1. Check the clutch release guide seal ring for contamination and clean if necessary. Install the clutch release bearing.
2. Apply a thin layer of grease to the splines of the manual transmission input shaft. Remove any remaining grease.
Do not lubricate the splines of the driven disk.
3. Place the driven disk on the manual transmission input shaft. Remove excess grease from the hub joint and remove the driven disk again.
Install the driven disc so that the long part of the hub faces the manual transmission. Follow the installation instructions on the clutch disc.
Engines 1.5 and 1.6 l
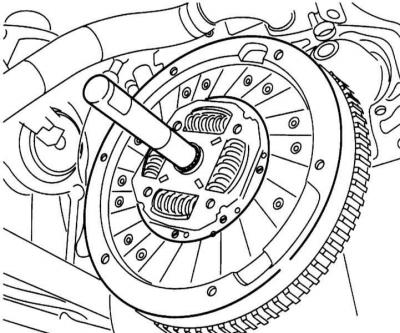
1. Install the driven disk and center it using a drift or the HAZET-2174 centering tool.
Centering the driven disk
2. Tighten the driven disk mounting bolts evenly with force 15 Nm.
3. Install the manual transmission (see Chapter Manual 5-speed gearbox).
Engines 1.2 and 1.4 l
1. Install the clutch basket assembly with the driven disk onto the flywheel without securing it.
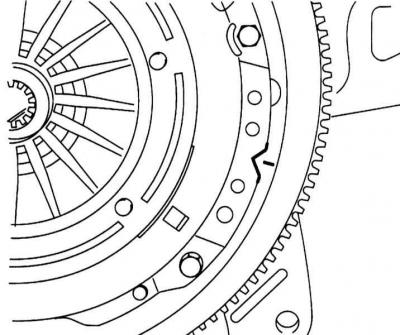
Make sure that the marks on the clutch basket and the flywheel match.
Clutch timing marks
2. Raise the driven disk slightly and center it with the primary shaft. Carefully insert the primary shaft into the splined hole of the driven disk and gear, ensuring that they mesh correctly.
Centering the driven disk

Observe the marks made on the input shaft and gear during removal.
3. Secure the clutch with force 15 Nm.
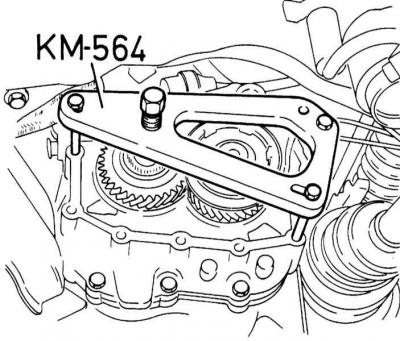
4. Insert the primary shaft with the KM-564 tool until it stops. To do this, be sure to screw the cylindrical bolt into the shaft. Do not drive the shaft in with an impact tool, otherwise you can damage the teeth of the splined connection. Tighten the cylindrical bolt with force 15 Nm.
Installing the primary shaft
5. Secure the input shaft with a new retaining ring.
6. Glue the new gearbox cover seal with grease.
7. Install the manual transmission cover and evenly tighten the bolts that secure it with the required force.
8. Squeeze the clutch with a tire iron, remove the three clamps and release the clutch.
9. Install the clutch basket assembly cover and tighten its mounting bolts with force 7 Nm.
All engines
1. Install the left wheel so that the marks made during removal match. Secure the wheel with bolts. Lower the car to the ground and tighten the bolts crosswise with force 110 Nm.
2. Connect the clutch cable to the clutch release lever and install the locking clip onto the threaded element.
3. Check the oil level in the manual transmission and add oil if necessary.
4. Check the clutch adjustment.
Visitor comments