
Note: In case of replacement or regrooving of brake discs, it is necessary to install new brake pads on them at the same time.
Removing
2. Jack up the car and remove the wheels (see chapter «Introduction»).
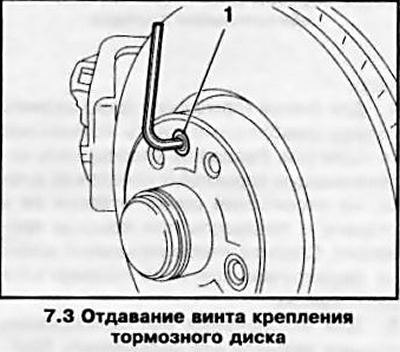
3. To remove the front wheel brake disc, release the brake hose from the support bracket on the suspension strut (see Section 4) and unscrew the fixing screw (see resist. illustration) - You don't need to remove the caliper.
4. To remove the brake disc of the rear wheel, you must remove the brake pads (see Section 6), disconnect the brake pad guide from the disc, without disconnecting the hose, take it to the side and tie it up with a wire. Make sure that the brake hose is not twisted or stretched.
5. To prevent the piston from slipping, clamp it with a wooden block, setting the latter between the piston and the caliper. Loosen the fixing screw and remove the brake disc from the wheel hub (see illustration 7.3).
6. If, as a result of prolonged use, any of the discs has become attached to the wheel hub, use a plastic hammer and knock the disc with light blows.
Attention: When removing the disk, strong impacts are not allowed!
Try using a rust remover as well. If these attempts fail, remove the disc with a puller or knock the disc off with a heavy hammer. When removing the disc with a puller, it must be replaced with a new one; when using a heavy hammer, in addition, the wheel bearings must also be replaced.
Installation
7. Check the condition of the brake disc (see below). Measurements when checking a disk must be accurate, so the compilers of this Guide recommend contacting a service station or a specialist who has the appropriate measuring tool and the necessary experience in performing these works.
8. Installation is done in the reverse order to the dismantling of the components. Before installation, make sure that the mating surfaces of the disc and hub are absolutely clean and dry. Lightly lubricate the threaded portion of the disc fixing screw with locking compound. If the disc is being replaced, remove the protective varnish from the new brake disc with thinner. When installing the rear wheel brake, do not forget to adjust the parking brake (see Section 12).
Status check
9. It is best to check in a stationary workshop, where all the conditions and the necessary tools are available. However, in some cases, it is possible to check the discs without removing them from the car - this somewhat reduces the complexity of the work, but it is more difficult to achieve the required measurement accuracy. All checked dimensions are given in the Specifications to this Chapter.
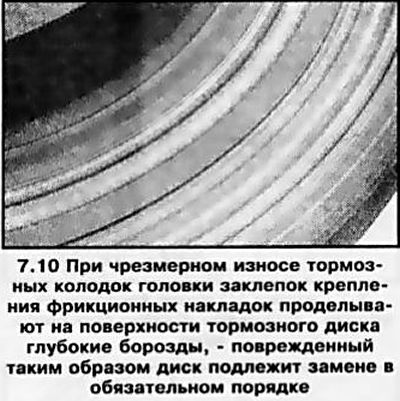
10. Perform a visual check of the condition of the working surface of the disc (see resist. illustration). Light defects can be removed with fine-grained sandpaper. To remove deep grooves, the disc should be machined. Remember that the disc must be inspected from both sides. Rusted brake discs create increased noise during braking, if the noise does not disappear during a sufficiently long period of operation, replace the discs.
11. If, during braking, pulsations of the foot brake pedal were noticed, which are not related to the operation of the ABS, the magnitude of the lateral runout of the brake disc should be assessed. The value of the lateral runout is checked using a plunger-type dial gauge. The measurement result should not go beyond the allowable range specified in the Specifications, otherwise the disk must be given to the groove.
Note: The compilers of this Guide recommend turning the discs, regardless of their condition, in order to remove any kind of defects from the working surfaces. In extreme cases, you can limit yourself to processing the disk with fine-grained sandpaper.
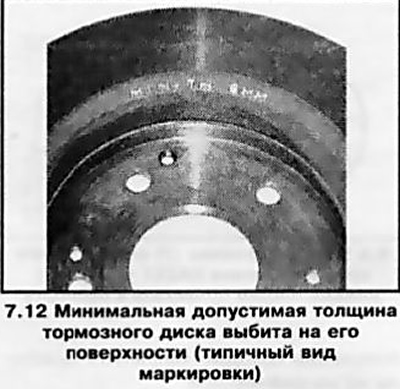
12. When turning a disc, special attention should be paid to compliance with the requirements of the Specifications for its minimum allowable thickness. Appropriate marking is provided on the end surface of the disc (see resist. illustration). The thickness of the disk is measured using a micrometer and some other instruments.
Visitor comments