


Note: A failed brake master cylinder must be replaced. Manufacturers do not recommend attempting to perform a refurbishment of the brake master cylinder.
1. The brake master cylinder is located in the engine compartment of the vehicle and is attached to the brake booster assembly.
2. Remove the brake fluid reservoir cap and pump out as much of the fluid as possible (use a syringe or a rubber bulb).
3. Place rags under the fittings and have plugs or plastic bags available to seal the open ends of the brake lines to prevent dirt from entering the system.
Warning: Brake fluid is an aggressive chemical compound and when in contact with body panels it destroys the paintwork. Before starting the procedure, cover the fenders and front panel of the car with special covers or just old blankets.
4. If equipped, disconnect the electrical wiring of the brake fluid level switch sensor from the brake master cylinder reservoir.
5. On models with manual transmission, disconnect the clutch hydraulic line tube from the master cylinder reservoir (see accompanying illustration). Carefully remove the reservoir from the brake master cylinder, remove any spilled brake fluid with a clean rag.
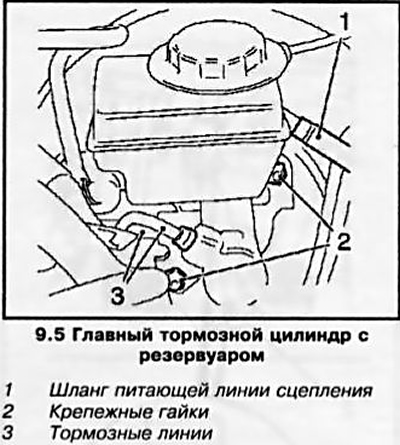
Note: When disconnecting any lines or the reservoir, immediately plug the open cylinder ports and tube ends with plugs.
6. Loosen the nuts of the union assemblies connecting the brake lines to the master cylinder (see illustration 9.5). To avoid rounding the nut splines, loosen them using a special open-end wrench with a slotted head. Pulling slightly outward, separate the brake lines from the master cylinder nipples.
7. Loosen the 2 mounting nuts (see illustration 9.5) and separate the master cylinder from the brake booster assembly. Remove the cylinder from its mounting studs and lift it out of the engine bay, being careful not to spill any hydraulic fluid filling the cylinder onto the painted body panels. Remove the sealing gasket.
8. The brake master cylinder is installed in the reverse order of its removal. Do not forget to replace the removed gaskets.
9. After installation is complete, fill the cylinder and reservoir with brake fluid and bleed the system (see Section 3). Bring the fluid level up to the "MAX" mark (see Chapter 1) and tighten the tank cap securely.
10. Before operating the vehicle, make sure that the brakes are functioning properly.
Visitor comments