
OpelBook.ru
Cars AvtoVAZ Cars Mitsubishi Cars BMW Cars Mercedes Cars Nissan Cars Toyota Cars Chevrolet
English Русский
Български
Беларускі
Український
Српски
Hrvatski
Română
Polski
Slovenský
Magyar
 |  Sitemap  |  Contacts  |    


Main Astra Corsa Insignia Kadett Omega Vectra Zafira Others Articles
Astra F (1991-1998, petrol) Astra G (1998-2004, petrol) Astra G (1998-2004) Astra H (2004-2009) Astra J (2009-2015, petrol)
  • Main
  • Astra
  • Astra H
  • Chassis
  • Brake system
  • Bleeding the brake system

Bleeding the brake system (Opel Astra H)

            0

Warning: Wear safety glasses when bleeding the brake system. If brake fluid accidentally gets into your eyes, rinse them immediately with plenty of water and seek medical help!


1. Bleeding the hydraulic system is performed in order to remove air from it that gets into the system when servicing the brake mechanisms, replacing hydraulic lines or the master cylinder, and also when the fluid level in the master cylinder reservoir drops below the minimum permissible value.

2. Press the foot brake pedal several times with the engine off to relieve any residual vacuum in the brake booster.

3. All models considered in this Manual are equipped with ABS as standard. For high-quality and guaranteed bleeding of the hydraulic drive, as well as for the clutch drive (see Chapter 6, Section 4), a special bleeding kit must be used - carefully read the instructions for its use before starting work. Remove the brake fluid reservoir cap and install a suitable adapter in its place to connect the bleeding device. To prevent air from entering the brake tract, the free end of the hose must be immersed in a container with brake fluid (see accompanying illustration) - do not forget about the need to monitor the fluid level in the master cylinder reservoir (the level should not fall below the MINI mark).
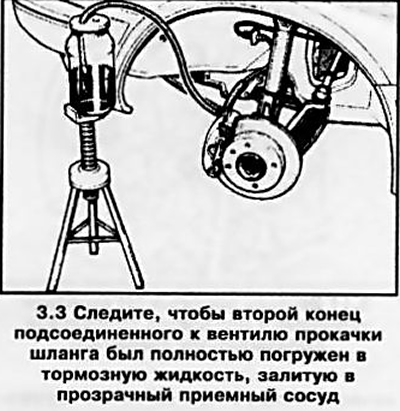
3. All models considered in this Manual are equipped with ABS as standard. For high-quality and…


4. After bleeding is complete, add fresh brake fluid to the master cylinder reservoir, bringing its level back to normal.


5. Check the efficiency of the brakes. The pedal should provide firm resistance when pressed - the feeling of its softness indicates the presence of air in the hydraulic circuits and the need to repeat the bleeding procedure.

Attention: Never operate the vehicle unless you are absolutely sure that the brake system is functioning properly!


Emergency bleeding method - requires assistant assistance


6. In some cases, when the bleeding kit is not available, but it is necessary to continue the trip, if air gets into the hydraulic tract of the service brake system drive, you can use the method below.

Note: On models equipped with ABS, this method does not provide a 100% guarantee of complete removal of air from the system - be especially careful when continuing to drive!


7. If air has entered the system due to a drop in the fluid level in the brake master cylinder reservoir, or when the brake lines are disconnected from the brake master cylinder, the brake mechanisms of all four wheels must be bled. When disconnecting the lines from any of the calipers/wheel cylinders, it will be sufficient to bleed only that specific brake mechanism.

8. If the brake line was disconnected from the nipple located between the brake master cylinder and one of the brake mechanisms, only this part of the brake circuit is bled.

9. Before starting the procedure, check the brake fluid level in the reservoir and, if necessary, bring it up to the "MAX" mark.

Note: Do not forget to regularly check the fluid level in the reservoir during bleeding. An excessive drop in the level may result in air entering the master cylinder, which will nullify all efforts and will entail the need to bleed the entire brake system.


10. With the help of an assistant, have a supply of fresh brake fluid, a clear container partially filled with brake fluid, a length of plastic hose that fits snugly over the bleeder valve, and a suitable open-end/box wrench to loosen/tighten the valve.

11. Remove the dust cap and loosen the bleed valve slightly (see accompanying illustration) brake mechanism of the right rear wheel, then tighten it again so that it releases easily and quickly during the procedure.
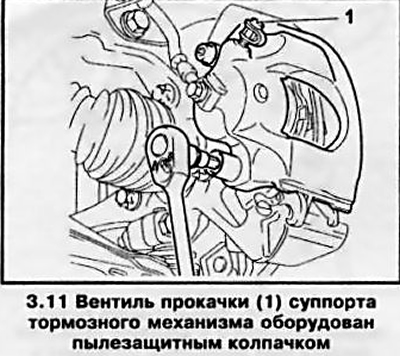
11. Remove the dust cap and loosen the bleed valve slightly (see accompanying illustration) brake…


12. Attach a suitable plastic or rubber hose to the valve, and lower the other end into a transparent container partially filled with clean brake fluid (see illustration 3.3). The end of the hose must be completely immersed in the liquid.

13. Ask an assistant to slowly depress the foot brake pedal several times, thereby increasing the pressure in the system.

14. With the brake pedal locked in the lower position, open the bleeder valve just enough to force brake fluid out of it. Watch the fluid coming out of the hose. After a few seconds, when the pressure weakens, close the valve and allow the assistant to release the pedal.

15. Repeat the procedures of the last two paragraphs until the fluid starts to flow out of the valve free of air bubbles, then move on to the brake mechanism of the left rear wheel. Proceeding in a similar manner, bleed this mechanism, then the mechanisms of the right front wheel and, finally, the left front wheel.


Caution: Always ensure that the fluid level in the master cylinder reservoir does not drop too low; make appropriate adjustments if necessary!


16. Never add used brake fluid to the reservoir - it is highly hygroscopic and over time absorbs a lot of moisture, which leads to a drop in its boiling point and, as a result, to a decrease in braking efficiency. In addition, the presence of moisture in the hydraulic system contributes to accelerated aging of the material of flexible brake hoses.


This article is available at russian, bulgarian, belarusian, ukrainian, serbian, croatian, romanian, polish, slovak, hungarian
Checking the article: Simonov Timofey

Share information:

Previous articles
Opel Astra H: Brake system
Next articles

Electronic braking control systems
General information
Brake system specifications
Checking the condition and replacing brake lines and hoses
Replacing the front disc brake pads
Replacing the rear wheel disc brake pads
Removal, installation and inspection of the brake disc
Removal and installation calipers/pad guides for disc brake mechanisms
Removal and installation of the master brake cylinder (MBC)


See similar ones from other Opel car manuals:
▶ Bleeding the brake system Opel Corsa B (1993-2000)
▶ Bleeding the brake system Opel Insignia A (2008-2017)
▶ Bleeding the brake hydraulic system without special… Opel Kadett E (1984-1995)
▶ Brake system — bleeding Opel Omega B2 (1999-2003)
▶ Brake hydraulic system — bleeding Opel Vectra A (1988-1995, petrol)
Link to this page in different formats

Visitor comments


No comments yet


How much will 48 + 24 =


Astra J (2009-2015, petrol) 
  • General information
  • Vehicle device
  • User manual
  • Faults en route
  • Maintenance
  • Power unit
  • Engine repair
  • Cooling and lubrication system
  • Engine power system
  • Exhaust system
  • Transmission
  • Clutch
  • Car gearbox
  • Drive shafts
  • Chassis
  • Front suspension
  • Rear suspension
  • Steering
  • Brake system
  • Wheels and tires
  • Body
  • Exterior
  • Interior
  • Doors and windows
  • Body Care
  • Heating and air conditioning
  • Security systems
  • Electrical equipment
  • Equipment and devices
  • Lighting and signaling
  • Power devices
  • Electrical circuits
Astra H (2004-2009) 
  • General information
  • Introduction to the guide
  • Troubleshooting
  • User manual
  • Maintenance
  • Power unit
  • Engine repair
  • Cooling and heating
  • Power and exhaust system
  • Ignition system
  • Launch and charge system
  • Transmission
  • Mechanical gearbox
  • Automatic gearbox
  • Drive shafts
  • Chassis
  • Brake system
  • Car suspension
  • Steering
  • Body
  • Interior
  • Exterior
  • Electrical equipment
  • Equipment and devices
  • Electrical circuits
Astra G (1998-2004) 
  • General information
  • Introduction to manual
  • User manual
  • Maintenance
  • Power unit
  • SOHC gasoline engines
  • DOHC gasoline engines
  • Diesel engines 1.7 and 2.0
  • Engine repair
  • Cooling system
  • Supply system
  • Injection system (gasoline)
  • Injection system (diesel)
  • Exhaust system
  • Charge and launch system
  • Ignition system (gasoline)
  • Preheat system (diesel)
  • Transmission
  • Manual gearbox
  • Automatic gearbox
  • Clutch
  • Drive shafts
  • Chassis
  • Brake system
  • Wheel suspension
  • Steering
  • Body
  • Exterior
  • Interior
  • Doors and windows
  • Ventilation and heating
  • Electrical equipment
  • Equipment and devices
  • Electrical circuits
Astra G (1998-2004, petrol) 
  • General information
  • User manual
  • Car care
  • Maintenance
  • Power unit
  • Single shaft engines
  • Twin shaft engines
  • Engine repair
  • Cooling and heating
  • Fuel and exhaust systems
  • Starting and charging system
  • Ignition system
  • Transmission
  • Clutch
  • Mechanical gearbox
  • Automatic gearbox
  • Drive shafts
  • Chassis
  • Brake system
  • Car suspension
  • Steering
  • Body
  • Interior
  • Exterior
  • Electrical equipment
  • Equipment and devices
  • Wiring diagrams Opel Astra
  • Wiring diagrams Opel Zafira
Astra F (1991-1998, petrol) 
  • General information
  • Maintenance
  • Power unit
  • Engine in car
  • Engine removed
  • Cooling system
  • Heating and ventilation
  • Fuel supply (carburetor)
  • Fuel supply (injector)
  • Emission control
  • Ignition system
  • Transmission
  • Clutch
  • Mechanical gearbox
  • Automatic gearbox
  • Drive shafts
  • Chassis
  • Brake system
  • Car suspension
  • Steering
  • Body
  • Exterior
  • Interior
  • Electrical equipment
  • Equipment and devices
  • Electrical circuits
OpelBook.ru © 2017–2026 · Mobile version · · Sitemap: EN BG BY UA RS HR RO PL SK HU · Feedback · Site search
Astra F, petrol · Astra G, petrol · Astra G · Astra H · Astra J, petrol · Corsa B · Corsa C, petrol · Corsa C · Insignia A · Kadett D · Kadett E · Omega A · Omega B · Omega B2 · Vectra A, petrol · Vectra A · Vectra B, petrol · Vectra B · Vectra C · Zafira A, petrol · Frontera A, petrol · Frontera B · Ascona C · Vivaro A ·
We want your visit to be comfortable 🤝! We use cookies 🍪 to make that happen.