
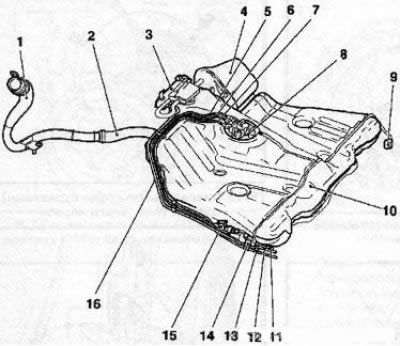
10.1a Fuel tank (10) petrol models: 1. Filler pipe with filter; 2. Connecting hose; 3. Fuel tank ventilation filter; 4. Box with activated carbon; 5. Rear section of the supply fuel line; 6. Fuel line of the heating / ventilation system during parking; 7. Rear section of the return fuel line; 8. Fuel pump assembly cover; 9. Wiring harness; 11. Connector for the fuel line of the interior heating / ventilation system during parking; 12. Fuel line connector; 13. Fuel return line connector; 14. Fuel filter; 15. Dosing pump for the heating / ventilation system during parking; 16. Pipe of the fuel tank ventilation system

10.1b Fuel tank (3) diesel models: 1. Filler pipe with filter; 2. Connecting hose; 4. Rear section of the supply fuel line; 5. Rear section of return fuel line; 6. Fuel pump assembly cover; 7. Second fuel return line (only on Y30DT engine); 8, 15. Wiring harnesses; 9. Connector for the return line of the fuel cooling system; 10. Middle fuel line connector; 11. Fuel line connector; 12. Fuel return line connector; 13. Second fuel return line connector; 14. Valve of the fuel cooling system; 16. Additional heater dosing pump
2. Disconnect the negative cable from the battery. Relieve residual pressure in the supply system (petrol models).
3. Before removing the fuel tank, all fuel must be removed from it. Since the manufacturers do not provide a drain plug, pump out the fuel with a special pump - be careful, there will still be some fuel left in the tank.
4. Remove components of system of release of the fulfilled gases.
5. Release the parking brake cable from the intermediate holders (see resist. illustration) and clamps and take it away from the tank.
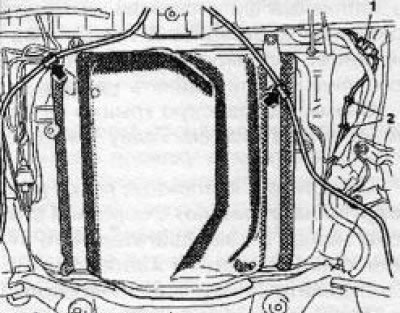
10.5 Intermediate holders (indicated by arrows) parking brake cables: 1. Electrical wiring connector of the fuel tank pump unit; 2. Holders
6. Disconnect the fuel pump wiring connector (see illustration 10.5).
7. Substitute a suitable container to collect fuel, disconnect the fuel line connectors (see illustrations 10.1a and 10.1b) and close them with suitable plugs.
8. Loosen the clamp and disconnect the connecting hose (see illustrations 10.1a and b) filler neck from the tank.
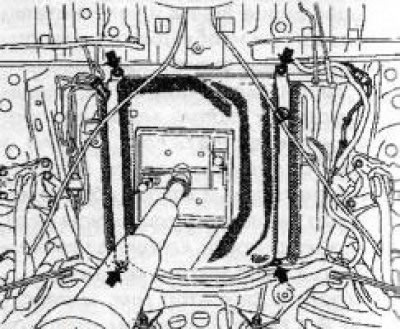
10.10 Removing the fuel tank using a lifting jack, the arrows indicate the bolts securing the mounting strips
10. Support the tank with a cart jack (see resist. illustration), previously, to distribute the load, laying the last piece of the board on the head, unscrew the fixing bolts and remove 2 mounting strips.
12. Slowly lower and remove the fuel tank together with the filler neck sleeve, disconnect all supply lines from the tank. If necessary, remove the fuel pump assembly from the tank.
13. Installation is carried out in the reverse order. If the tank is being replaced, reinstall all removable elements from the old to the new one.
14. Before the first trip, fill the tank with a small amount of fuel and check it for signs of leak development.
Visitor comments