


Remember that gasoline is a highly flammable liquid! When working with fuel system components, observe all accepted fire safety measures. Do not smoke! Do not approach the work site with an open flame or an unprotected portable lamp! Do not service the system in rooms equipped with heating devices operating on natural gas and equipped with a pilot torch (such as water heaters and clothes dryers). Do not forget that gasoline is a carcinogen, i.e., a substance that promotes the development of cancer! Try to avoid fuel coming into contact with exposed areas of the body - use rubber protective gloves, in case of accidental unexpected contact with fuel, wash your hands thoroughly with warm water and soap. Immediately collect spilled fuel and do not store fuel-soaked rags near open flames. Remember that the fuel system of models equipped with fuel injection is constantly under pressure. Before disconnecting the fuel lines, release the residual pressure in the system. When servicing fuel system components, wear protective glasses. Always keep a class B fire extinguisher at hand!
1. On petrol models, release residual pressure in the fuel system (see section Relieving pressure in the fuel system of gasoline engines). Disconnect the negative cable from the battery.
2. Before removing the fuel tank, it is necessary to drain all the fuel from it. Since the manufacturers do not provide a drain plug, you will have to remove the tank with a minimum amount of fuel remaining, having previously removed the main supply using the siphon method.
3. Remove the exhaust system components and heat shields (see section Fuel injection system of gasoline engines of this Chapter).
4. Support the front wheels with wheel chocks and loosen the parking brake adjusting nut (see Chapter Brake system).
5. Disconnect the parking brake cable from the hook located in front of the brake drum. (See Chapter Brake system).
6. Release the parking brake drive cable from the intermediate brackets and clamps and move it away from the tank.
7. Disconnect the electrical wiring from the fuel pump/fuel flow sensor unit (see sections Checking and replacing the fuel pump - gasoline models and Replacing the fuel level sensor).
Source is on the website Opelbook.ru
8. Open the filler cap and remove the rubber sealing ring. Unscrew the bolt securing the filler cap to the body.
Lower bolt securing the fuel tank filler neck to the body element
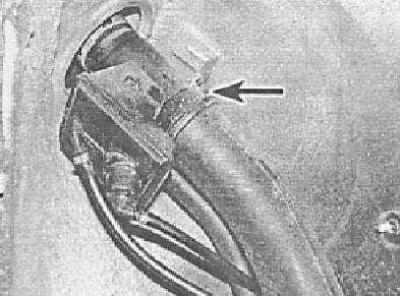
9. Remove the right rear wheel, loosen the mounting screws and nuts and remove the wheel arch protection liner.
10. Mark and disconnect the two small hoses from the neck, having first loosened the clamps that secure them.
11. Loosen the clamps and disconnect the fuel lines connected to the base of the filler neck. Unscrew the lower bolt securing the filler neck and remove the latter from under the car.
12. Follow the fuel lines from the tank to their nearest attachment point. Label and disconnect both hoses, first loosening the clamps holding them in place.
If quick-connect connectors are used to attach the hoses, follow the instructions in Section Checking the condition and replacing fuel lines and their fittings.
13. On gasoline models, separate the fuel filter from the fuel tank mounting strip.
14. Support the tank with a trolley jack, having first placed a piece of board on the head of the latter.
15. Unscrew the mounting bolts and remove the mounting strips.
16. Gently lower the tank, disconnecting all hoses along the way. Remove the tank from under the car.
17. If water has accumulated in the tank, remove the fuel pump/fuel flow sensor cover (see section Checking and replacing the fuel pump - gasoline models) and remove any remaining fuel from the tank. If there are traces of moisture in the tank, rinse it with clean fuel. The tank is made of plastic and must be replaced if seriously damaged. Minor defects can be repaired in a specialized workshop.
18. Installation is carried out in the reverse order of dismantling the components. Please note the following points:
- Make sure that when installing the tank, the hoses laid above it are not pinched;
- Ensure that the mounting strip fasteners are tightened securely;
- Ensure that all hose and electrical connections are correctly connected and securely fastened;
- Do not forget to adjust the parking brake (see Chapter Brake system);
- Before your first ride, add a small amount of fuel to the tank and check for signs of developing leaks.
Visitor comments