
OpelBook.ru
Cars AvtoVAZ Cars Mitsubishi Cars BMW Cars Mercedes Cars Nissan Cars Toyota Cars Chevrolet
English Русский
Български
Беларускі
Український
Српски
Hrvatski
Română
Polski
Slovenský
Magyar
 |  Sitemap  |  Contacts  |    


Main Astra Corsa Insignia Kadett Omega Vectra Zafira Others Articles
Corsa B (1993-2000) Corsa C (2000-2006, petrol) Corsa C (2000-2006)
  • Main
  • Corsa
  • Corsa B
  • Power unit
  • Supply system
  • Checking the condition and replacing fuel lines and their fittings

Checking the condition and replacing fuel lines and their fittings (Opel Corsa B)

            0

Contents: Steel tubes ⬇ Flexible hoses ⬇ Replacement ⬇ Repair ⬇
Remember that gasoline is a highly flammable liquid! When working with fuel system components, observe all accepted fire safety measures. Do not smoke! Do not approach the work site with an open flame or an unprotected portable lamp! Do not service the system in rooms equipped with heating devices operating on natural gas and equipped with a pilot torch (such as water heaters and clothes dryers). Do not forget that gasoline is a carcinogen, i.e., a substance that promotes the development of cancer! Try to avoid fuel coming into contact with exposed areas of the body - use rubber protective gloves, in case of accidental unexpected contact with fuel, wash your hands thoroughly with warm water and soap. Immediately collect spilled fuel and do not store fuel-soaked rags near open flames. Remember that the fuel system of models equipped with fuel injection is constantly under pressure. Before disconnecting the fuel lines, release the residual pressure in the system. When servicing fuel system components, wear protective glasses. Always keep a class B fire extinguisher at hand!


The fuel lines of the fuel system are laid between the gas tank and the engine compartment. Steel tubes and flexible fuel hoses are attached to the bottom of the car with clamps and screw fasteners. Every time the car is raised above the ground for any purpose (for example, to inspect or replace components of the exhaust system), try to take advantage of the opportunity and check the condition of the fuel lines and their fittings.


Carefully inspect all hoses and tubes of the fuel system for cracks, twists, deformations and other mechanical damage.

If signs of internal contamination or obstruction are detected, the corresponding section of the fuel tract must be removed and blown out with compressed air.

Make sure that all hose connections and metal tubes in the fuel system are securely tightened.

Steel tubes


Use only high-strength steel tubes from reputable manufacturers in the automotive industry as replacement sections.

Remember that copper and aluminum tubes are not able to withstand vibration loads that occur during vehicle operation.

Remember that fuel lines on fuel injection equipped models must withstand high internal pressure.

Often, in branded stores of automobile accessories, you can buy sections of metal tubes equipped with threaded nipple attachments. When loosening and tightening nipple connections, use two wrenches to avoid turning the mating part of the connector. Be sure to check the condition of the sealing rings used to seal the nipple connections. Replace worn or mechanically damaged rings immediately. Try to use only branded parts as replacement components.

Flexible hoses


When replacing fuel hoses, use only genuine components rated for high internal pressure.


Flexible fuel hoses must be installed no closer than 10 cm from exhaust system components and no closer than 25 cm from the catalytic converter. Make sure that the fuel lines do not come into contact with body parts or suspension components. The minimum permissible clearance is 6.3 mm.


Replacement


1. Release the pressure in the fuel system (see section Relieving pressure in the fuel system of gasoline engines).

2. Release the section of the fuel line to be removed from the intermediate fasteners securing it to the bottom of the vehicle.

3. In most cases, flexible hoses are attached to metal lines using spring-type clamps. To release the clamp, squeeze it with pliers and slide it up the hose. A clamp that is deformed when released cannot be reused and must be replaced. Make sure that the hose is pulled onto the pipe by at least 2.5 cm when connecting, and install the fastening clamp correctly.

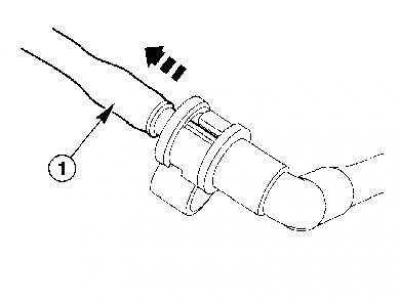
4. Some fittings use quick-connect connectors - to release such a connector, squeeze its locking tabs and pull the connected lines in different directions
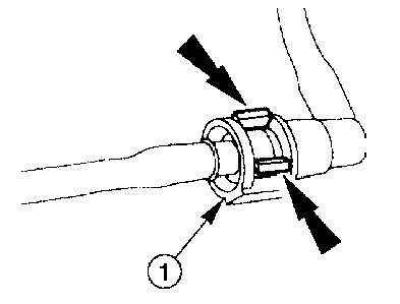
Squeeze the locking tabs…
Squeeze the locking tabs…


… and release the retainer

… and release the retainer


Do not remove the connector housing from the metal tube fitting unless necessary, as this will weaken the holding force it develops.


Quick-connect nipple connectors are not subject to repair and in the event of their failure, the corresponding section of the line must be replaced as an assembly.


5. Installation is carried out in the reverse order. On the quick-connect connectors, ensure that both locking tabs snap into the receiving grooves.

Repair


In case of damage to the metal or flexible fuel line, the failed section should be replaced only with a branded one of the corresponding size.


This article is available at russian, bulgarian, belarusian, ukrainian, serbian, croatian, romanian, polish, slovak, hungarian
Checking the article: Trifonova Emilia

Share information:

Previous articles
Opel Corsa B: Supply system
Next articles

Relieving pressure in the fuel system of gasoline engines
General information and precautions
Power and exhaust system specifications
Removal air from the fuel system of a diesel engine
Removal contaminants from the fuel system of a diesel engine
Removal and installation air intake tract components
Replacing and adjusting the throttle cable
Removal and installation the accelerator pedal
Checking and replacing the fuel pump — gasoline models


See similar ones from other Opel car manuals:
▶ Checking the condition and replacing fuel lines and their… Opel Astra H (2004-2009)
▶ Checking and replacing fuel lines and their fittings Opel Vectra C (2002-2008)
▶ Accessory Drive Belt — Checking Condition and Replacing Opel Zafira A (1999-2005, petrol)
▶ Checking the condition and replacing the engine compartment… Opel Frontera A (1991-1998, petrol)
▶ Cleaning and checking the technical condition of the… Opel Insignia A (2008-2017)
Link to this page in different formats

Visitor comments


No comments yet


How much will 28 + 13 =


Corsa C (2000-2006) 
  • General information
  • Introduction to guide
  • Troubleshooting
  • Vehicle device
  • User manual
  • Maintenance
  • Power unit
  • Engine repair
  • Cooling system
  • Power and exhaust system
  • Control system
  • Engine electrical equipment
  • Transmission
  • Clutch
  • Mechanical gearbox
  • Automatic gearbox
  • Drive shafts
  • Chassis
  • Brake system
  • Wheel suspension
  • Steering
  • Body
  • Exterior
  • Interior
  • Doors and windows
  • Heating and air conditioning
  • Electrical equipment
  • Equipment and devices
  • Lamps and lighting
  • Electrical circuits
Corsa C (2000-2006, petrol) 
  • User manual
  • Car access
  • Governing bodies
  • Seat control
  • Heating and air conditioning
  • Driving and maintenance
  • Engines 1.0 and 1.2 l
  • Engine repair
  • Cooling and lubrication system
  • Injection system
  • Engines 1.4, 1.6 and 1.8 l
  • Engine repair
  • Cooling and lubrication system
  • Injection system
  • Transmission
  • Clutch
  • Mechanical gearbox
  • Automatic gearbox
  • Drive shafts
  • Chassis
  • Wheels and tires
  • Wheel suspension
  • Steering
  • Brake system
  • Body
  • Exterior
  • Doors and windows
  • Electrical equipment
  • Equipment and devices
  • Lighting system
  • Electrical circuits
Corsa B (1993-2000) 
  • General information
  • Introduction to guide
  • User manual
  • Maintenance
  • Power unit
  • SOHC gasoline engines
  • DOHC gasoline engines
  • Diesel engines
  • Engine repair
  • Cooling system
  • Supply system
  • Injection system (gasoline)
  • Injection system (diesel)
  • Exhaust systems
  • Control system (gasoline)
  • Preheat system (diesel)
  • Charge and launch system
  • Transmission
  • Mechanical gearbox
  • Automatic gearbox
  • Clutch and drive shafts
  • Chassis
  • Brake system
  • Front suspension
  • Rear suspension
  • Steering
  • Body
  • Ventilation and heating
  • Exterior
  • Interior
  • Doors and windows
  • Electrical equipment
  • Equipment and devices
  • Lamps and lighting
  • Electrical circuits
OpelBook.ru © 2017–2026 · Mobile version · · Sitemap: EN BG BY UA RS HR RO PL SK HU · Feedback · Site search
Astra F, petrol · Astra G, petrol · Astra G · Astra H · Astra J, petrol · Corsa B · Corsa C, petrol · Corsa C · Insignia A · Kadett D · Kadett E · Omega A · Omega B · Omega B2 · Vectra A, petrol · Vectra A · Vectra B, petrol · Vectra B · Vectra C · Zafira A, petrol · Frontera A, petrol · Frontera B · Ascona C · Vivaro A ·
We want your visit to be comfortable 🤝! We use cookies 🍪 to make that happen.