
Examination
The fuel pump relay is located in the footwell, behind the right C-pillar cover, which is adjacent to the front passenger door. The relay provides power to the electric fuel pump and interrupts the power supply if there are no ignition pulses when the ignition is off (engine stalls).
If for test purposes it is necessary to turn on the fuel pump with the engine off, disconnect the relay and close terminal 30 (thick red wire) and terminal 87 (red-blue wire) with a short wire. To test the fuel pump relay, the battery must be charged.
1. On 1.2 and 1.4 liter engines with 45 and 60 hp switch off the ignition accordingly. The fuel pump must run for 2 s.
2. Check the No. 26 fuse in the fuse box.
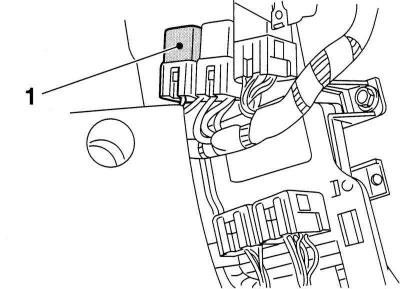
3. Disconnect the relay (1) First remove the pocket on the passenger side under the instrument panel and the A-pillar side trim.
Relay location
4. Connect a voltmeter to terminals 30 () and 85 (-) at the location of the relay. The voltage between them should be approx 12 V.
5. Otherwise, connect a voltmeter between relay terminal 30 and negative battery terminal. If the voltmeter does not show a voltage of approximately 12 V, check the continuity of the terminal 85 wire (see chapter Onboard electrical equipment) or check the red wire. Replace wire if necessary.
6. Turn on the ignition. If the voltage is 12V at terminal 86 () missing, check the integrity of the black wire. Replace wire if necessary.
7. Short wire terminals 30 and 87 together. If the pump is running, replace the pump relay. Otherwise, check the red/blue wire going to the fuel pump. If necessary, replace the wire.
8. If the wires are intact and the current passes, replace the fuel pump.
Checking the performance of the fuel pump
1. Relieve fuel pressure.
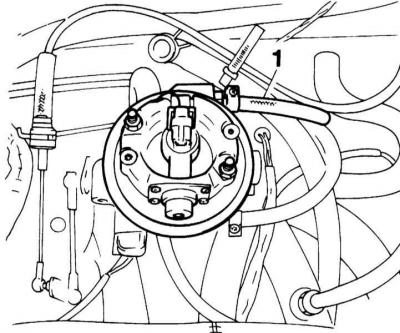
2. On 1.2 and 1.4 liter engines with 45 and 60 hp respectively disconnect the fuel supply hose (1) to the injection unit and direct the hose into a container with a volume of approximately 2 liters.
Fuel supply hose
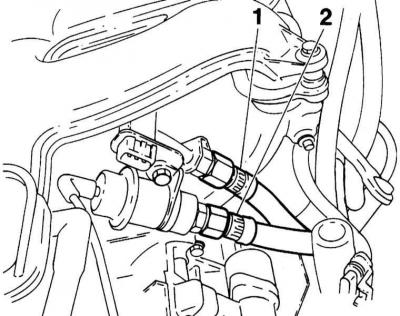
3. On 1.4 and 1.6 liter engines with 82 hp and engines DOHC 1.0 and 1.2 l disconnect the fuel supply hose (1) from the fuel line and direct the hose into a container with a volume of approximately 2 liters. Disconnect the hose from the fuel pressure regulator and close it.
Server (1) and return (2) fuel hoses
4. Disconnect the fuel pump relay wiring.
5. Connect terminal 30 from the relay base (thick red wire) and terminal 87 (red-blue wire) run the fuel pump for one minute. At 12 V, the pump should supply approximately 1.4 l/min.
6. If the performance is low, replace the fuel filter and check the pump performance again. If the test fails, replace the fuel pump.
7. Put on the fuel hose and secure it with a clamp or cap nut. If the vacuum hose was removed from the pressure regulator, put it on.
Replacement
The fuel pump is located under the rear seat, directly in the fuel tank. On a diesel engine, the fuel pump is built into the injection pump.
On CORSA COMBO vehicles, to remove the fuel pump, you will need to remove the fuel tank. Before removing the fuel pump, empty the fuel tank as much as possible to prevent fuel from escaping. To do this, you must either drive the car until the fuel is completely used up, or pump out the fuel through the filler neck with an explosion-proof pump.
Keep the workplace well ventilated. Observe the safety rules when working with gasoline!
1. Relieve fuel pressure.
2. Disconnect the negative cable from the battery.
3. Fold back the rear seat.
4. Pull out the mat.
5. Wring out a screw-driver a plastic cover in the bottom of a body.
6. Disconnect the connector (1).
Connector (1) and fuel lines (2) fuel pump
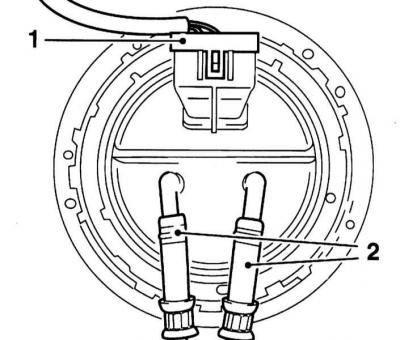
7. Tape the fuel lines (2) and disconnect them from their respective fittings (refer to illustration). To do this, loosen the clamps with a screwdriver or cut.
Before disconnecting the hoses, put plenty of rags in the appropriate places to collect the escaping fuel.
8. You can also plug the hoses to prevent fuel from escaping. The fittings should also be closed to prevent dirt from entering the system.
9. Open the fuel pump lock. To do this, you can use the special tool KM-797. If the specified tool is not available, place a suitable plastic wedge against the groove of the retaining ring and open the clamp by lightly hitting the wedge with a hammer.
Opening the lock of the fuel pump
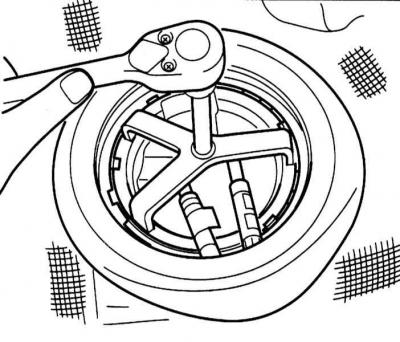
Do not use a metal wedge for this to avoid the risk of sparks!
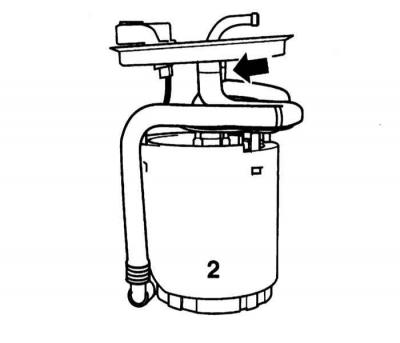
10. Disconnect the fuel return hose from the fitting (arrow).
Return fuel hose
11. Grasp the three locking tabs with your hands.
Pump body locking tabs
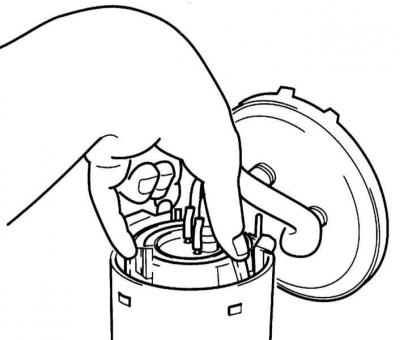
12. Remove the pump housing from the tank with a hook and wipe off dripping fuel with a rag.
Removing the pump

In case of any damage to the fuel pump equipped with a filter mesh, the mesh must also be replaced. Damage and contamination of the fuel pump mesh can cause fuel pump malfunctions.
13. Installation is carried out in the reverse order to the dismantling of the components.
14. After installation, start the engine and check that the pump is working and that there are no leaks.
Visitor comments