


Contents: Removal the front timing belt cover ⬇ Removal the rear timing belt cover ⬇ Removal the rear timing belt cover ⬇ Removal the rear timing belt cover ⬇
As already mentioned, the valves are controlled by a toothed belt. It drives the camshaft at half the crankshaft speed. It also drives the water pump.
The toothed rubber belt is of great importance in our Opel engines. The small combustion chambers do not allow a situation in which one of the valves is open and therefore extended into the combustion chamber, while the corresponding piston moves upwards to its highest position. This situation can occur if the toothed belt breaks or if several teeth on the belt pulley jump. Then the valve hits the piston crown and the engine is damaged in the blink of an eye. Therefore, the toothed belt is replaced every four years or at 60,000 km. The tension of the toothed belt is not checked as part of the inspection. The installed toothed belt, which must be removed during installation, must also always be replaced with a new one.
Removal the front timing belt cover
- Remove the air filter housing, see chapter on the air filter.
- Mark the direction of rotation of the poly V-belt. Loosen the belt and remove it from the belt pulleys, see chapter "Generator".
- 1.6L Engine: Unscrew the top of the front timing belt cover or remove it from the clips.
- Unscrew the poly V-belt pulley from the crankshaft. To do this, block the flywheel with the KM-911 tool
- Unscrew the lower part of the front timing belt cover or remove it from the clamps. Lift the timing belt cover upwards out of the engine compartment.
- When installing, tighten the timing belt cover to 4 Nm.
- Screw the poly V-belt pulley with a new central bolt with an 8-valve 1.6 l engine at 55 Nm +45° +15° and with a 16-valve 1.6 l engine at 95 Nm +30° +15°.
- 1.8 and 2.0 L engines: remove the torque support, see chapter on generator.
- Unscrew the front toothed belt cover or remove it from the clamps. Where necessary, unscrew the poly V-belt pulley. To do this, press the central bolt of the toothed belt drive pulley in the opposite direction. Tightening torque 20 Nm.
- When installing the torque support, tighten it to 60 Nm.
- Tighten the timing belt cover to 8 Nm.
- For all: check the size of the distance to the pulse sensor with a template: the specified value is 1.0±0.7 mm. If the gap size is not correct, replace the pulse sensor holder.
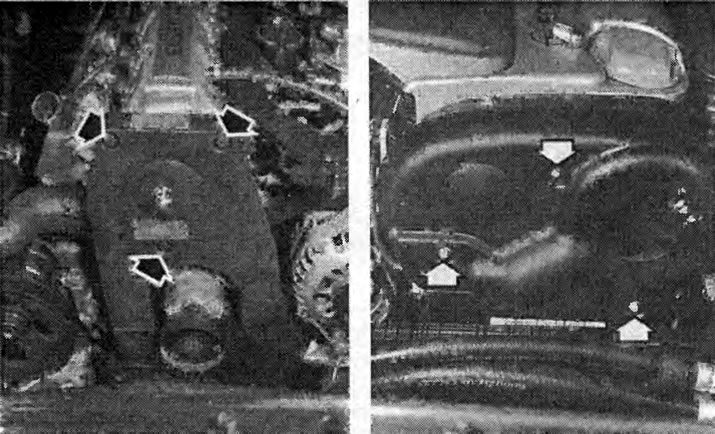
The arrows show the fastening bolts of the front timing belt cover. On the left is the timing belt cover of an 8-valve 1.6L engine. On the right is a photograph of the cover of a 16-valve 1.6L engine.
Removal the rear timing belt cover
8-valve engine
Remove the front timing belt cover
- Set the 1st cylinder to the TDC position of the ignition timing.
- Remove the crankcase ventilation hoses from the cylinder head cover. Remove the cable channel. Unscrew the cylinder head cover mounting bolts and remove the cover.
- Unscrew the timing belt tension roller on the oil pump.
- Remove the timing belt.
- Remove the timing belt drive pulley from the crankshaft. Pay attention to the installation position!
- Unscrew the camshaft pulley; to do this, use an open-end wrench to press the camshaft by the hexagon in the opposite direction.
- Unscrew the rear timing belt cover mounting bolts and lift the cover upwards from the engine compartment.
- Tightening torques: rear cover of the toothed belt on the oil pump and camshaft housing - 12 Nm, camshaft pulley on the camshaft - 45 Nm, tension roller of the toothed belt on the oil pump - 20 Nm (pay attention to the mounting position).
- Apply the toothed belt, taking into account the valve timing. Check the tension of the toothed belt.
- Install the front timing belt cover.
Removal the rear timing belt cover
16-valve 1.6 l engine
- Remove the timing belt.
- Remove the cylinder head cover.
- Unscrew both camshaft pulleys.
- Unscrew the timing belt guide roller from the cylinder head on the intake side.
- Remove the timing belt tensioner roller from the oil pump.
- Remove the timing belt drive pulley from the crankshaft.
- Unscrew the rear timing belt cover from the cylinder head and from the oil pump
- Installation: Screw on the timing belt cover with a tightening torque of 4 Nm.
- Slide on the toothed belt drive pulley. Observe the installation position!
- Timing belt tension roller on the oil pump - 20 Nm.
- Timing belt guide roller on cylinder head - 25 Nm.
- Install the camshaft pulleys, see later in this chapter.
- Apply the toothed belt, taking into account the valve timing. Check the installation of the toothed belt tension roller and water pump, see section "Checking the timing belt tension".
Removal the rear timing belt cover
16-valve engine 1.8 and 2.0 l
- Remove the timing belt.
- Remove the cylinder head cover.
- Unscrew both camshaft pulleys
- Unscrew the camshaft position sensor and the adapter located underneath it from the cylinder head.
- Unscrew the timing belt tension roller and guide roller(s) from the engine block.
- Unscrew the guide roller holders from the engine block.
- Remove the toothed belt drive pulley. Press the drive pulley in the opposite direction with the KM-662-V tool and unscrew.
- Unscrew the rear timing belt cover from the cylinder head and from the oil pump.
- Installation: Tighten the timing belt cover to 6 Nm.
- Secure the timing belt drive pulley with a new bolt (130 Nm + (40°-50°). Check the condition of the elastic washer.
- Install the camshaft pulleys, see later in this chapter.
- Timing belt tension roller on oil pump - 25 Nm, guide roller holder on engine block - 25 Nm, guide roller on holder - 25 Nm, adapter on cylinder head - 60 Nm, camshaft position sensor on cylinder head - 6 Nm.
- Apply the timing belt. Note the valve timing. Check the position of the timing belt tension roller and water pump, see section "Checking the timing belt tension".
Visitor comments