


Contents: Checking the charging voltage ⬇ Checking graphite brushes ⬇ Replacing graphite brushes ⬇ Checking graphite brushes ⬇ Replacing graphite brushes ⬇ Replacing the regulator ⬇ Dismantling the generator ⬇
There is no maintenance required for the alternator, except for the extremely rare need to replace the carbon brushes. More serious damage cannot be repaired by amateur means.
Checking the charging voltage
Connect a voltmeter between the thick red wire of the generator and ground
Start the engine at medium speed.
If the voltage regulator is working properly, the device will show approximately 14.0 to 15.0 V.
If this is not the case, check the graphite brushes or replace the regulator.
Otherwise, the generator itself is faulty.
Checking graphite brushes
Bosch Generator
On the generator cover, unscrew the three Phillips-head screws, unscrew the B+ wire and remove the cover clips from the rear clamps, remove the cover.
Remove the regulator from the generator by loosening the two slotted head screws.
Flip the regulator back slightly so that the graphite brushes do not hang down.
Measure the projection of the graphite brushes.
The new graphite brushes are approximately 13mm long; permissible wear value is 5 mm.
Replacing graphite brushes
Bosch Generator
This job requires a soldering iron, solder, and knowledge of soldering.
Remove the regulator from the generator as described above.
Unsolder the connecting ends of the wire and remove the brushes.
Remove the pressure spring from the old brushes and install it on the new brushes.
Solder the connecting ends of the wire.
Do not use too much tin solder and work quickly so that the connecting ends of the wire do not become tinned. Otherwise, they will become stiff.
Checking graphite brushes
Delco Remy Generator
Remove the generator.
Remove the three screws on the bearing cover.
Remove the rotor with the drive bearing and belt pulley from the stator.
Unscrew the ends of the stator winding from the diode support, remove the stator from the slip ring bearing.
Remove the excitation diodes (three nuts, one screw).
Unscrew both screws of the graphite brush holder, remove the insulating washer.
Disconnect the connecting tabs of the graphite brushes from the bracket, remove the brushes from the guide and measure their length.
If the total length is less than 20 mm, they must be replaced.
Replacing graphite brushes
Delco Remy Generator
The springs of the graphite brushes are fixed in the bracket with a wire bent into the shape of a hook.
After installing new brushes, don't forget their wire hooks.
When assembling the generator, the long end of the wire is inserted into the hole in the slip ring bearing.
Replacing the regulator
Delco Remy Generator
Remove and disassemble the generator as described below in the section "Checking the graphite brushes".
Disconnect the connectors.
Unscrew the regulator mounting screw and remove the regulator.
Tip: When the graphite brushes are removed, you can simultaneously check the copper contact rings of the generator armature (graphite brushes move on them). If they have deep wear marks, they can be reamed in a workshop that repairs automotive electrical equipment.
Dismantling the generator
Disconnect the battery ground cable.
Remove the air filter housing together with the air intake hose and, where present, the air intake casing, see the chapter on the air filter.
Before removing the poly V-belt, mark its direction of rotation.
Using a spanner, turn the tension roller of the poly V-belt against the force of the spring (clockwise) until the holes in the tension roller flange and the tension roller itself align.
In this position, secure the tension roller with a suitable pin or Phillips screwdriver and carefully remove the overhead key.
Remove the poly V-belt.
With an 8-valve engine, disconnect or remove the Multec central injection multi-pin connector. Remove the cable channel from the camshaft housing and set it aside.
For the 1.6L 16V engine, remove the air duct tube from the bottom of the intake manifold and from the throttle body and fold it down.
For all: Remove the torque stop.
Remove the accessible generator mounting bolts.
Remove the generator bracket mounting bolts.
Remove the generator cables.
Remove the bracket together with the generator upwards from the engine compartment.
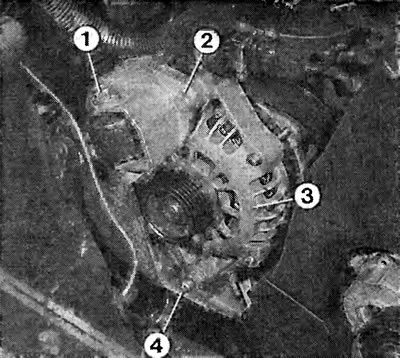
Generator in the model with 8-valve 1.6 l engine. The numbers indicate:
1 - stop [stopper] against rotation;
2 - upper mounting bolt;
3 - generator;
4 - lower fastening nut.
Remove the generator mounting bolts from the bracket.
The following torques apply when screwing: generator on the mounting bracket 35 Nm, mounting bracket on the engine block 35 Nm, support and cover on the intake manifold and generator 18 Nm, stop [stopper] against rotation 60 Nm.
Place the poly V-belt, taking into account the direction of rotation.
Install the tension roller with a socket wrench. Remove the rod and carefully loosen the tension roller.
Check that the belt is correctly positioned on the belt pulleys.
Visitor comments