


Contents: Types of starters ⬇ Removal the starter ⬇ Replacing graphite brushes ⬇ Replacing the graphite brushes of…⬇ Replacing the graphite brushes of…⬇ Dismantling the electromagnetic…⬇
Want to hear a funny expression? Here it is: "reciprocating screw starter". It is installed in the Vectra and functions as follows:
- When the ignition key is turned to the "Start" position, the voltage (from the ignition switch) goes to terminal 50 of the electromagnetic switch located at the top of the starter.
- As a result, the starting lever moves the starter gear along a steep thread into the toothed ring of the engine flywheel.
- When the gear engages, the electromagnetic switch turns on the full battery current coming from terminal 30, and only after the gear engages does the starter powerfully crank the engine.
- If the engine starts, the gear comes out of the flywheel again.
Types of starters
The Vectra is equipped with either a Bosch or Valeo starter. These starters are no different in design. Both starters have a power of 1.4 kW.
Removal the starter
Disconnect the ground wire on the battery, otherwise there is a risk of short circuit.
Where applicable, unbolt the intake manifold support from the intake manifold and from the engine block.
If present, unscrew the starter support.
Unscrew the positive battery cable and terminal 50 cable from the electromagnetic switch.
Unscrew the top mounting bolt (long bolt) starter from the gearbox side.
Unscrew the lower mounting bolt and remove the starter.
When installing, pay attention to the different lengths of the bolts.
Tighten the starter mounting bolts to 60 Nm.
Tighten the starter support to 25 Nm. Tighten the support on the intake manifold and on the engine to 20 Nm.
Replacing graphite brushes
If the starter is on strike, it is possible that the graphite brushes have simply worn out. These brushes can be purchased at an Opel workshop or a spare parts store and then replaced. Next, you will need: soldering knowledge, electric solder and a powerful soldering iron, at least 150 W. If you do not have a soldering iron, you can dismantle and mount the starter yourself, but solder the graphite brushes in a car repair shop. There, you can check the starter for its various electrical and mechanical functions.
Text was copied from the portal [OpelBook]
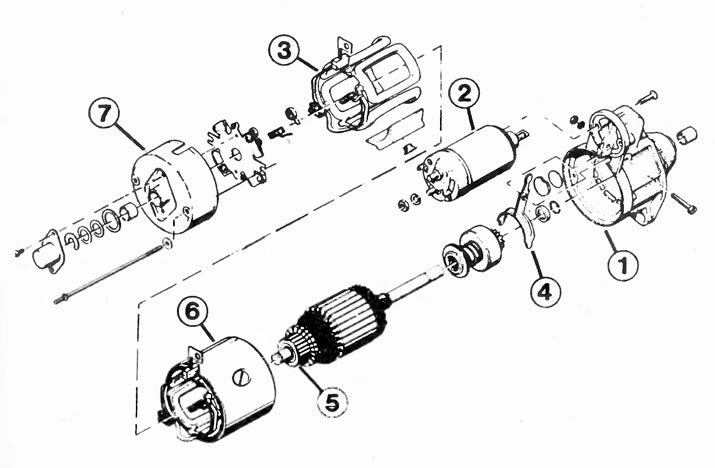
Individual parts of the Bosch starter:
1 - collector body;
2 - traction relay;
3 - excitation winding;
4 - starting lever;
5 - collector;
6 - gearbox;
7 - housing cover.
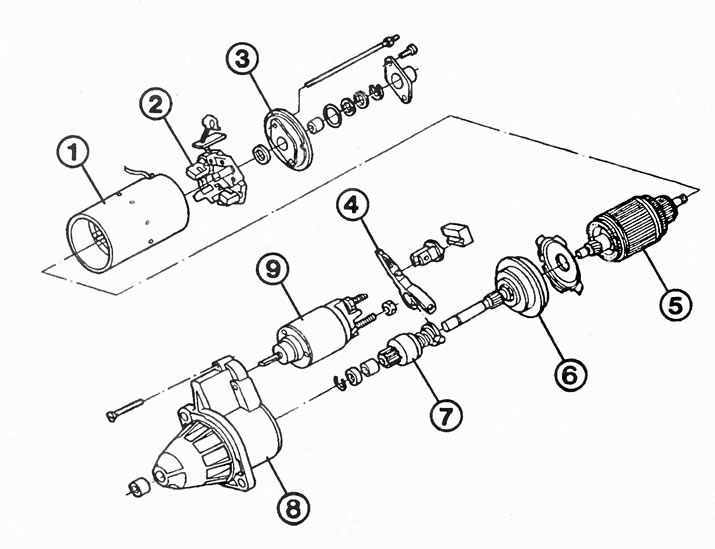
The Delco Remy starter (9) consists of the following main parts:
1 - body;
2 - electromagnetic switch;
3 - lid;
4 - starting lever;
5 - collector;
6 - body;
7 - bendix;
8 - graphite brushes with holder;
9 - traction relay.
Replacing the graphite brushes of the Bosch starter
Unscrew the support from the starter.
Unscrew the bearing cover from the manifold support.
Remove the anchor fastening washer and compensation washer from the anchor shaft. Pay attention to the rubber ring.
Remove both pole housing screws.
Remove the bearing from the housing on the collector side.
Remove the graphite brushes from the bracket and measure their length. The minimum length is 13 mm.
Unsolder the copper ends of the wires from the worn graphite brushes.
When soldering, use pliers to grasp the ends of the stranded wire of the new brush to prevent tin solder from flowing into the stranded wire.
Replacing the graphite brushes of the Valeo starter
Remove the starter.
Unscrew the wires to the starter from the electromagnetic switch.
Unscrew both fastening nuts on the housing cover on the closed side of the starter.
Remove the housing cover from the starter together with the gasket and graphite brushes.
Remove the graphite brush holder from the housing cover.
Use a screwdriver to press the pressure spring away from the brush holder. Pay attention to the insulating plates.
Remove the insulating plates and graphite brushes from the brush holder.
Measure the length of the graphite brushes: min. 13 mm.
When installing, slide the brush holder with the gasket onto the starter.
Insert the positive graphite brushes into the brush holder. Insert the connecting wire angle into the gasket guide.
Place the wire tip onto the electromagnetic switch connector.
Insert the negative graphite brush into the brush holder.
Place the tip of the negative graphite brush onto the left housing cover mounting bolt.
Place the insulating plates on the graphite brushes.
Place the pressure spring and press firmly on the spiral to secure it in the brush holder.
Install the housing cover with insulation onto the starter.
Slide the insulating sleeve onto the positive graphite brush connector until it locks into place.
Screw the connecting wire onto the electromagnetic switch.
Dismantling the electromagnetic switch
Remove the starter.
Unscrew the wire to the starter.
Unscrew the mounting bolts on the electromagnetic switch flange.
Bosch starter: Pull the electromagnetic switch back slightly and unhook the eye from the starter trigger.
Delco Remy Starter: Loosen the mounting bolts on the magnetic switch mounting flange.
Remove the electromagnetic switch from the starter using a rotary motion.
Visitor comments